Friday 31 July 2020

Fun Fold Friday Zoo Globe

Well what a way to end my week here in my corner of the world the sun is shining and the sky is blue. .. and I've got a fun fold card featuring the fabulous Zoo Globe cuties ....bliss 😃
The fun fold is curtesy of a fellow demonstrator Eimear Carvill. Called a simple diorama card it is fun and easy and a little bit different which is just what is needed for fun fold Friday's 😉 
Starting with a piece of card measuring 14 85cm x 28.5cm (4 1/4" x 10 7/8" ) that will become the card base.
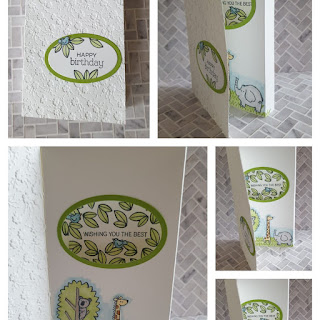
Now score along the long edge at 8.5 cm , 9.5cm, 18cm, 19cm and 27.5cm ( 3 2/8", 3 5/8", 6 7/8", 7 2/8" and 10 1/2" ) The photo below show it better 😉
Next create an appature on the panel labled E on the photo below. This will become your window. 
Now decorate as desired then reinforce the folds. 
For the view through the window stamp your image or sentiment on a piece of card measuring 8cm x 14.4cm ( 3" x 4 1/8"). My tip for this is don't forget to stamp slightly outside the window hole as it can be seen from certain angles 😉 
Now attach your stamped panel to the section marked C on the photo below. 
Attatch adhesive to the strip marked B on the photo below. Folding from the right, panel F on the photo, close the card up so that the back of panel F attatches to the adhesive on panel B. Now this all sounds complicated but I promise once you have it in your hands it will make sense 🤞
This card will fit into a standard C6 envelope when folded flat.
So that's if for my Zoo Globe inspiration week but they will most certainly be appearing in many more cards.
Please join me next week when Gill will be inspiring us with her talent.
Have a great weekend and hope you get time to craft.
Have fun
Cary xx
Zoo Globe  fun fold Stampin Up


Thursday 30 July 2020

Throwback Thursday Zoo Globe

"We three Giraffes of Orient are...." 🤴🤴🤴
Today's Zoo Globe inspiration goes Christmas!!!
The fantastic Zoo Globe stamp set coordinates with the Still Scenes stamp set and dies which are all from Stampin' Up! 
The Still Scenes stamps and dies we're in last years winter mini catalogue and returned in this years annual one 😊
So for today's inspiration I thought I'd combine both sets and for some reason We Three Giraffes 🦒  sprang to mind 🤣🤣🤣
So taking my lead from the colour of the Giraffes I looked to some new pattern paper , Plaid Tidings a collection of fab checks and tartans in some great colour combo's.
All in all a fun,  non traditional christmas card for that quirky someone in your life 🦒🦒🦒

zoo globe Christmas stampin up


Wednesday 29 July 2020

Watercolour Wednesday Zoo Globe

When you say watercolour what springs to mind? 

Beautiful paintings? Delicate floral images? Quick backgrounds..wait....quick!!

Yup watercolour washes make for great quick backgrounds. In fact so quick that I made 3 cards with the Zoo Globe cuties in the time it might take to make 1!!!

Now I know what you're thinking all that fussy cutting but hey if you're cutting 1 why not do 3 🤣🤣🤣 . 

The reason I chose to fussy cut is because I wanted to have my images not be influenced by the colours I chose for my watercolour wash backgrounds.

Paper pieceing is a great technique for getting colour onto an image without losing the finer detail.


Zoo Globe watercolourStampinUp fussy cutting


Tuesday 28 July 2020

Tips, Tricks and Techniques Tuesday Zoo Globe

Who knew 1 year old's birthdays could be so busy!!! Lol my niece Rya's birthday was great fun even though we had to abide by the social distancing rules.  So now I can share the card that inspired this weeks Zoo Globe inspiration 🤣🤣🤣
Today's card is what we call an A5 card, that is a piece of A4 card folded in half. Great for special cards this size also allows you lots of room to create on 😉
My tip for today is one that might not at first be obvious but in my opinion makes thing look more finished. What I'm talking about is a small detail.
When you fussy cut/ die cut an image that is close cut ie following the stamped line, take a corresponding marker pen and carefully ink the cut edge !! If you work from the back it is safer as you're less likely to accidentally go onto your image. 
The reason for doing this is to not be able to see the white of the card core. It helps make a more finished look to your work in my mind. On my card its the fun elephant in the Zoo Globe that I've cut 3 stamped images and stuck them together to add extra dimension to the globe scene. I used a black marker on all 3 images once the were stuck together. 
Well I hope you like Rya's card it was a hit with her and her family 😊

Zoo Globe Tips tricks fussy cutting StampinUp


Monday 27 July 2020

Make it simple Monday Zoo Globe

wow didn't Gill share some lovely projects?
This weeks projects from me will be featuring a stamp set called Zoo Globe from Stampin' Up!
 The choice came about as it's  my nieces 1st birthday today and this set just jumped out at me as it's soooo cute 😍 Since it's her birthday today I won't share her card till tomorrow 😉
So for today's #simplestamping card I am pleased to share with you a simple card and coordinating envelope, no surface should remain unstamped in my book 🤣🤣🤣.
The card and envelope today is a project that can be recreated with just a single ink pad and a box of watercolour pencils so great for a beginner stamper.


 Zoo Globe simple stamping Stampin Up


Friday 24 July 2020

Fun Fold Friday  

Well, we are here again, another week has gone by and WOW hasn't it flown? When we are children Christmas always seems so very far away. Now that I'm older it gets here far too quickly!
We will be making Christmas cards before you know it!! OOO! How scary is that?
Anyway, as we have still not even got to August yet, lets worry about that later. 
As it's Friday, I have made another Fun Fold card. This time, it's a card within a card. One card opening the right way and the second card a small square. I chose Highland Heather and Purple Posy card for the bodies of the cards.
For the base card using Highland Heather, I cut a piece of card 22.5cm  by 14.85cm (8,3/4" by 5,3/4") and scored it along the 22.5cm side at 7.5cm (3"). 
I used the Loyal Leaves stamp set for my images and you'll find more information HERE
In the 2nd colour, I cut a card 21cm by 10.5cm (4,1/8" by 8,3/4") and scored half way at 10.5cm (4,1/8") along the 21cm edge. I added Whisper White mats to the inside of the smaller card and place it onto a mat the same colour as the base card which was 11cm (4,1/4") square. 
I added DSP to the front panels of both cards and the inside of the shorter panel on the larger card.
On the main card 4cm and 4.5cm from the edge of the card, I cut a slot 11cm log. This is to enable the front of the smaller card to slip through the aperture when closing. 


  I used the new papers called Playing With Patterns to decorate inside and out on this. I then stamped the leaves and added them to the front of the card and inside to complete.


 I watercoloured the leaves in Calypso Coral and So Saffron to get the Autumnal colours
using a Watercolour brush.


Once the card bases are cut out, decorate with your favourite papers etc and cut out the small slot on the left hand panel. It's only about 0.5cm or (1/4"). 


Once both are decorated, add the smaller card to the centre panel placing the smaller card in the centre of the card back with a border of approximately 2.2cm (7/8")  from all 3 edges and 1 fold.
Once in position and before fixing permanently, check that the smaller card will go through the slot in the main card from the front.


Both cards fold on opposite sides so the large card folds on the left and the smaller one folds on the right as shown in the diagram.
 Finish your card by adding embellishments throughout.


Thank you for joining me this week, I hope you've got some ideas to make your own projects.
Take care, Stay very safe and see you in a short while.
Cary will return next week with her creations.
:))

Thursday 23 July 2020

Throwback Thursday  

Every day I start off the day with plans of what I hope to do throughout the day.  
I have no idea why I do this as I NEVER get to do the things that I need to do!
 Crazy, isn't it? Why do we do things to confuse ourselves/
My throwback this week is some gorgeous paper, DSP from about 2 years ago. 
It is called Irresistibly Yours. They are all sheets of White patterned embossed papers with stripes, stars, spots and leaves all across. They can be sponged or brayered (as I have done) 
or even left plain white. 
I chose to use the leaves and using my brayer, I rolled the brayer across the ink pad Magenta Madness then starting from the outside of the mat, ON the grid paper, I rolled the colour over the mat. You have to load the roller several times and move the roller all over the mat. You can make it as subtle or as bold as you like and the more you roll ink onto the roller, the more colour you will get on the card.
You could even mix different hues of similar colours and get a complete variation on the card. 
Once I completed the mat and using Memento Ink I stamped the leaves onto Magenta Madness card stock.  Yes of course, I fussy cut them out again! 
To add depth to the card, the leaves were all fixed using Dimensionals.


Isn't this new pink gorgeous? I really do love this year's In Colors from Stampin' Up!

Wednesday 22 July 2020

Watercolour Wednesday  

Hello again. I really don't know what we've done to deserve it but once again we have 
such beautiful weather here in the UK. Glorious!  
For my watercolouring today, I went a little off piste for me. Still using the Loyal Leaves stamp set, More information HERE.
I started by stamping 3 of each of the leaves in Versamark and Silver Embossing Powder onto Watercolour Paper, then heat set them. 
Using the technique that I love, I scribbled several shades of green across a large acrylic block then soaked it using a spritzer. I laid the paper across it to soak up the ink and then just distributed the ink to the places it didn't go to using the watercolour brush. Then I fussy cut them all out!  Yes, all 9 of them! 
I laid them across a C6 mat and moved them around as much as possible to cover the mat. Once I was happy I removed the dimensionals and placed them back in position. Once that was completely finished, I cut the oval out using the Layering Ovals dies. 
Messages from the stamp set Loyal Leaves completes the 2 cards.


Here is the 2nd card made from the centre oval removed from the 1st card.


2 for the price of 1. I love that!


Tuesday 21 July 2020

Tips, Tricks and Techniques Tuesday  

Hello again this lovely Tuesday. It has been so warm here recently,
 that it's nice to open the curtains in the morning to feel and see the sunshine.
Today, still using the Loyal Leaves stamp set, I am showing you a card that I have been heat embossing on. More information on the stamp set HERE
The important thing with heat embossing is to not over heat the project. Which sounds very strange I know as you've got to heat it to set the ink and powder on the card. I started with a piece of card, this time in Misty Moonlight and I wiped it thoroughly with the embossing buddy. The purpose of the embossing buddy is to remove all grease and oils from the piece of card which naturally comes from your fingers, biscuits etc. I then inked up the stamp with Versamark. Versamark is a Watermark Stamp Pad. I re-stamped the image time between each stamping. The powder sticks to the ink and then it is heat set with the heat gun. Once stamped all over, I poured the White Embossing powder onto it and tapped the excess off. 
It uses so little powder and I use the tray to catch and pour the powder back into the pot. The small paint brush is to wipe off any excess powder that catches on the card.
My tip that I always advise is when you are ready to set the powder, switch the heat gun on and wait for about 15 to 20 seconds for it to really heat up before pointing it at your work. You are quite likely to burn the powder and the card if you aim the heat gun at it the whole time. Once the gun is hot, point it at your work and then it should take only a matter of seconds then from the powder to turn from greyish and powdery to shiny and set. I have taken a photo of what I use to show you. I use a giant wooden peg to hold my work as it saves me burning my fingers! 
Heat guns get VERY HOT and WILL burn!! 
The other thing I will advise you is to not press too hard on the stamp as the Versamark will mark your card and once set it will not be removed as you can see in my 1st picture. 
You can see that I have stamp and block marks across the piece of card. Not what you want to see on your finished project. 


As you can see I stamped and fussy cut another leaf and mounted it on top of the central leaf 
to add some dimension.