Pages

Friday, 29 October 2021

Fun fold Friday Arctic Bears

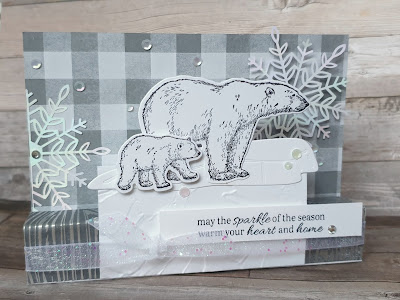
 T'is the season to sparkle !!!  That is what today's card is all about but in a subtle way. The fold is a simple one but one that give the bears from the gorgeous Arctic Bears a space to shine. 

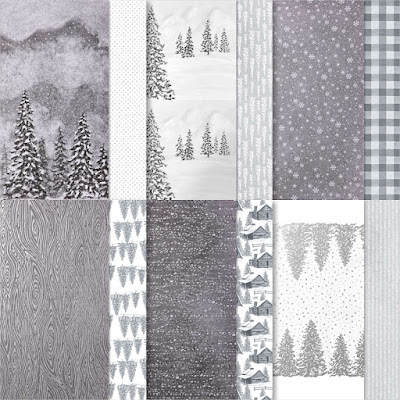
The pattern paper, ribbon and shimmer sequines are from the beautiful Peaceful Place suite. The ribbon is a beautiful shimmery iridescent one and the sequins are a mix of soft silver, white and iridescent. The patern papers are all shades of grey, silver and white with beautiful soft patterns on one side and bolder ones on the other with silver fouled accents.

Peaceful place Stampin Up

The card is sized to fit into a standard C6 envelope and folds flat. 

Arctic Bears Stampin up fun fold fancy fold Christmas card

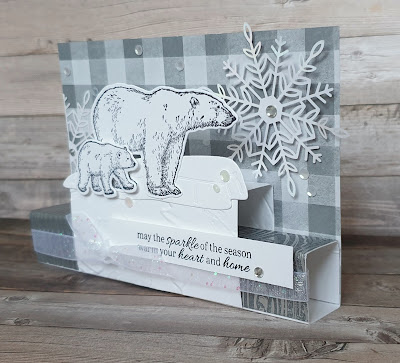
From the side you can see how it stands...

Arctic Bears Stampin up peaceful place fancy fun fold Christmas card
 
Well that's it from me for this week. I have loved playing with the Arctic Bears and hope that my creations have inspired you . I do hope you'll have time for some crafting over the weekend. I hope to get a little in before my grandson arrives for an overnight visit.
Gill will be sharing her inspiration here next we so please join me and come see what she's created.
Have fun
Cary xx 
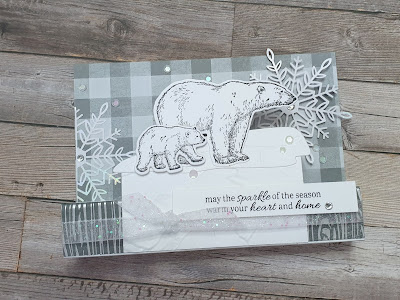
Arctic Bears Stampin up fancy fun fold Christmas card


Thursday, 28 October 2021

Throwback Thursday Arctic Bears

 Thursday's are throwback days here at 2 Big Girls Crafting.  What does that mean? Well it can mean many things it might be that we take inspiration from a previous card we've made,  use a product or stamp that has retired, it might be an old technique or as in the case of today's inspiration it might be a card from a catalogue. One of the reason's I purchased the Arctic Bears was the picture in the back of the July to December mini catalogue from Stampin' Up! 

Arctic Bears Stampin up


Now CASEing (copy and sharing everything) a card from the catalogue isn't something I do very often but I  fell in love with this one and thought why not!!

So here is my version of the card.

Arctic Bears Stampin up


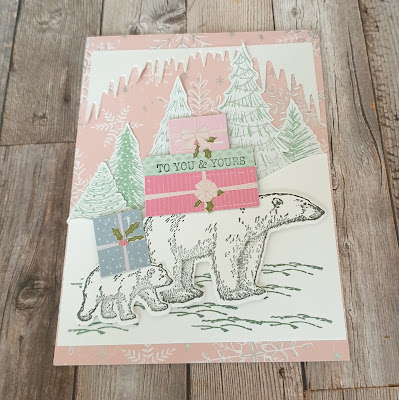
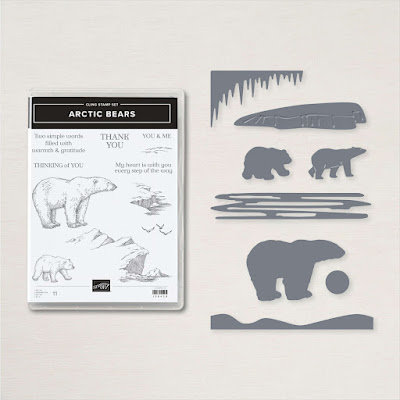
I used the same papers from the gorgeous Whimsey and Wonder pattern papers. I die cut the icicles and bears using the Arctic Bears stamps and dies. From the pattern paper I cut the trees and presents. The sentiment is different from the catalogue version but hey you can change things up a bit sometimes 😉

Arctic Bears Stampin up

I can highly recommend CASEing the catalogue if your looking for inspiration if you're short on time or mojo!

If you'd like to see the picture in the mini  catalogue just turn to page 69 for the card I used or page 39 for more inspiration. 

Wednesday, 27 October 2021

Watercolour Wednesday Arctic Bears

 I'm Certainly in a Wink of Stella phase this week! So much so that I have even used it today for watercolour Wednesday!! I have also taken liberties with my colour  palette for my Arctic Bears bundle. The bundle is the stamp set and dies and they are really great.

Arctic Bears bundle Stampin up water colour with wink of stella

I started out by stampin the bear in versamark then heat embossed with white powder onto white cardstock.  I then decided on an alternative colour for my bear..... pink!!

The pink colour is called polished pink and one of my favourites 💗.  I took the ink pad and dabbed it onto an acrylic block. Then I took my wink of stella and used it to pick up the colour and paint inside the bear. Once I was happy I used the coordinating dies to cut the bear out. 

Arctic Bears Stampin up watercolour wink of stella


Whilst I was colouring in the bear I coloured onto some other white cardstock randomly.  I used this to die cut out the watery swoshy piece and a moon.

Once the principal pieces were done I set to creating the card. I used some pattern paper from a collection called Peaceful Place

Peaceful place stampin up

A stip of white across the bottom to place the watery swishy bit and bear onto. I also stamped a simple sentiment onto the strip.

Arctic Bears Stampin up watercolour wink of stella

I know that a pink bear is a little challenging but I was really happy with the finished result. What do you think? 

Arctic Bears Stampin up watercolour wink of stella

Would you choose it? Even if you wouldn't please have a go at  using wink of stella to watercolour with. It's a great way to do something a bit different. So have a go and have fun. 


Tuesday, 26 October 2021

Tips, Tricks and Techniques Tuesday Arctic Bears

 Do you like making beautiful backgrounds? You can stamp one or watercolour one or blend one and have great fun doing so. But then the big question is what to do with these beautiful creations! Well I have a tip for you using the Arctic Bears.

Arctic Bears Stampin up blended background

My tips to use those gorgeous backgrounds  are not rocket science but might be ones that you've not thought of.

So my first tip is stamp on the background as if it were pattern paper. There is another part to this tip make sure your background is dry. Now if like me you've blended lots of different layers of ink the cardstock will be quite wet. So you can either leave it to dry naturally or help it along with a heat tool.

So I dried my piece then stamped along the bottom using the same navy blue ink that I'd used around the edges of my blended piece.

My next tip is don't forget that you can heat emboss onto your background. So I used the large bear and heat embossed it using versamark ink and white embossing powder. 

I  then got my wink of stella out and used 2 techniques . The first technique is splattering. I used the  brush tip of the pen and flicked it using the lid. The further away you are the smaller the splats . This creates a very random sparkle across the piece.

The 2nd tequnique is to use the wink of stella as a colouring tool.  I "coloured" the bear. The great think of this is that the wink of stella is a clear sparkle so the colours below show through. The sparkle highlights the image beautifully in real life but sadly doesn't show in my photos very well.

Arctic Bears Stampin up wink of stella blended background

My next little tip is to do with when adding another element such as the moon. The moon was die cut from white cardstock and was very stark against the blended background.  So to make it "fit" into the background I very lightly blended around the edges.

Arctic Bears Stampin up blended background

A simple sentiment and my card was complete. I love this card the colours are so beautiful and the shimmer is gorgeous 😍 

Monday, 25 October 2021

Make it simple Monday Artic Bears

 Sometimes the "simple " creation is the hardest!! That was most certainly true for today's inspiration! I had decided to showcase a stamp set called Arctic Bears . I had lots of ideas for some cards but #simplestamping not so many   ... 

Arctic bears Stampin up simple stamping easy scene card

But after lots of fun making the other cards to share this week I had an idea 💡 . How about creating a simple scene 🤔 . Whilst keeping it just stamps, ink and paper the Arctic Bears beautiful images made it simple!

Arctic Bears Stampin Up simple stamping easy scene building

I chose to stamp in a beautiful soft turquoise colour called costal cabana.  First I stamped my bear. I then took 2 small pieces of sticky note and just covered his paws.  Then I stamped the large iceberg so that it went over his paws. I did this so that he appears to be standing atop the iceberg. I then used the same stamp and added a few more icy features to the bottom edge of the card.

I stamped the sentiment and birds and my card was complete. Whilst working on this card I wondeted how it would look on a coloured card base. Now coloured card bases are not my go to but sometimes you just have to challenge yourself... so I took a chance and had a go!

I chose to use a card base in the same colour as the ink I'd used for the first card but stamped in a dark grey colour. I  recreated the card exactly the same way.

Arctic Bears Stampin up simple card easy scene building

I really like both my inspirations for #simplestamping and hope you do too. I will be going live on our Facebook page at 4pm BST today and sharing how I created these easy scene building cards. if you can join us that would be great. 

Arctic Bears Stampin up simple stamping easy scene building card


Friday, 22 October 2021

Fun Fold Friday - Classic Cloche

 Well here we are again, it's Friday already! Another week has sped past once more! Today's card is probably the one that I have been waiting to show you. For the last time this week of using the Classic Cloche stamp set, I made a card base in the gorgeous dusky blue of Misty Moonlight. I folded one half of the card sides in to form the base of an easel card. I added 2 white panels to each of the smaller halves and then added a piece of the Whimsy and Wonder Speciality Paper to each of the white mats. The paper is also the Misty Moonlight and has little Christmas trees and tiny stars across it. 

 
Above is the card when it's closed and below when it is first opened.
 

I cut a blue mat 12.5cm by 9cm and another piece of Whimsy and Wonder paper in the Silver stripe. From the silver stripe paper, I die cut the cloche from the centre of it. I then die cut another cloche from Silver Foiled card and stamped the cottages onto white card using the Smoky Skate Ink pad. This white piece was die cut out using the smaller of the cloche dies which as you can see, emulates the silhouette of the cottages. I glued this using Tombow Multipurpose glue onto the silver cloche. I took the Cloche Shaker Dome and peeled the tape from the front of the dome. then placed it inside the aperture in the Silver striped paper. Next I placed Tombow Multipurpose glue on the rear of the Silver Foiled Dome and using the dome as a guide, I placed the silver dome onto the blue piece of card that I cut earlier. 

Using the Subtle Shimmer Sequins, I sprinkle 2 or 3 pinches onto the silver dome. Making sure that the sequins stayed within the stamped area on the dome, I removed the adhesive tape from the bottom part of the dome then covered the back of silver striped paper with glue then placed the dome and paper into a centralised position on the blue card mat. 


I added a white mat to the inside on the card which I stamped with the cottages once again. Taking a  small strip of white card, I stamped the sentiment and added the white strip to a piece of the Misty Moonlight card. This was then added to the inside of the card using Dimensionals (foam shapes). This allows the front of the card to stand up like an easel when open. The small blue mat with the dome on now needs to be added to the card. The best way I find is to add adhesive, tape or wet glue to the back at the lower part of the mat, then add adhesive to the top of the front half of the card to where it will be standing against.

Using the dies from the Cloche set of dies, I die cut several of the trees in different sizes then place them around the front of the blue and silver mat. 

For more information on any of the products that I have used this week, please click HERE  It will take you to our Stampin' Up! shop where you can see all of the products including the Clearance Rack offers too. If you would like to order through us, please feel free to as we would love to be your one stop shop for all things Stampin' Up! If you are in the UK then please click the link to have a look at our shop.

We also have a wonderful community of fellow Stampin' Up! Demonstrators called Larger Than Life Stampers.  If you're interested or would like more information in becoming a demonstrator and live in the UK, Austria, France, Germany or the Netherlands, please click the link  JOIN on our shop page or message us for more details. There are lots of advantages to becoming a demonstrator with Stampin' Up! including saving money! The product quality are second to none!

Well, that's it from me for another week, Cary will be back again to inspire you with her creations on Monday so please stop by. 

Until I return have a good week but most of all stay safe, stay well and 

KEEP ON CRAFTING xxx 

Thank you for joining me, Gill xxx


Thursday, 21 October 2021

Throw back Thursday - Classic Cloche

For my Throwback Thursday card, today I've gone way back in time to when I paper pieced cards. Something that I haven't done in many, many years. Using the Classic Cloche stamps, I stamped the cottage 3 times across the white mat using the really light grey of Smoky Slate. Then using the stamp from the set to colour the images, I stamped the cottages in the rich deep red of the Cherry Cobbler Ink Pad. I stamped another of same the images onto a scrap piece of card. This was then added to a piece of the Foam Adhesive Sheet. 

This is a sheet of double sided foam very like the Dimensionals but a sheet approximately 4 1/2" square. I die cut the small cloche shape out which left me with the frame and the coloured cottages on the cloche. Firstly, I cut into the cottage piece and fussy cut them all out. They were then added onto the card image. Taking the residue from where the cloche was cut from, I fussy cut around the edge to give me a simple frame which once done, I added it to the card and surrounded the little cottages.  

A fiddly but very rewarding, fun way to give a unique look to a card.


 I'm pleased with it, I hope you are too?


Wednesday, 20 October 2021

Watercolour Wednesday - Classic Cloche

White or Washed?

 I can't believe it's Wednesday already! It's amazing how quick time flies isn't it? For my Watercolour Wednesday card today, I started by washing the pale blue of Balmy Blue Ink across the card mat. After I let the mat dry, I used the gorgeous rich green of Shaded Spruce and stamped the small leaves to the mat and adhered it to the Silver Foiled Card.

On a separate piece of white card, I stamped the cloche and the birds into the middle of it. Using the stamp for the leaves, I used the Shaded Spruce for the leaves once again and coloured in the birds using a little pinkie/orange of Calypso Coral and the soft beige colour of Sahara Sand with a little of the soft yellow of So Saffron. I fussy cut the cloche out and then glued that to a piece of the Silver Foiled card and again, fussy cut that too. The sentiment was stamped onto white card and I punched it out using the Elegant Tag punch. I placed the punched piece back into the punch and tool a little more off the label to make it smaller. I punched another shape in the Silver Foiled card and glued the white to the silver. 

Stampin' Up! punches are so versatile as you can add them back into the punches and change the whole dimension of it. To complete the card, I stamped several of the birds again and coloured them in too. Yes, I fussy cut them out as usual and they were added randomly across and inside the card too.


 Before I had completed the card, I had made another cloche image. This one however, was with a watercolour wash across the cloche just like the main mat on the card. Below is a picture of the original piece which in the end, I chose to go with the white one.

 I think I chose right but what do you think? Which do you prefer...White or Washed?

Tuesday, 19 October 2021

Stamp Sale 20th October 2021

 Wahoo tomorrow is the day!!!

15% off all cling mount stamps in the annual catalogue!!!

Click Here to shop 


Sale starts at midnight and ends at 11.50pm so don't delay!!!


Technique Tuesday - Classic Cloche


 Hello, for today's card I have jimmied up yesterday's card to another level. Using the Classic Cloche stamps again but this time I have added layers again. This is probably my favourite technique. By adding layers to a card, you can add height, depth, width... plus all the different kind of dimensions that you could ever think of. Using another Basic White card base, I have added a piece of the gorgeous paper from the Whimsy and Wonder speciality papers pack. 

Although the paper has been added to the card, I haven't used Dimensionals, or foam shapes to raise it too much. I wanted the effect of layers but I didn't want to add too much height. I then stamped the cottages image and again used the grandchildren's colouring pencils then added that to another white mat. Once again making layers but not too much height. As I have coloured the background in, you can clearly see the white border of the lower mat. 

A few sentiments inside and out and the card was complete. 


For more information on the products that I am using this week, please click HERE


Monday, 18 October 2021

Make It Monday #simplestamping - Classic Cloche

Hello. Well....How do I follow those amazing cards from Cary last week? Weren't they just gorgeous? Well I think they were so now I have to see whether I can hope to show you some of my projects to hopefully inspire you to make some card for yourself. #simplestamping is the name given by Stampin' Up! for beginner cards. This week I have used the Classic Cloche stamp set and later in the week I will be using the matching dies called Cloche too. So starting in true simple fashion, I have made this very easy card using only a stamp set, some card and an ink pad.

I've used Basic White card, Classic Cloche and Memento Tuxedo Black ink. I did add a little colour by using my grandchildren's colouring pencils too. A few sentiments and the card is complete.


Friday, 15 October 2021

Fun Fold Friday Gingerbread and Peppermint suite

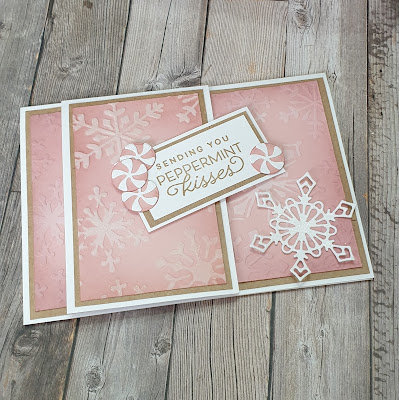
 Happy Friday 😀 to celebrate Friday's here at 2 Big Girls Crafting we have fun with our inspiration.... Fun Fold inspiration that is 😉 and this Friday is no different! The fun fold I'm sharing is an easy one that give you plenty of spaces to decorate and a simple  hidden message space.  I have used the Adorning Designs decorative masks from the Gingerbread and peppermint suite.  Now the masks are a fab purchase as they're not just for Christmas,  although today's card is using the snowflake one 😀 

Adorning designs decorative masks stampin up

To start today's card I used the mask and created 2 background pieces. For the first I used Embossing Paste and the second I used White craft ink

I mixed some wink of stella into the embossing paste before spreading it throught the mask. I also painted a little more over the paste in areas to give it a little more of the subtle shimmer. I use pieces of cardstock in a softer shade of pink called blusing bride. 

Embossing Paste wink of stella Adorning Designs Decorative masks stampin up

As you can see above I forgot to take photos of the backgrounds before I completed the card 🤫 but hey that's life 😅

For my second background piece I used  white craft ink to blend throught the mask. Using the white craft ink gives a lovely soft colour that isn't harsh. Again I forgot to take photos before using the piece 🙃 

Whisper White craft ink Adorning Designs Decorative masks stampin up


I left my background pieces to dry thorough and started on the card base. For the base you'll need a piece of cardstock measuring 14.85cm x 21cm scored at 10.5cm.  You'll also need a piece of cardstock measuring 7.5cm x 21cm scored at 10.5cm .

The smaller piece was adhered to the front of the card base when it was in a landscape orientation . I  positioned the small card to the left of the card but not to the edge.

I then took my piece of white inked background and cut it to 9.5cm x 13.9cm and blended it with ink around the edges. I mounted it onto a piece of the Kraft paper that is also a part of the suite. 

This piece was adhered onto the card front with the small piece open so that it covered the cut edges.

I then decorated the small flap. I cut a piece of the embossing paste background to 6.5cm x 9.5cm and as before blended ink around the edges. I matted this onto a piece of the kraft paper and then onto to flap.

I  decorated the front of my card using the Frosted Gingerbread stamps and dies. I used my trusty Wink of stella glitter brust to add more subtle shimmer to the white die cut snowflake and peppermint kisses.

Gingerbread and peppermint suite stampin up Adorning Designs Decorative masks soft vintage fun fold Christmas card

Next it was time to decorate the hodden message on the inside of the flap on the front of the card.

Gingerbread and peppermint suite stampin up vintage Christmas card

Don't you just love the sweet sentiment? 

Gingerbread and peppermint suite stampin up fun fold Christmas card

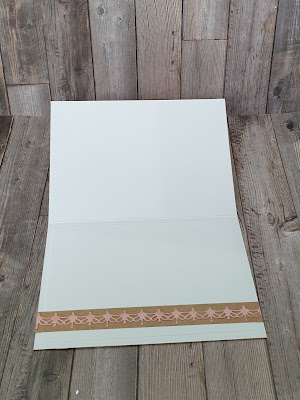
I also got a bit carried away and decorated the back of the card ...

Gingerbread and peppermint suite stampin up Christmas card

As well as the insert inside!!!

Gingerbread and peppermint suite stampin up Christmas card

This card gives you lots of space to write, add photos etc which makes it a great card to send with your annual family round up. Or as a card where lots of people can leave messages. 

Vintage style Christmas card stampin up


Well thats it from me for this week. I do hope you've been inspired by what I've shared and that you'll join me next when we see what the lovely Gill has to share.

Have a great weekend, hopefully with lits of crafty time 😉

Have fun

Cary xx

We'd  love to be your one stop shop for all things Stampin' Up! If you're in the UK then please click Here to go have a look at our shop.

We also have a wonderful community of fellow Stampin' Up! Demonstrators called Larger Than Life Stampers.  If you're interested in becoming a demonstrator and live in the Uk, Austria,  France,  Germany or the Netherlands  please click Here or message us for more details. 

Cary & Gill xx