For today's Throwback Thursday inspiration I've created a background using one of my favourites a galaxy background. I've paired this fun technique with the sweet little penguin from the Count On Me stamp set.
This cute little fellow is resting on die cut clouds with simple white stars on a simple white mat.
The bold pops of colour are from the blended galaxy background. I used bright orange, hot pink and deep purple to achieve the look. I randomly laid down the orange then the pink then finally the purple. I blended the colours together. Then I flicked water over it. To add a final touch I flicked some wink of stella over it all.
I just love this card 😍 The cute characters and the beautiful background all come together to make a card that makes me smile.
Today I'm getting messy... really messy!! But boy did I have fun 🤩 From the start I knew that I would do something fun with the kiwi bird from the Count on Me stamp set. This fun little cutie deserves to be given a big showcase so I decided to use Watercolour Wednesday would be just the right way to go.
But what style of watercolour should I use 🤔 that was the question 🤔 and then suddenly I saw an image of a paint splash and thought wow I want to use that.
The question is how was I going to do it? After lots of thoughts and research I chanced up a video from a fountain pen creative creator. They used ink and a syringe to create a splash.
So I grabbed a syringe, reinkers, water and cardstock and went into the kitchen. I knew it would get messy so got a clear space a tray and some kitchen paper. I was also wearing old clothes and glad I did! I would recommend an apron for this job!!!
Here is what my space looked like mid creativity....
The colours I chose were bright yellow, bold green, sunny orange and a hot pink. I wanted to bring the beautiful sunny weather we have had into my project 🌞 .
To create the splash effect is simple. Put a drop of water into a container, I used a bottle cap, then mix in 2 drops of reinker. Now draw up 1ml of air in the syringe then draw a drop or 2 of the water reinker mix.
Now the fun part ! Place your cardstock onto your protected area then aim the syringe and squirt it from above. Practice a few times to see how it works and get the effect you want.
Here is the link to a short video showing how I do it. https://youtu.be/1w2NBQ4-fGk
Once you've tidied up and your creations are dry it's time to admire your work and decide what to do with them. Below are the pieces I decided to use.
I knew I wanted to use the quirky little kiwi bird from the Count On Me stamp set so decided to stamp him in black ink randomly all over the backgrounds.
For the larger piece I made this card.
I also used an eclipse technique for the sentiment. I die cut the words from the background. The dies I used also come with a shadow die for the words called Amazing Thanks they are a lovely set to play with.
So for my next 2 cards I decided to use some pattern paper and texture along with the backgrounds.
The first one uses bold black and white stipes to add a dramatic look. The white mat has been embossed with a strips folder.
The second card uses a piece of black with a fine white spot on it paper and a splash texture embossing folder on the white panel.
The sentiments on both cards are heat embossed in white onto black cardstock. When heat embossing onto cardstock, especially darker colours, make sure to use an anti static bag. This handy little tool helps eliminate all those random flecks of powder settling and ending up spoiling your project.
So that is what I did with my messy creative time. I love the bright bold look of these fun cards. The strong colours highlighted with the black make for quite the statement 😀
Do you ever buy a stamp set just because you saw 1 stamp used by someone ? What they'd done just inspired you so much!! And today's card is featuring that one stamp... the uber cute bear 🐻 😍 from the Count on Me from stampin up stamp set.
The bear has been used by many talented people in so many ways. The look that I have been very drawn to are where the stampers have altered the stamped image. Now I am no artist! I struggle to draw a squiggly line let alone a straight one 🤣 So the thought of altering a stamped image by drawing is a bit scary!!
My first tip is to stamp the image a few times onto scrap paper and just give it a try. As they say practice makes perfect! So I used a pencil and lightly drew in the lines. Once happy with where the lines are I used a black marker pen with a fine nib to draw over them. Once done I erased the pencil lines and started colouring. See the steps below.
Now in the examples below I've used pencils to colour but for the examples above I used alcohol markers. I like the effect both gave.
For my card I used alcohol markers and a white gel pen to add the details to the bears outfits.
For the card I started by blending a light blue colour all over a mat of card. I then used dies to create a scene for my bears to be in.
I love this card even though it's not my usual style. I really enjoyed getting my fashion designer on 😅
Happy Monday everyone 😀 and welcome to a week of inspiration featuring a stamp set called Count On Me. This super cute set is just adorable. Full of animals and some lovely sentiments it's suitable for all ages.
This set is a great one for those new to stamping as its images are clean and simple in many ways. They are also fabulous for colouring in , in many mediums. I have had great fun creating samples to share this week.
For today's #simplestamping inspiration I have used the kangaroo. I think she looks so sweet. I stamped her in black ink then coloured her in with pencils. I used a rust brown/ orange as a base layer then went over with a grey pencil to create the body colour. Short strokes help create a feeling of texture. I coloured the flower in a pretty shade of pink with a yellow center just because it makes me smile.
I then felt as if the roo was kind of floating in the middle of thw white space. To combat this I could have used the grass stamp and given shadows underneath her. What I decided to do was to use a sentiment stamp to give my roo somewhere to nestle on the card.
First I stamped the sentiment in black ink. Next I chose a soft grey colour ink and stamped the sentiment around the image in a staggered way down the right-hand side.
I really like to use my stash to it's upmost and using sentiments not just for the message is one such way. Sentiments can become a great tool to have in your stash to help create great backgrounds too.
As always on a Monday I will be doing a Facebook live at 4pm BST on our page here. If you can't make it live I will be sharing the link to the YouTube version here later today.
Well it's Friday already. Time really does fly when you're having fun! My last card this week with the Handsomely Suited stamp set and dies is similar in a way to Wednesday but this is on one of my favourite fun folds. Using only half a sheet of A4 card cut at 10.5cm by 29.7cm and scored at 14.85cm. After the scoring was done I marked in pencilled the centre front edge of the card where it will be standing up. Then it was a case of pencil marking from the centre fold line 5cm down both of the front edges and then 10cm. Once they were marked, I laid them on the trimmer and scored the the edges really well. When scored I used my bone folder to burnish them really well after I got the desired folds in place, I added tear and tape and secured them behind the lower front point. I then cut a piece of DSP from the In Good Taste pack of paper at 10cm by 14.4cm. I marked this at the bottom centre of the mat and cut off the 2 outer edges from the mark that I made and the 2 outer corners of the top of the mat.
Now I had 3 triangles, 2 right hand triangles and 1 Isosceles triangle. Using the die for the V, I lined it up and removed the centre of the DSP on the Isoscelels triangle. Then cut a white piece to fill in the space for the shirt. A button welt and set of buttons were die cut and glued using Tombow multipurpose glue into the centre of the triangle on the card. Adding the fancy pattern around it. The lapels were die cut in Night of Navy card and embossed with Tasteful Textile Embossing Folder and added to the card with the bow tie.
The 2 right angled triangles were added to the left and right of the inside of the card. Then I cut a white mat 10cm by 14.4cm and marking the centre point of the 10cm line and removed the white triangles. The white triangle was then added to the inside for sentiments. I like to repeat that last part for the rear of the front panel. I just think it looks tidier but that isn't essential.
The card really does stand beautifully and can be made in may different
sizes so if you like to make different sized cards, it can be adapted very easily.
That's it for me this week. Thank you for joining me and I hope that you've found something to inspire you to make some cards for yourself.
Cary will return, (hopefully) refreshed next week and will show you some of her amazing projects. Until I return, please take care, stay safe and well but most of all.......
For today's card I have made a very simple but I think quite classy card. I have used Basic Black and Basic White card and a small piece of DSP from Handsomely Suited suite, including the papers for the bow tie. The 2 white mats were both embossed with different folders. The larger mat with Tasteful Textile and the smaller one with Bark embossing folders. Very simple but a style that I could make all day long.
Hello, well I am sad to say that after the events of this last weekend, I am going to let you down! There is no watercolouring this week, sorry! Instead, using the Handsomely Suited stamp set and the dies called Suit and Ties dies, I created this jacket and tie. Strangely enough, I anticipated that it would be difficult but it was far from it. I chose to use some retired DSP from the matching range but that sadly has retired. I used the very simple plain colours as it's going to be sent to a friend who has just retired from working in London. Then I decided that it can be his birthday card instead as it's only a week after his retirement.
Anyway, the dies to this set are brilliant. You can cut out the V in the centre of the jacket, add the lapels, collar, pocket and handkerchief. Really simple and very effective. I also made a card as a cardigan. That to me was an added bonus as suits are generally aimed at the men but not this time!
This is the cardigan version, I cut a simple strip for the welt, a few small circles for the buttons and gems on the top. The collar was a long strip of card with tear and tape on the back, then once the paper was removed from the tape, I fan folded the strip and curved it around the round neck which was a die cut circle from Layering Circles Dies.
Forgive me this week please as we are both absolutely shattered! Cary and I have just this weekend held our 1st in person retreat in over 2 years. Lots to do!! WOW there was lots going on but hopefully everyone enjoyed themself. Well, they said they did so that's a good thing! Anyway, carrying on from yesterday's card, I'm showing you some cards this week that we used in our annual mens class last year. We used Handsomely Suited, an ideal stamp set for the men in your life. The technique is to use several squares of DSP which coordinated with the stamp set. Sadly, it is no longer available but this just proves that you can mix all of the different papers and nothing looks out of place.
My squares are 3cm square or about 1,1/4". I worked out where the centre of the card mat was and worked from there. Nothing apart from the DSP and cardstock was measured, all of the positioning was done by eye. I prefer it that way as it looks more natural.
This week I'm actually cheating. Using the Handsomely Suited stamp set which we used for our annual mens class last year. I took a white mat of card and pencilled a little mark in the centre point. Then I took one of the tie stamps (there are 2) I stamped a cross initially making the top of the tie stamp into the centre. That means the top of the tie will be stamped over several times so that's not an issue as hid that part. Then I continued by adding the four corners in and finished off with the ties stamped either side of the images I had already stamped. Once I completed that , I cut it down and added it to a beautifully soft blue of Balmy Blue. I added a little strip of ribbon to one end and then adhered the whole lot onto the white card base.
Obviously, to hide all of the tie knots, I had to add a mat for the sentiment but I raised mine up using Dimensionals (foam shapes).
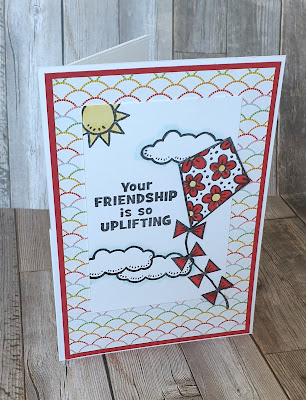
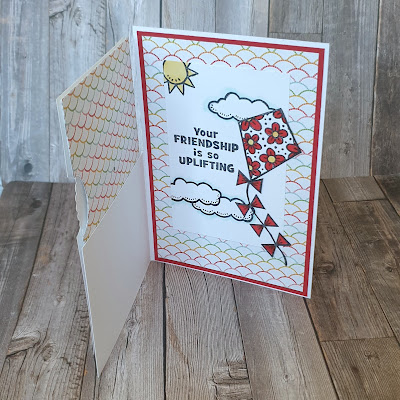
For my final inspiration using the delightful Kite Delight stamp set I've gone bright and bold. The fun fold is a simple one called a Dutch barn door fold. You take the front of your card and cut the top off! Then you turn the cut off piece and place it in the center of the card front but you only attatch it to the bottom panel!
Now this simple fun fold card has so much scope you can make it as simple or decorated as you like. I have chosen to make my sample interactive. I've used a fantastic set of dies called Give it a Whirl dies. They help you create a fun card that is a little special.
I created the twirling part as the front panel. And used the part that I cut off the front to decorate the inside of the card.
I love the bright bold colour of the card. The fun twirling feature is such fun. All in all Ibenjoyed making this card.
So that's it from me for this week. Gill and I are hosting our annual weekend craft retreat this weekend. We will be busy making sure everyone has the best time and we will may be busy but we'll have the best time for sure.
Please join me next week when Gill will be sharing her inspiration with us all.
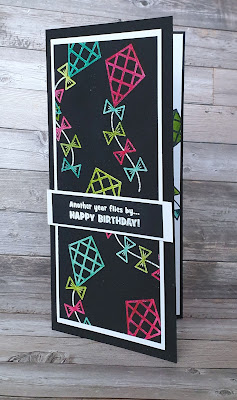
Do you ever scroll around the Internet looking for inspiration only to find it much closer to home? Well that's exactly what happend to me as I was looking for a fun card to share today!
I knew I wanted to use the gorgeous Kite Delight but wanted to do something I hadn't done for a while. Any way I stopped scrolling because I wasn't being inspired and went away. I then had a quick peek at Facebook and there was a link by someone whom I had the pleasure of meeting at a Stampin' Up! Event about 5 years ago!! Her name is Sarah Fry Edwards and she lives in Arazona in the USA. She was sharing a technique that I haven't used in such a long time!!
What the technique is call I have no idea but I like to think of it as colouring on black. Sarah said it reminded her of an old childhood toy called Lite Bright!
Any way here is my project inspired by Sarah's cards.
The way to create this bright bold look on black cardstock is easy when you know how 😉
It all starts with a piece of black cardstock which I stamped with versamark. I then used white embossing powder and heated it up.
Next I took my alcohol markers when the embossed areas where cool coloured them!!
So simple yet so effective!!
I kept the cardstock to just black and white so the the colours really popped.
For the inside I stamped a kite and tail in black onto a white mat. I then coloured inside the lines instead of on them!!
I really enjoyed making this card and can highly recommend it as a fun way to switch things up.


.jpg)
.jpg)
.jpg)
.jpg)
.jpg)
.jpg)
.jpg)
.jpg)
.jpg)
.jpg)
.jpg)
.jpg)
.jpg)
.jpg)