Pages

Friday, 29 July 2022

Fun Fold Friday - Cottage Rose and Abigail Rose DSP

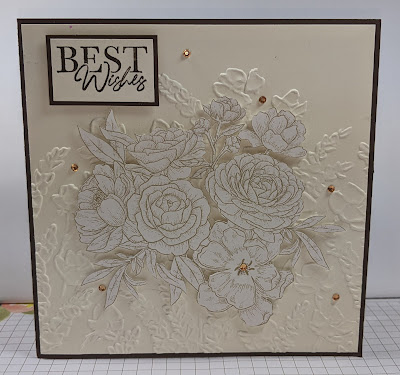
Well, here we are and it's Friday already. Where does time fly to?  For my last card this week with the Cottage Rose stamp set and the Abigail Rose Designer Series Papers, I made a 6" square card. I have used one of the colours I very rarely use and that is Early Espresso. I have no idea why I don't use it more but I have now. Anyway, I also have used Very Vanilla card too, I think it softens the brown really well. 

Using the Early Espresso, I cut a card base in metric at 14.85cm by 14.85cm which is almost 6". I then cut 4 mats in Very Vanilla at 14.4cm by 14.4cm. Just a smidge smaller than the card base. I embossed 3 of them using a New embossing Folder called Painted Posies, it leaves a really deep impression across it. 


I then cut 4 mats 7cm by 7cm and 4 Very Vanilla mats at 6.6cm by 6.6cm. I embossed all 4 of these mats using the same folder. The strip of card that was cut for the card base from a sheet of A4, was trimmed to 5.5cm by 29.2cm. This was fold in half and then in half again. This gave 4 equal sized folds in the strip. Using the Very Vanilla card panels, I adhered the 3 large embossed panels to the front and inside of the card base and the 4 smaller panels to the 4 smaller Espresso mats. 

I decided to used 2 different papers for the decorating, a simple one for the front and the brown images for the inside. I left it quite plain from there as I liked the simplicity of the monochromatic effect. A few gems from the Champagne Rhinestones to decorate the front and inside, then some sentiments to finish the decorating. I added the last of the large panels to the rear of the card to be written on. I added some stamped images of the triple flower sets and another sentiment to complete this card and added the panel to the back of the card.

Well I hope you have found something to inspire you to make some cards this week, I have had fun making them. I cannot thank Bella my grand-daughter enough for all of the fussy cutting that she has helped me with too. She is a star. 
Cary will be back on Monday once again, so please stop by to see what she will be creating. 

Until I return, as always, stay safe, keep well but most of all 
 

KEEP ON CRAFTING. 

 
Thank you, 
😍  xxx  Gill  xxx  😍


Thursday, 28 July 2022

Throwback Thursday - Cottage Rose

 Hello, today's card was inspired by a card that I made for our retreat back in March of this year. I believe that it's called and book fold, I may be wrong but it looks very like it to me too. Using the Cottage Rose stamp set and the coordination papers called Abigail Rose, I cut a piece from the patterned papers and started to cut it right down. Bella continued to fussy cut it for me as I was unable to complete it. As I mentioned earlier in the week, I have carpal tunnel and I am finding it quite restricting, to say the least! 

I coloured in the piece using my Stampin Blends pens and once finished, using Tombow multipurpose glue, I glued it to a piece of Smoky Slate card and gently cut around leaving a small border behind. Before I fixed the book fold down, I tied a piece of the Gray Granite ribbon around it and used some of the Stampin Up! Tear 'n Tape to seal it.

 I used some more of the DSP on the card base, picking one of the other patterns of DSP in the same Smoky Slate and the 2 pieces were attached to the card base. I added Dimensionals to the back of the flowers to adhere to the card front. A few sentiments later, and this card is completed.

ABIGAIL ROSE 12" X 12" (30.5 X 30.5 CM) DESIGNER SERIES PAPER


Wednesday, 27 July 2022

Watercolour Wednesday - Cottage Rose

For today's card, I stamped the large image from Cottage Rose stamp set into the centre of a Basic White mat. I added the single flowers around the border but decided that I only wanted the one flower coloured in. I stamped an acrylic block onto the Highland Heather ink pad and using a watercolour brush, picked up the colour and washed it over the flower. I continued using the Granny Apple Green Ink Pad and coloured in the leaves too. I mounted the white mat onto Highland Heather card mat and then onto the Basic White card base. 


Tuesday, 26 July 2022

Technique Tuesday - Cottage Rose

Today's card is one that I've never attempted before and don't know why because I really enjoyed making it. Using the Cottage Rose stamp set I stamped the sentiment for a Happy Birthday. I then took hold of the most amazing, stunning papers that coordinate with the stamp set. They are called Abigail Rose. They are in some of the colours that I would rarely or even if at all use, they are Basic Black, Crumb Cake, Early Espresso, Petal Pink and Very Vanilla. Yes, I do use the Basic Black and Petal Pink but definitely not Crumb Cake! Cary loves it and I must admit that the cards she makes are stunning but I just can't get my head around it! Stupid really, aren't I? 

I started by choosing a piece of DSP and started to fussy cut it out. Now if you saw yesterday's post, I mentioned that I have carpal in my right hand. I had steroid injections in it a week ago which I am hoping will help. Only time will tell! I had to ask my asking my grand-daughter, Bella for help. She very kindly and sweetly, fussy cut lots of the paper images out for me. She's absolutely great, I love her to bits!  Once it was cut out, I added lots of Dimensionals to the back and placed it onto a piece of Basic Black card. It was at this point I decided to chop it up!  Just into 4 pieces and spread them out across the card. It was that simple. Here are the gorgeous Abigail Rose papers that I fell in love with.

ABIGAIL ROSE 12" X 12" (30.5 X 30.5 CM) DESIGNER SERIES PAPER


Monday, 25 July 2022

Make It Simple Monday - Cottage Rose

 Welcome back on this much cooler Monday! We had some real scorchers over the last few weeks here in the UK. It was really different!! Anyway, this week I'm going to be playing with Cottage Rose stamp set and the coordinating papers, Abigail Rose Designer Series Papers (or double sided papers). I will explain though, I am going to have some very important help this week as I have now got carpal tunnel in my right hand and finding it difficult to do my normal things! My grand-daughter Bella is helping me wherever and whenever she can, particularly with the fussy cutting. She is an absolute superstar!

Today's card is a very simple one that I stamped the leaf using a Memento Black ink pad onto a white mat. Then using the stamp again, I inked it again and stamped off once onto my grid paper then the stamped the image onto the corners of the card. I repeated this along the outer edge of the card base too to get the soft, light image. I wanted this to be a simple monochromatic card today and matted the small mat onto some black card to define it.  


Friday, 22 July 2022

Fun fold Friday Bottled Happiness

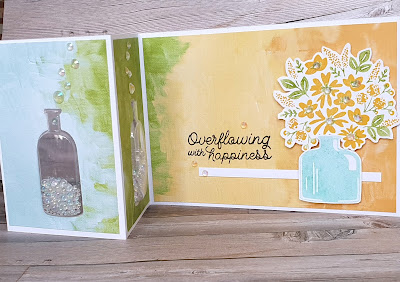
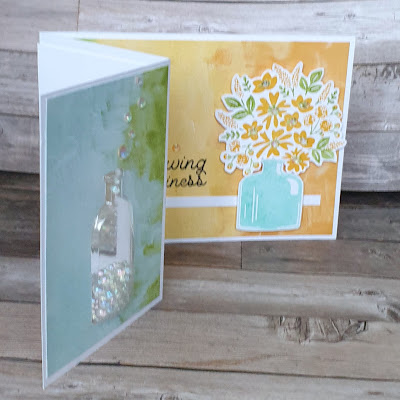
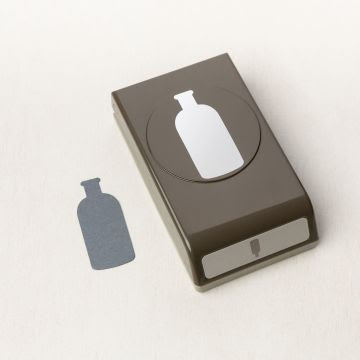
 For my card today I have used the  Bottled Happiness bundle and the coordinating Vintage bottle shaker domes to make a fun shaker card. These shaker domes are great as the come with adhesive on both sides so make them easy to apply. They also fit the punched appatures perfectly too!!

Vintage bottle shaker domes stampin up

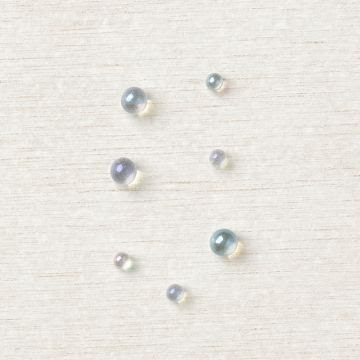
They are also pefectly sizes for the gorgeous Effervescent elements so I had to use them too!! 😉

 I knew I wanted to create a shaker card but I also wanted it to be a fun fold as it is Friday after all 😀 

So to start with I created a simple fun fold card base .  To do this I took a piece of cardstock measuring 10.5cm x 29.7cm, scored at  7.4cm and14.85cm. Fold the first score line as a mountain fold and the second as a valley fold.

I then punched a bottle out from each of the small panels in the card base. I then took a small piece of acetate and a shaker dome  I filled the dome with a pinch or two of the effervescent elements into the dome. After peeling the backing off the back of the dome I used the acetate to seal the elements inside.

Once I had made 2 shaker bottles I removed the tape cover from the front of them and placed them in the appatures on the card base. 

Now to decorate the front of the card. I used some of the pattern paper from a pack called Hies of Happiness to create simple mats for each panel, not forgetting to punch out a bottle for the 2 smaller panels 😉

Bottled Happiness Stampin up fun shaker card

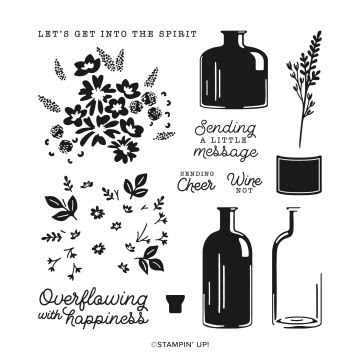
I decided to stamp and fussy cut out the flowers from the stamp set in coordinating colours. I also stamped and punched out a bottle. I then stamped a sentiment directly onto the pattern paper mat. I adhered the flowers flat and popped the bottle up on 3d foam. 

Bottled Happiness Stampin up fun shaker card


To further decorate I added more of the effervescent elements to the centers of the flowers and added some above the shaker elements.

Bottled Happiness Stampin up fun shaker card


I love that the shaker elements of the card are see through. It makes the card even more fun don't you think?

Well that's it from me this week. Please join me here next week when Gill will be sharing her inspiration with us all.

Have fun

Cary x

Thursday, 21 July 2022

Throwback Thursday Bottled Happiness

 As today is Thursday it must mean throwback Thursday projects!! And it is ..... but the throwback is to Tuesday just gone 🤣 I really like the card I shared here. But it isn't the front of the card that I'll be using as my inspiration....  Rather the inside! As with all the cards this week the stamp set I've used in both cards is the Bottled Happiness which I'm loving 😍

Here is the inspiration for today's project...

Bottled Happiness Stampin up simple fun bright card

I loved the simplicity of this inside of the card and the colour palette.  But being me I wanted something a bit brighter , possibly using my favourite colours of the moment... the 2022-24 In-Colors? 

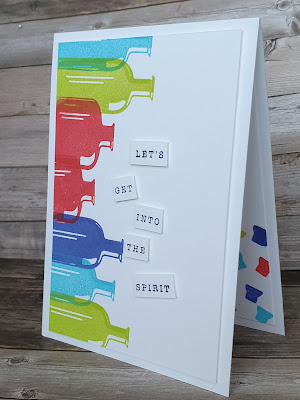
Of course it had to be done 🤣 for my inspiration today. So I started with the five yummy colours tahitian tide, orchid oasis, parakeet party, sweet sorbet and starry sky.

I stamped the bottles along the edge of a basic white mat. I stamped randomly over the edge and each other. I had the cardstock mat in a landscape orientation. 

I then stamped a sentiment from the Bottled Happiness stamp set in starry sky onto white cardstock and then cut each word out separately. Using 3d foam I adhered it to the mat. Then adhered the mat to the white card base.

Bottled Happiness Stampin up fun bright simple stamping card

The mat started out being stamped in a landscape orientation but as I was putting it together I realised I liked it better portrait!
Now it might not be to everyone's taste but I think it looks great 😊 

As this card came about because of the inside of another card I just had to decorate the inside of this one too!!

Bottled Happiness Stampin up fun bright easy contemporary card

This time I used the cork from the stamp set to create a fun confetti look. Using of course those gorgeous In-Colors 😉

I had great fun making today's card. I do hope it inspires you to turn things on their head sometimes 😁


Bottled Happiness Stampin up simple fun easy card


Wednesday, 20 July 2022

Watercolour Wednesday Bottled Happiness

 Today's card is an unusual size for me to use. Here in the Uk we call it a DL card. It measures 9.9cm x 21cm when folded. Sometimes they're xalled slimline cards. Usually used for business purposes I chose it as I wanted a lot of space for my bottles!! I wanted to use the Vintage bottle punch as the key feature. 

Vintage bottle punch stampin up


This punch does of course coordinate with the fab Bottled Happiness stamps but I wanted to showcase it in todays watercolour card. 

To start I cut my card base as above from a piece of basic white A4 cardstock. I did this by placing the cardstock into my trimmer in a landscape orientation,  with the long side running left to right.  I  then put the left hand edge at the 9.9cm mark and cut. After removing the cut panel I slid the remaining 2/3rds of the card across to the 9.9cm mark and scored the card. This created my card base and a mat for the front.

I then took the mat and trimmed of 1cm from both the long and short edges. I then used this to create my watercolour background.  For this I used a cellophane bag, water spritzer and a blue waterbased ink pad .

I added ink to the cellophane bag by dabbing the ink pad directly onto it. Next I spritzed it liberally with water. Then I took  the white cardstock mat and laid it onto the wet ink. I moved the mat around until the ink was all used. I then dried the mat and repeated the process to add more depth and tone to the background . 

Whilst waiting for the background to finish drying I punched out 6 bottles from white cardstock.   I know I usually swear hy using odd number for embellishments etc but for this card 6 was just right ✅ 

I decided to use white bottles because I wanted to use a fun new embellishment called Effervescent Elements. These are 2300 mixed sized little iridescent balls... so so pretty 😍 

Effervescent elements stampin up

I'm  a sucker for iridescent anything so these were definitely for me! I used multipurpose liquid glue and applied it randomly around the side and bottom of each bottle.  I then poured the elements over them and set them aside to dry. I do suggest you do this in a tray so that the excess can be collected and put back in the tub and you don’t waste any 😉

Bottled Happiness Stampin up watercolour background sode pop card

When they were dry I adhered the bottles to the watercolour mat using 3d foam.  I also heat embossed a sentiment in white onto a vellum tag. 
I then wound some white bakers twine around the bottles and used a smidge or pool party ribbon to attach the tag .

Vintage bottle punch stampin up watercolour background fizzy pop card

A few extra effervescent elements sprinkled around and the card had come together beautifully.  I mounted the mat onto the dl card base with both doubleside extra strong tape and liquid adhesive to make sure it stayed put! The elements do add a bit of weight to the card so I would recommend a nice mat on the inside too.

Bottled Happiness Stampin up watercolour fizzy pop card

I love this watery fizzy pop card so much fun 😄 


Tuesday, 19 July 2022

Tips tricks and techniques Tuesday Bottled Happiness

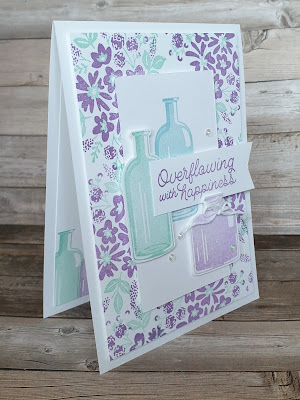
 Today is even hotter than yesterday.. or the weather man says it will be.!!! So running around isn't on the agenda... so I'll be sat next to my fan crafting 😁 and drinking plenty  of water! And the odd cheeky ice lolly 😉 Today's card features  the bottles and the flowers from the Bottled Happiness and incorporates the subtle shades of blue called pool party and balmy blue from yesterday's card with the addition of a pretty shade of lilac called highland heather.

Bottled Happiness Stampin up pretty gentle card

The background was created by using the 2 step floral stamps. I used the more turquoise blue, pool party for the leaves and flower centers. The flowers and petals were stamped in the lilac colour. 

Top tip when stamping randomly with a 2 step stamp position your stamps in the same orientation on seperate blocks. With  a key feature in the same position on both. Then stamp the flowers, step 1, once then immediately followed by the leaves,  step 2. If you try and do all over the background with step 1 randomly you'll get in a bit of a puckle with step 2.... ask me how I know 😉

Bottled Happiness Stampin up gentle pretty card

For the focal point I stamped one bottle directly onto a piece of white cardstock.  I then stamped another large bottle onto scrap paper and used the coordinating Vintage bottle punch to cut it out. I did then stamp and fussy cut out the tubby bottle.


A little twine wrapped around the neck of the tubby bottle and a few sparkley gems and my card was complete... on the out side!! 

Bottled Happiness Stampin up gentle soft card

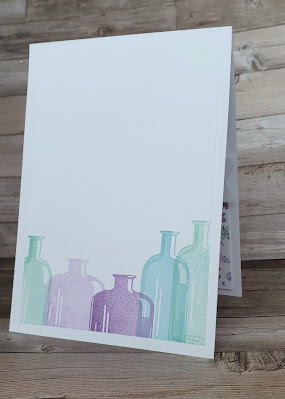
For the inside I stamped the bottles randomly along the lower edge of a white mat. I love how this turned out especially how the colours layer so well over each other. 

Well that's all for today please join me tomorrow for for a watercolour inspired Bottled Happiness card.

Bottled Happiness Stampin up simple gentle card


Monday, 18 July 2022

Make it simple Monday Bottled Happiness

 Oh my day's!!! It's so hot here !!! Now I know what it feels like in other parts of the world.... like New Orleans in the USA.  And that's not a bad thing as I'll be visiting NOLA at the end of August 😜 I am very fortunate to have the opportunity to visit due to attending a training event with Stampin' Up! as New Orleans is on my bucket list of places to visit. Now I know the city has many attractions but food and drink are high on the list for sure 😉 and the moto "laissez les bon temps rouler" , Let the good times roll, sounds like an invite to a party for sure!. With that in mind I decided to use a stamp set called Bottled Happiness ... sounds right for the Big Easy doesn’t it?

Bottled Happiness Stampin up simple stamping easy card making

As today is #makeitsimplemonday I kept my invite to the party very clean and simple. Using just stamps, ink and paper.

The colour choice was inspired by a cooling dip in the sea. I chose 3 shades of blue, costal cabana,  pool party and balmy blue. The names bring water to mind for sure too 😀

For my first card I used the tall bottle and stamped onto a card base in a portrait orientation. 

Bottled Happiness Stampin up simple stamping easy card making

For my second version I used the stubby demi-john style bottle in a landscape orientation. 

Bottled Happiness Stampin up simple stamping easy card making

Which is your preferred orientation for a card? Portrait?  Or Landscape?  
I must admit to Portrait just pipping Landscape at the post 😉
Any way that's enough for me today I'm off to play with a different type of bottle ... a water sprayer .. with my 4 year old grandson for a water fight 😄.  Wherever you are make the most of the day  and stay warm or cool 😎. 


Friday, 15 July 2022

Fun Fold Friday - Apple Harvest

It's my last day once again for this week and I have made a style of card that I don't often do . In fact I think I have only ever made 2 or 3 like this. It is a very simple fun fold too. Using the Apple Harvest stamp set, I stamped one of each of the apple stamps and one more single apple onto white card. I coloured them in using Blends pens after looking online at the many different types of apples available. I cut a mat of Granny Apple Green card 14.4cm by 10cm, embossed it with the Hive folder and added it to the front of the card base.

I cut another white mat 10cm by 28cm and scored at 7cm,14cm and 21cm. Using the new label punch called the Decorative Label, I placed it half way into the centre fold on the inner white card piece and cut out the aperture. I embossed the white mat from both ends using the Hive folder

I used my Stamparatus to stamp the apples out all in one go and removed the extra stamps leaving only the single one in place. Instead of a piece of white card, this time I added my silicone mat onto the platform and inked and stamped the image several times. Once I was happy with the image on the Silicone mat, I placed a scrap of white card carefully over it and stamped the apple again. This resulted in the apple being stamped on both sides of the white card. If I had only wanted 1 double sided image, this would have been perfect but I needed to adhere some ribbon or thread in the centre of 2 apple images. Before adding the ribbon, I coloured both sides using my Blends pens. Then, I cut a short length of the Simply Elegant Trim in Silver and taped it into the centre so that it would suspend from where it was placed. I added Tombow multipurpose glue to the whole apple and adhered the other side of the apple to the first one. They were then taped to the centre fold of the white inner mat and suspended within the centre of the aperture.

I cut some Granny Apple Green panels for the outer mats to make the images pop and then a further one for the centre of the aperture. My measurements for the green panels were 2 pieces 7.5cm by 10.3cm and one piece 14cm by 10.3cm. The latter of which was embossed once again with the Hive folder. I added the centre panel first and then adhered the 2 green panels to the outer edges of the long white mat then adhered those 2 green mats to the inside of the card.

I finished off by adding the other apples and a sentiment from a Saleabration stamp set called Hippest Hippos. I'm sure you have seen the gorgeous cards that Cary has made using them. 


 Well, that's it from me this very hot week. Thank you so very much for stopping by to see what I had made. Please take care and make some cards yourself to give and or send to some loved ones. I love to receive hand crafted cards, they really do cheer me every time I get one. I hope that mine cheer others up too. 

Cary will be back next week with some of her creations so please stop by to see.
Until I return the following week, please take care, stay safe and well but most of all, 

KEEP ON CRAFTING!  

😍 xxx Gill xxx 😍