Friday 30 June 2023

Fun Fold Friday - Translucent Florals

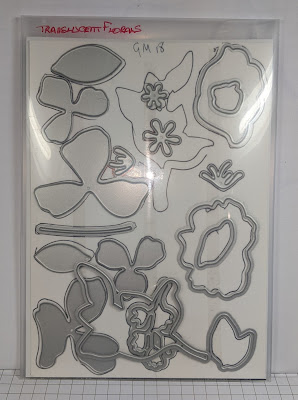
Today's card is lovely and bright. I used a piece of Lemon Lime Twist card for the card base and basic white card for the inside card. I kept it simple today and added a piece of DSP from the Bright and Beautiful range of papers onto the front of the card base. I opened up the Lemon Lime card base and using a circle die, I centralised it 2cm from the top and almost the same from the sides. I die cut this circle out. I stamped some of the flowers and leaves from the Translucent Florals stamps onto some Berry Burst card and Lemon Lime Twist card in the same colour inks then die cut them out. 

I used a piece of white 14.4cm by 20.5cm and scored down it in half.  I folded the right hand side of the card into the centre of the white piece and angled this outwards. I adhered the white mat to the back of the green card base leaving a small green border as always. The fold is now centralised in the closed hole of the green card base. Looking from the front, I added some Tombow glue to the part of the white card that was showing through onto the front. I then added the circle back onto that central hole again. I added another smaller circle in white to the centre of the circle. This I embossed using the Stripes and Splatters Embossing Folders. After die cutting the flowers and leaves, I added them onto the circles and the bottom of the card.  I added some more DSP from the Bright and Beautiful papers onto the inside panels of the white card. When the card is opened, it looks like a right hand opening Z fold card. There is many other ways that you could decorate your card from there. As you can see, I did just that. I even added a scalloped circle to the front of the card too. 


This last picture show you clearly the Z fold coming along from the right-hand side. 

That's it from me for this week again, I hope that you have found some ideas and inspiration for your own cards and most of all make sure that you have fun.

Cary will be back once again next Monday, as always until I return... 

Stay Well, keep Safe but most of all 

😍😍 xxx CARRY ON CRAFTING!!  xxx 😍😍


Thank you all so much, 


Gill xxx
Thursday 29 June 2023

This or That Thursday - Translucent Florals

 Both of my projects for today are partially from the weekend of crafting with Stampin Up demonstrators from all over the world. It was great fun. Mine are not as they were meant to be as I changed them quite a lot. We used the Translucent Florals stamp set, Gray Granite card and Very Vanilla card. The first is the Congratualations card that I stamped the small seeded plant 3 times across a mat of the gray and then using the vanilla card, I stamped the big leaves in Old Olive ink and die cut it out. I don't have any of the new ribbon as yet so I used the gorgeous silky Gray Granite ribbon. Each of the mats were die cut with the Deckled Rectangles dies. I used the Fern embossing folder for the front panel once I had stamped all over it.

My first card is THIS 


My second card is You're The Best, made in Poppy Parade and Basic White card. Simply stamped 2 of the flowers in Poppy Parade, the stalks in Old Olive and the 2 sets of leaves in Old Olive too. I also stamped the leaves onto a piece of vellum and fussy cut them out. The vellum was curled over a ball/embossing tool to add some dimension to the leaves. I stamped the flowers aross the red card base and it seems to add more interest to the card base. Another of the Deckled Rectangles, a sentiment and adding the leaves with a glue dot to hold them in position.

My second card is THAT


So that is my 2 cards for this and that today. Which is your favourite?

Wednesday 28 June 2023

Watercolour Wednesday - Translucent Florals

 For my watercolour day, today I went the whole hog so to speak! I had a piece of Fluid 100 watercolour paper and soaked it using a water brush back and forth across the paper. Then using 2 different colours, I chose Berry Burst, Lemon Lolly and Pretty Peacock ink refills. I put a drop onto some acetate and picked a little up with a narrow brush and let it smoosh across the very wet paper. I did the outer 2 colours first and then the Lemon Lolly in the centre last. I loved watching the way the colours all merged together with the softened edges too. You can see the even the Pretty Peacock has different shades too. While that was drying, I took another piece of watercolour paper and washed that too with a large brush. I then used Balmy Blue to cover the whole piece. I love that there are dark parts and lighter parts offsetting the whole page. Once the first sheet was dry, I stamped the leaves and flowers across the colourful mat and squeezed as much in as possible.  It was then just a case of fussy cutting them all out. That was fun! I do love a bit of fussy cutting! I then placed several of the pieces over the blue mat to see how they looked. I am pleased with the end result. 


Tuesday 27 June 2023

Technique Tuesday - Translucent Florals

 The cards for today are using the technique of using Vellum cardstock. It's called cardstock vellum as it's quite weighty in comparison to something like greaseproof paper which looks very similar but is not as beautiful to work with as the vellum is. Using the Translucent Florals stamp set, I stamped the images of the flowers in a water based ink and/or Memento Tuxedo Black. Most of what I have done is in coloured inks as the stamps show so much of the whole image. The first card is white on white with a little added colour. This was based on some elements that one of the demonstrators were using on Sunday. I had a scrap, strip of the spotted vellum and added a small white mat over it which had been embossed using the Splatters embossing folder. It is one of 2 folders in the pack called Stripes and Splatters. I die-cut the petals from some more of the spotty vellum from the Vellum Basics papers.I added some Calypso Coral Blends pen to the back of the smaller flower and some of the individual leaves using the Granny Apple Green, both in the dark shades. The sentiment was die-cut from the Deckled Rectangles dies and the little flower centres were also di-cut from the scrap of coloured vellum. 

The second card is on a Fresh Freesia card base with another of the Deckled Rectangles die cut in white card. I embossed another of the pieces of white with the Splatters folder once again and added the sentiment landscape this time across the card. A simple spotty, clear, vellum, flower and some leaves, complete this one. 


Card 2


Monday 26 June 2023

Make It Simple Monday - #simplestamping - Translucent Florals

 Wow! Cary did go to town last  week with the Circle Sayings didn't she? Some more beautiful cards once again too! I am going to be a little more sedate in comparison this week using the Translucent Florals. They stamp set is exactly as it sounds. The images are very translucent. I love them. In fact, last Saturday, we attended a presentation online from some amazing demonstrators who had been working on this set. I had the set already so I started making my cards whilst watching along and joining in. My first card is obviously a simple one as it's #simplestamping Monday today. In fact, I made 2 cards for most days this week!

The first is stamping straight onto a white mat. I used Petal Pink for the flowers and Old Olive for the leaves. I matted them onto a piece of Pretty Pink card. Very simple and understated. My second card is similar except that I stamped and fussy cut the leaves and flowers out. I layered them onto a piece of the gorgeous DSP called Hello, Irresistible 6" by 6" double sided papers. They are only available by ordering them an the rest of the suite online. They really are gorgeous I promise you. 


Card 2


Friday 23 June 2023

Fun fold Friday Circle Sayings

 Happy Friday 🎉  for my final card of the week I have an easy fun fold for you 😀 Using the Circle Sayings and the stamp that started the week the fun cupcake. 

The pretty pattern paper is called Bright and beautiful and has 15% of the price till the end of the month!


Circle sayings stampin up simple fun fold card

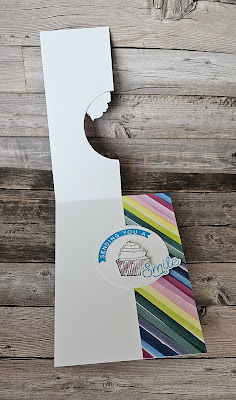
The card starts as a piece of cardstock measuring 10.5cm x 29.7cm scored at 14.85cm.  Then cut a 5cm strip of the front panel up to the scoreline. Save the strip.
Then take the circle punch and line it up half way in on the cut edge of the card front. 
Now for my card I covered the panel with pattern paper before punching the semicircle out. 
I then covered the piece I cut off in another of the fun pattern paper. And adhered it to the right-hand side of the card making sure to line it up with the front left-hand side and the back right-hand side. 

Circle sayings stampin up simple fun fold card

I punched a full circle and adhered it to the card so that it lined up with the appature on the front. 

Circle sayings stampin up simple fun fold card

I then stamped and paper pieced 3 cupcakes using some scraps of the paper, waste not want not after all 😉. And adhered 2 on the front and one onto the white circle.
The first part of the sentiment was stamped directly onto the white circle the second I stamped onto a scrap of white cardstock and fussy cut around it.
I then used some of the Loose Silver sequins to add a few  bubbles to this fun card.

Circle sayings stampin up simple fun fold card

Well that's it from me for now . Gill will be sharing next week so please join us again.
As the card says I'm sending you all a smile so have a great weekend.
Have fun
Cary xx


Thursday 22 June 2023

This or That Thursday Circle Sayings

 Bright and bold? Or soft and subtle?  Top folding ? Or book folding? They are the questions for today! Made exactly the same way using the Circle Sayings bundle but looking so different!

 Colour is amazing! It can make us feel different. It can convey messages. It can help us explain things. It's just amazing!

 For my first sample I chose hot pink and crisp bright green. This would be my go to. I love bold and bright colours. Especially when they are colour blocked. I also favour the top folding or A frame card base. All off set with white embossed sentiments and floral swags.

Circle sayings stampin up birthday card

But then again how delicate and gentle does this soft and subtle version look? The pale pink and soft green work so well together. 
The addition of the white matt dots and the stamped insert just work so well on both cards.

Circle sayings stampin up birthday card

Circle sayings stampin up birthday card
 
So which do you prefer?  I can't chose I love them both!!!


Wednesday 21 June 2023

Watercolour Wednesday Circle Sayings say

 A fun watercolour background for today's sample using ink pads, water spritzer, watercolour paper and acrylic blocks. Whilst perusing the internet I can across an image of some random shapes that were splodged onto the paper.... from that I came up with the idea of using my smallest acrylic blocks as stamps. As I started all I knew was that I wanted a background that I could put a bold focal point on. I wanted to use just sentiments from the Circle Sayings stamps.

I also wanted to use a piece of my favourite pattern paper,  well my favourite this week anyway 😉, as inspiration. The paper is from a pack called Stargazing.  It is an amazing pack full of beautiful bold bright patterns. ( which has 15% off till the end of this month 😀)

Circle sayings stampin up watercolour backgrounds bold card

So I took my colour palette from the beautiful orage and pink planets sheet.  With this in mind I picked 2 shades of pink, a yellow, an orange and a lilack coloured inks to use.


Circle sayings stampin up watercolour backgrounds bold card

I then took my watercolour paper and spritzed it with water. I then took my acrylic blocks stamped them onto the ink pad. Spritzed that with water too and stamped it onto the paper. I repeated it in a random pattern using both square and rectangular acrylic blocks . I then spritzed the finished piece to make sure the colours ran the way I wanted them too. 

Circle sayings stampin up watercolour backgrounds bold card

Once dry I adhered the panel onto a navy blue card base. I stamped the sentiments onto another piece of navy cardstock in versamark and used white embossing powder to heat emboss them. Make sure you use an anti static bag when heat embossing on dark cardstock especially. 

Circle sayings stampin up watercolour backgrounds bold card

I then used some gorgeous iridescent and silver sequins and adhered them randomly over the piece. In real life they catch the ligjt beautifully and twinkle like stars 🌟 
As the card is a shorter then normal slimline/ dl card I created a simple envelope using some of the gorgeous pattern paper.  With the planets on the inside the our side is a dark bluey black patter so I die cut a fun shape in white cardstock and adhered that to the front so it can be posted.

Circle sayings stampin up watercolour backgrounds bold card

Join me here tomorrow for more inspiration using the Circle Sayings bundle of fun.