Pages

Friday, 28 June 2024

Fun Fold Friday - Sneak Peak Week - Winterly Tree Tops Bundle

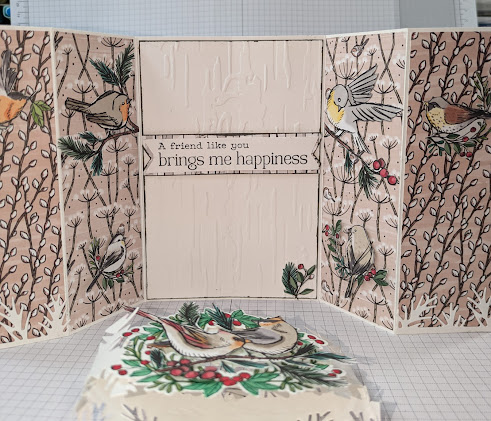
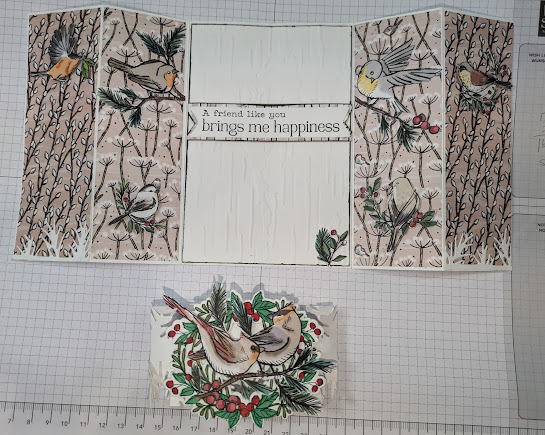
 Well, here we are again on a Friday already. Today's card is a basic Landscape, Gate Fold Card in White. Well, it started with a white card base 29.7cm wide and 14.85cm high (11,3/4" by 5,7/8"). I scored this at 4.9cm and 9.9cm (1,7/8" and 3,7/8") from each side and after I burnished each fold line really well. I started adding some strips of the DSP from Nests of Winter DSP. These were each 4.7cm wide by 14.4cm high (1,13/16th" by 5,7/16th"). The other sides of these papers are lots of birds so it's been difficult trying to decide to use it! The colours of the DSP to me look like Petal Pink or even the New Basic Beige or even a combination of the 2. Very soft colours which is why I chose them. I cut a white 9.5cm by 14.4cm mat for the centre (3,15/16th" by 5,7/16th") and embossed it using the Birch Wood embossing Folder and I stamped the sentiment onto white and added it to another strip of the DSP. Lots of fussy cutting on this one as the birds are much smaller but still gorgeous nonetheless. 

I made a belly band for this card from the piece of card that I cut off from the A4 sheet of white card and working in 10 cm wide or 4" strips, I die-cut along the bottom edge and then repeated it until it was all cut out. You have to make sure that the piece you don't want die-cut, i.e.the upper edge remains above the die or the die will end up cutting the sides of the band too. I repeated the same for the top of the band. 

Nothing is wasted if I can help it as you can see, I used the white die-cut out pieces for the front 2 panels of the card. I stamped a pair of the boughs, coloured them in and die-cut them out. I was able to join the 2 pieces together at the back on the sides using a Dimensional, then adhered it to the front of the belly band along with the pair of beautiful birds and berries. 

I am unable to send you a link to the new products until they have been released but do watch out for them in just over a month. 


Well, once again, that's it from me for this week. Please take care and stop by next week as Cary will be sharing some of her creations for you. 
I will be back the following week as always but until then ..... 
Stay safe, Keep Well, but .....

KEEP ON CRAFTING 

😍😍😍 xxx Gill xxx 😍😍😍


Thursday, 27 June 2024

This or That Thursday - Sneak Peak Week - Winterly Tree Tops

Hello on the double take card day. Today is your time to decide which card do you prefer. My first card is a landscape style card in Coastal Cabana and using one of the little stamps which I believe is a twig with fresh buds on. I have used it as coloured lights. My son has just put up some garden lights which look very like these. I stamped them onto a white mat and then coloured them in using my Stampin' Blends pens. I then embossed it with the NEW folder called Birch Wood which goes beautifully with this set of stamps and dies. I stamped and die-cut out the birds before colouring them and then coloured in the buds or lights as I see them. A simple message of thanks and thinking of you for the inside completes this one.

THIS AND THAT


THIS


THAT 

My next card is another that I have used a mat of DSP but this time, I have added a mat of the Three Colour Glimmer papers beneath it. The colour of the Glimmer is Pretty Peacock and the DSP is Pool Party. Don't they go well together? This time a portrait style card with a sentiments across the lower part and I added a rectangle of the Glimmer paper again and added the stamped and coloured birds to the door. Beneath the door is another bird. Believe it or not but my birds started off as a very pretty yellow of Lemon Lolly! These are my tropical birds!


Wednesday, 26 June 2024

Watercolour Wednesday-Sneak Peak Week - Winterly Tree Tops

 On this lovely, hopefully very dry and warm day today I have made a card very similar to yesterdays card. This time though I took a white card mat and watercoloured wash in Pool Party across the whole piece and left it to dry. While that was drying, I fussy cut 2 sets of the birds from the Nests of Winter DSP. Unfortunately, with this sheet the dies don't fit! :(( However, as always, I enjoy fussy cutting images anyway so it isn't a problem for me. Once dry, I die-cut the frame for the card using the large die and then using a piece of DSP from the Thoughtful Journey papers for my watercoloured background! A bit of a cheat I know but this is a much better version than I could do! I placed the die-cut frame face down on the desk and added the die cut DSP face down into the frame. By adding tape across the back of it, I was able to trim it down to size easily for the card base which this time is in the lovely shade of blue from Misty Moonlight. I then added the birds onto the picture and completed this one.


Tuesday, 25 June 2024

Tips, Tricks, Techmiques Tuesday - Sneak Peak Week - Winterly Tree Tops

 Hello. On today's card, I have once again used a mat of DSP or paper from the Nests of Winter set. This is a much closer image of the Birch wood grain I think and I like that the fact it's fresh once again. I started this time with a bright card base in Coastal Cobana. Using the stamps and dies for Winterly Tree Tops I die cut out the frame in Pool Party then die cut the birds out of one of the other sheets of the DSP. It's great! I don't have to fussy cut these ones! I added them to the card using Dimensionals, or double sided, foam shapes. I love the way you can see the birds in the trees as if you were looking through a window. A simple frame can make all the difference. 


Monday, 24 June 2024

Make It Simple Monday - Sneak Peak week - Winterley Tree Tops

 Hello and thank you for joining me today. Cary's cards were lovely and bright last week weren't they, really lovely. Twice a year Stampin' Up! have 2 seasonal catalogues in addition to the 1 annual catalogue. We are currently gearing up for the winter season and as a demonstrator, we are often given the opportunity to pre-order some of the new things. Well...this is one of them. Winterly Tree Tops is as it sounds, a winter themed stamp set but I have made it much brighter. Why is it always dark colours in the winter? Why can't we have bright in the winter too?

A simple card today starting off the week with, I have used a very light grey card base and a piece of the coordinating paper which look like Birch trees to me. A simple mat of paper on the front with a bird stamped in the light grey and coloured in with ordinary colouring pencils and a few sentiments to complete the inside and out.


Friday, 21 June 2024

Fun fold Friday Citrus Blooms

 The sun is shining and it appears as if summer has decided to put in an a much wanted appearance...at last! Does the weather effect your crafting?  The sunshine certainly does make me want to use bright and bold colours. Which is why the Mediterranean Blooms suite has been perfect for this weeks posts! With its summer vibes it just brings a smile and a feeling of warmth to you.

Mediterranean Blooms suite stampin up

As it's Friday today's inspiration is a fun fold and today's is a beauty . Taking full advantage of the Mediterranean Blooms pattern paper and the fantastic Citrus Blooms dies and stamps. 

The name of the fold escapes me but you're going to love the simplicity of it!

Start with a piece of cardstock measuring 14.85cm x 29.7cm.  The score at 7.5cm, 15cm, 19cm, 23cm and 25.5cm. Next reinforce the folds using a bone folder and starting with a mountain fold concertina fold them. 

Citrus Blooms stampin up Mediterranean blooms fun fold card


Now the hard part... chosing which of the beautiful papers to use! The 3 chosen papers are cut into mats. The largest measures 6.5cm x 13.9cm, the middle one is 3cm x 13.9cm and the smallest is cut at 1.5cm x 13.9cm.  These are all adhered to basic white mats that are 0.5cm bigger. Next adhere these pieces to the panels of the card base.

Citrus Blooms stampin up Mediterranean blooms fun fold card

This fun fold stands beautifully and has a multitude of opportunities to decorate! Using the dies to cut out images from the gorgeous Mediterranean Blooms paper made it a quick and easy option.  As the images would only be adhered partially I used the same die and cut basic white versions and adhered the paper ones to them for extra stability. Top tip use your envelope to measure as you go so that the elements don't overflow.

Citrus Blooms stampin up Mediterranean blooms fun fold card

The place to write your message is on the back of the largest panel. To complete the look you can decorate here too.

Citrus Blooms stampin up Mediterranean blooms fun fold card

The other nice thing with this fold is that it folds flat for posting... Today's project fits in to a standard C6 envelope.

Citrus Blooms stampin up Mediterranean blooms fun fold card

This fun fold is very versatile.  You can change the width of the card base to 10.5cm and you end up with a portrait version that still fits in a standard C6 envelope.  You can scale the width up to 21cm and create an A5 version. The length and scorelines remain the same!

Citrus Blooms stampin up Mediterranean blooms fun fold card

Well that all folks for this week from me. Hopefully you have found inspiration amongst my post's using the fantastic Citrus Blooms stamps and it coordinating products in the Mediterranean Blooms suite. 

Next week Gill will be sharing her inspiration with us all here. 

Have fun 

Cary xx

Thursday, 20 June 2024

This or That Thursday Citrus Blooms

 Do you go around in circles? Not literally 🤣 rather does your style or your favourite product ? It seems as though I'm on a pattern paper kick. This is probably because the papers around at the moment are really appealing especially  the Mediterranean Blooms paper that coordinate with the Citrus Blooms bundle

The only problem with these gorgeous papers is which side to use!

Do you go for the bright , bold and zesty.....

Citrus Blooms stampin up Mediterranean blooms dsp easy cards

or the calm, serene and cool ones?

Citrus Blooms stampin up Mediterranean blooms dsp easy cards

Both have a fresh vibe that is so right for summer. 
The papers are so nice it's a shame to waste any of it! So the negative from the die cuts make great decorative elements for the inside of your card.

Citrus Blooms stampin up Mediterranean blooms dsp easy cards

So what do you think 🤔 are you team bright and zesty or calm and cool?

Citrus Blooms stampin up Mediterranean blooms dsp easy cards


Wednesday, 19 June 2024

Watercolour Wednesday Citrus Blooms

Do you like watercolour? Are you a little intimidated by it? Well if you answer yes to both today's card might be just for you! Made using the Citrus Blooms bundle of stamps and dies and using what I call a wet watercolour wash technique you can create gorgeous watercolour effects.

Start with the background piece. Take a piece of watercolour paper and attach it to a board, make use of the grey board from packs of pattern paper 😉, using low tack tape and creating a narrow boarder around the piece. Taping your watercolour paper to a board allows the panel to remain flat. 

Now take your water spritzer and thoroughly spritz the panel. It needs to be wet! Then using almost neat reinker gently dab the colours to the paper. Allow the colour to spread via the water on the panel. Using 3 shades of one colour gives a great tonal effect to the piece. Use kitchen roll to dab any excess and water that runs of the paper.

Once completely dry remove from the board.


Citrus Blooms stampin up watercolour wet wash die cut background card

Then take the large frame die and the small foliage die and place them in the center of the panel and cut out.

Citrus Blooms stampin up watercolour wet wash die cut background card


Citrus Blooms stampin up watercolour wet wash die cut background card

With the main panel complete repeat the process on a smaller panel of watercolour paper and using an orange colour ink.

Citrus Blooms stampin up watercolour wet wash die cut background card

This time instead of die cutting stamp the image of the orange using a dark brown ink onto the panel. 

Citrus Blooms stampin up watercolour wet wash die cut background card

Now stamp the same image with the brown ink  onto a piece of vanilla cardstock and die cut it out. Then fussy cut the orange from the watercolour paper along the stamped lines. Top tip here is that when you've finished cutting it out take a marker pen in the same colour and run it along the cut edges. This creates a more seamless look once the fussy cut piece is adhered to the stamped image. This technique is called paper piecing. 
For those of us who find watercolouring an image different the wet watercolour wash and paper piecing tequniques provide a beautiful alternative 😀 

Citrus Blooms stampin up watercolour wet wash die cut background card

Once all the pieces are layered together the final card has an elegant look. Keeping the card base and layers in the same colour palette as the background piece gives a harmonious feel. The pop of orange on the fruit and flowers brings a little zest to the finished card.
The small foliage flourish that was die cut from the background piece is used to decorate the inside of the card.

Citrus Blooms stampin up watercolour wet wash die cut background card

A fun and easy way to create a watercolour card with no stress at all!


Citrus Blooms stampin up watercolour wet wash die cut background card


Tuesday, 18 June 2024

Tips tricks and techniques Tuesday Citrus Blooms

 Do you ever look at a technique and think hmmm that's a lot for a quick card? Well today's card is a quick version of a fun technique called triple stamping.  It still has impact and looks like it took a lot but using the tools you probably have in your stash already it's a lot quicker 😁! 

Your going to need pattern paper. I'm using the gorgeous Mediterranean Blooms paper that coordinates with the Citrus Blooms stamps. The colours are fresh and zesty.  The patterns are citrus  based on one side and Mediterranean inspired blues and white tile patterns on the reverse. 

Citrus Blooms stampin up Mediterranean Blooms pattern paper


With the paper you'll need coordinating plain cardstock.  I chose a lovely navy blue . You'll also need a set of nesting dies. These can be any shape but you will need there to be 6 dies in the nest. The ones used for today's sample are called Countryside corners dies


Citrus Blooms stampin up Countryside corners dies

Take the 1st, 3rd and 5th dies , working from the outside in. Place these onto a piece of pattern paper measuring 14.4cm x 10cm.  Ensuring that the gaps are equal all the way around each die, cut them out all together. 
Then repeat the process with dies 2, 4 and 6 but on a piece of cardstock measuring 14.4cm x 10cm. 
Now adhere layers 1 and 2 together. Then layers 3 and 4. Next using 3d foam adhere these 2 parts together then adhere the final pattern paper piece to the back using 3d foam as well. Piece 6 of the cardstock is used for the sentiment.
Once all together gather a card base measuring 10.5cm x 29.7cm scored at 14.85cm. Now lay the nested element onto the card and lightly mark where to cut the corners off to replicate the shape. Make sure that there is enough of the folded edge to act as a hinge for the card.
It might sound like it took a while bit I promise you it didn't! 

Citrus Blooms stampin up Countryside corners dies Mediterranean Blooms paper faux triple stamping technique card

When all together with the addition of the 3d foam the layers create an in ward shaped diorama effect.

Citrus Blooms stampin up Countryside corners dies Mediterranean Blooms paper faux triple stamping technique card


The card is quick and effective and requires little to no decorations . Fun , quick and easy.

Citrus Blooms stampin up Countryside corners dies Mediterranean Blooms paper faux triple stamping technique card