Wednesday, 17 January 2024

Watercolour Wednesday Lovely and Sweet

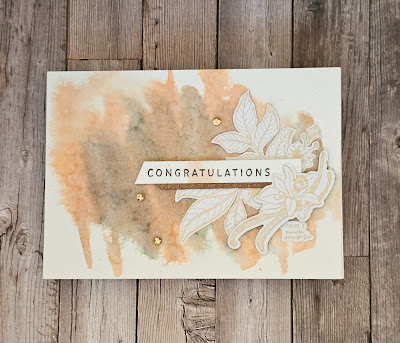
 A quick watercolour project for today's inspiration using the beautiful Lovely and Sweet. The card also shows how versatile the stamps , dies and paper are together.  The beautiful paper that goes with these stamps is called Nature's Sweetness . With it's subtle elegant pallette of white, gold , soft muted grey and a calm shade of brown it's a dream to work with.

Lovely and Sweet stampin up watercolour wash and pattern paper congratulations card

Inspired by the colours in the patter paper I created a watercolour wash onto a piece of watercolour paper. I used the same soft shade of grey and added to it with a soft peachy pink colour.

Lovely and Sweet stampin up watercolour wash and pattern paper congratulations card

The images used on this card are cut from the pattern paper. Some are die cut using the coordinating dies and some are cut by hand. These paper's are just such a great addition to any craft stash.

Lovely and Sweet stampin up watercolour wash and pattern paper congratulations card

A simple and quick way to decorate any card is to add some gems or small elements. The little pops of gold onbl the background of this card come from adding guilding flakes to little cork elements.
A simple sentiment and voila the card came together so easily.
Lovely and Sweet stampin up watercolour wash and pattern paper congratulations card


Tuesday, 16 January 2024

Tips tricks and techniques Tuesday Lovely and Sweet

 And now for something completely different from yesterday's #makeitsimplemonday card! I think this style is called collage 🤔 but I'm not sure. What would you call it ? The stamps used to create the look are from the Lovely and Sweet stamp set which is soo beautiful. 

The card started life as a piece of basic white cardstock and the idea to use a tool that has been reintroduced to the mini catalogue from Stampin'Up! a brayer. Now this tool was one that has a multitude of uses from giving even pressure when stamping a large stamp to applying ink to stamps to direct to paper techniques and more!

When you first ink your brayer up a top tip is to only roll the brayer over the ink pad in one direction.  You want the ink to be all around the cylinder not just in one place on it. The technique used for this card is a simple random direct to paper one.

Start by chosing your ink colour and loading up your brayer. Then run the brayer across the cardstock in random directions with random pressure... have fun with it! This is one technique where there is no right or wrong. Each piece will be different and unique so I suggest using a larger piece of cardstock than you might need . This can then be cut up to create multiple backgrounds to use at a later date 😉

Lovely and sweet stampin up collage card brayer

For this style of card I wanted to create layers of colour so I kept the strokes short and changed direction often. 

Lovely and sweet stampin up collage card brayer

One final top tip for when using a brayer make sure to clean it properly before putting it away! You don't want cross contamination on your ink pads. One way to clean the brayer is to roll it off on scrap paper but that seems a little wasteful. So I suggest you keep creating until there is no colour coming of and place that piece in your to be continued pile. Then run the brayer under clean running water, using a little washing up liquid if so desired, until it is completely clean. Now make sure that the brayer is completely dry before packing away. Taken care of your brayer should last you years and years of happy creating. 

So what did I do with my panel? Well I took the beautiful Lovely and Sweet stamps and used them to add more depth and texturee to the brayered piece. I used tone on tone inking as well as generational stamping with the same ink as the background.  I also used a darker shade of ink that has the same tones.

Next I die cut some sprigs and bits from the coordinating dies in the Lovely and Sweet bundle. I kept the colour palette to the same 2 shades of blue green and white.

Lovely and sweet stampin up collage card brayer

Making sure not to waste a bit of the beautiful background created is a must. So can I recomend decorating the inside of your cards with them?

Lovely and sweet stampin up collage card brayer

I also used some white bakers twine and white matt dots to add further interest to the card front.

Lovely and sweet stampin up collage card brayer

So are you a fan of this style? Have you played with a brayer before? Let me know in the comments 😀

Ohh and do you know what the botanical is that is used for today's inspiration?  Well its vanilla..sweet and lovely 😍 

Monday, 15 January 2024

Make it simple Monday Lovely and Sweet

 Happy Monday to you all and welcome to a week of inspiration with me, Cary,  here at 2 Big Girls Crafting.  This week I'm sharing projects featuring the beautiful Lovely and Sweet stamp set from the new mini catalogue from Stampin' Up!.

Lovely and sweet stampin up simple one layer card

The set has a field journal feel to it with its botanical drawings. The stamps also feature the latin name for each drawing.  Can you tell what they are? I have to say that I knew 2 of the 3 but had to Google the other!
So for the first card of this week it is a simple one layer card that coincidentally features the image I didn't know straight away. 

Lovely and sweet stampin up simple one layer card

I stamped the image on a brown ink called pecan pie. Then coloured it in with my watercolour pencils. I think using the pencils pays homage to the style of drawing the stamp is created in.
A simple sentiment in another shade of brown called early espresso and the card was complete.  

Lovely and sweet stampin up simple one layer card

Did you work out what the image is of? Well if you said sweet almond you'd be correct 😊

Friday, 12 January 2024

Fun Fold Friday - Inspirational Sketches

 Well, here we are again already. The week has gone very quickly once again and again I have had great fun making these cards and sharing them with you. Here is my last one for the week using the Inspirational Sketches stamp set. This is a very simple fun fold in as much as it's 2 pieces of card to make the fun fold of it. Yes, my decoration is slightly different but that is always a matter of choice. 

 
I started with a simple C6 card base in Boho Blue card stock measuring 21cm by 14.85cm high and scored at 14.85cm. Taking the other half of the whole piece of card, I marked on the bottom right edge at 3cm. I turned the card around and did the same on the other side. Then I cut between the 2 marks and folded it in half at 10.5cm and 5.25cm from each end. See below. This piece, once decorated will be on the inside of the card making it very like an easel card.

 
The inner piece once scored.  
 
I decorated the front and inside of this card with 2 different pieces of DSP and with the odd triangular, folded card mat, I added the left hand piece and the right hand piece of it to each of the inside edges. I added more DSP to the 4 shaped panels on the angled mat. I could have added some flowers and birds to this piece but I felt it was enough as it is.

 
I stamped the bird onto a rectangle of white card and coloured it in using my watercolour pencils without any water! Playing around with it I added it to a piece of Boho Blue card after cutting off the corners. I then repeated this with pieces of  Night of Navy card in 0.5cm strips. Piece by piece I added each strip over each edge just to give the frame all around it. To finish this off, I added Rhinestones around the frame. 


I decorated this card using the NEW papers from Stampin' Up! called Flight and Airy Designer Series Paper. These papers are FREE when you place an order from Stampin' Up! for £45 or more. They are stunning papers too. Look at those gorgeous birds and flowers!
 

That's it once again. Thank you for joining me this week, I hope you have found something to inspire you to make some cards this week. Cary will return on Monday and be sharing her creations with you so please pop by and join her here.
 
Until I return, stay well, keep safe but as always

KEEP ON CRAFTING. 

😍😍😍 xxx Gill xxx 😍😍😍