Pages

Sunday, 28 February 2021

Last post of Jan to Feb Sale-A-Bration 2021


Our  last order of Sale-A-Bration is going in this evening so I thought I'd share my favourite from this years offering Darling Donkeys! I've combined them with a sneek peek of a exclusive pattern paper called Butterfly Bijou.

Darling Donkeys Butterfly Bijou


This post is a part of a blog hop so why don't you hop over to the enjoy the inspiration.


Friday, 26 February 2021

Fun Fold Friday - Tasteful Touches

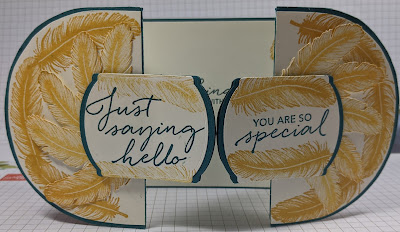
Hello and thank you for stopping by. For my last card this week it has to be a fun fold. Well, Fun fold it is but I added a little extra! I made a C6 sized Gatefold card but I've added extra card to the front on each side to give the circular effect. A standard gatefold is a very simple card to make and this, I guess if I had read the measurements somewhere maybe it would have been easier but I like to push my self out of my comfort zone. I started by making a standard wide Gatefold using Thick Very Vanilla card. I then decided at this point to make it longer. I needed a circle that was the same size as the depth of the card which is 10.5cm or 4,1/8". There are no circular dies that size so I looked around and discovered my Tear n' Tape roll was the right size thankfully. I took a piece of vanilla cardstock which was bigger than I needed it to be. I drew around one side of the circle of the tape on both ends of the card. I then cut it with my snips very carefully and using an emery board, I smoothed the edges. After cutting the mat in half I had 2 half circles but they each had a longer sides to form a stretched out D shape. I needed them to be longer to add them to the card base I had made. It worked as you can see in the first lot of pictures. 

I then took some Pretty Peacock card and repeated these steps again and made an elongated Gatefold card. Using some Very Vanilla card I made all of the mats in the same way as before but single panels and smaller to show off the lovely green of the card. I stamped the feathers and some of the little branches and fussy cut them all out. That's why it took so much longer than it should have done. However, many of you know me and the fact that I love to fussy cut. So it had to be done!

I used the Tasteful Textures, Tasteful Label Dies and the lovely Wrapped Texture dual Embossing Folder. The inks I used were Bumblebee and Pretty Peacock. A very simple colour palette which is what I prefer to do. I hope you like it.

More information on the stamps, dies, folders and anything else you'd like to browse through in my online shop HERE

 The link will open up in a new page so that you don't loose where you were. It will take you initially to the stamp set that I have used this week but by clicking on the Products button, it will allow you to browse around the shop. Please do have a look around as there really is so much to see. 

 
The picture above shows where I added the extra D shaped piece on each side. I attached it with about a 1cm overlap on each piece and below an overhead view with both of the pieces on. 

The picture below shows the whole of the finished card from the front. I added a label on each side to conceal the way the feathers were placed. I also added an extra mat behind the labels and consequently this will need to be posted as a large letter because of the depth with the foam pads or Dimensionals.


I added pieces of the Good Taste designer series double sided papers behind the semicircles.


To add a little more texture to the inside, I used the lovely Wrapped Texture embossing folder. They are a really good deal as you get 2 folders for the price of 1.


Yes as you can see, I fussy cut the leaves and added each one using Tombow multipurpose Glue.
It's brilliant glue!


In this view from above you can see that I used the Black Dimensionals for the darker coloured card. It works really well as if I had used the white ones, they would stand out quite a lot.
Thank you for joining me this week and I hope you have enjoyed looking at my projects and they've possibly inspired you to make some cards for yourself too. 
 
Please take care, stay safe and KEEP ON CRAFTING :))
Gill
Cary will be back on Monday ready to show you her creations.
 Please stop by to see them xxx


Thursday, 25 February 2021

Throwback Thursday - Tasteful Touches

One of the lovely stamps in this set is the feather. I have no idea why I like feathers but I do. I started by stamping the feather over the whit mat using the very soft pink called Petal Pink and the lovely soft grey called Smoky Slate. I then die cut using the coordinating Tasteful Labels dies. I stamped a few more feathers and then fussy cut them. The card base is also Petal Pink and I added a piece of the Smoky Slate card within the aperture that I made. I embossed the grey piece using Tasteful Textiles embossing folder. It just gives it a very subtle effect. I mounted the stamped mat and the feathers using foam pads or Dimensionals. For more information on the stamps and dies, please click HERE

On the inside, I have added the die cut shape and a simple message and a few more of the feathers to complete it. Again, another VERY simple card. 

I know I am always saying that but I honestly mean it as it was very simple.  


Wednesday, 24 February 2021

Watercolour Wednesday - Tasteful Touches

For today's card I started playing with ink scribbled onto a block and spritzed using lots of water to spread it all around. Sounds simple? Yes it is. It's is so simple that my granddaughter Bella has been doing the watercolouring now for about 3 years and she is only 10 years old. This is one of my preferred ways of watercolouring to get a complete piece of card with mixed colours all over. I used only 4 colours for this card and it shows on each flower differently.  For more information on the stamp set please click HERE   the dies or bundle HERE

I started by stamping the leaves onto the card then using a narrow embossing folder called Greenery, I embossed just the one side. I mounted the flowers using the foam pads or Dimensionals then coloured little areas of the flowers with clear Wink Of Stella. I have used some of the lovely white Crinkled Seam Binding, Using the Granny Apple Green stamp n' write marker pen, I coloured the ribbon very easily. The ink is water based so dried on the ribbon very quickly. The amazing thing about Stampin' Up! ribbon, is that they can be coloured to whatever colour you like. Really cool! The white mat was fixed to the green card mat, the now dry, coloured ribbon was added then were fixed onto the white card base. I stamped the message onto a scrap of card then using one of the dies from the coordinating Tasteful Labels dies, cut out the circle. There was a piece of the watercoloured paper left so I die cut another circle out, cut it in half and placed behind the message. 

Another piece of card for the inside and a message and decoration to finish this one off. Yes, this was another very simple watercolour card.


Tuesday, 23 February 2021

Tips, Tricks and Techniques Tuesday - Tasteful Touches

Hello and welcome back. It seems so long since I was last writing on the blog but it's only been a week! Cary excelled herself again last week with her chicks didn't she? She is in a really cutsey mode at the moment and loves all of the really gorgeous sets that Stampin' Up! have. Me, I'm a little more classical in my tastes but I do have the chicks too as well as all of the others she has used so far this year! Well, I do have young children in the family so I have to play too. Don't I? Teehee 😂😂

I apologise for missing yesterday's post. There really is no excuse other than I am so busy with Cary organising our next retreat next month! Lots to do! 

This week I chose to open my catalogue and pick the first stamp set that I opened it at. The stamp set is called Tasteful Touches. It has some amazing papers to go with it called In Good Taste. There are wood effects, tiles, plaster and loads more of different decorating effects. They are great papers. In fact I showed one on a Fun Fold Friday at the beginning of the year. I am in my simple card mode at the moment and want to show the kind of simple projects that can be made by an experienced crafter but more importantly the beginner just going into crafting. 

This one I embossed a white C6 mat using the Tin Tile embossing folder. I think it is ideal for this set of papers as well as fitting in perfectly with the stamps too. Some times there are stamp sets that are especially for ladies and not men but this one is ideal for both. By combining the folder and the papers, this card can be sent to anyone. Yes, you can see I did some fussy cutting. Well it wouldn't be me if I didn't now would it? So by using the gorgeous navy and white card, printed papers  and the stamps. Simple!


Thursday, 18 February 2021

Throwback Thursday Hey Birthday Chick

 Paper pieceing a super way to colour in with out pens or inks! It's also been a staple of my crafting arsonal since I began crafting all those years ago. So when I saw the Hey Birthday Chick stamps I immediately thought I can paper piece these little cuties!

Yes I know it involves fussy cutting but hey once in a while is ok for even the most reluctant fussy cutter 😉 Now I have to agree that the chicks with their spikey edges might at first glance look really difficult but you can chop of the spicky and spindeley, (a real Cary Crafting term ðŸĪŠ)  bits. The reason you can chop them off is because you stamp the image onto your project first then layer the cut out piece onto it. 

A little tip I do have is to take a marker pen, in the same colour that I stamped in, and run it around the cut edges of my paper piece.  This helps to create an almost seamless transition from paper to stamped image. 

I have also created my own coloured sparkle by colouring my clear rhinestones with my alcohol markers.  I love how this allows me to customise my cards.

Hey Birthday Chick easy paper pieceing funky chicken stampin up


The card was inspired by a team member  the lovely Jennie Martin  who keeps chickens and is such a fun and cheerie person. So this card will be winging it's  way to her very soon 😊 ðŸĨðŸĨðŸĨ


Wednesday, 17 February 2021

Watercolour Wednesday Hey Birthday Chick

 Today I'm sharing a soft and gentle card to show that the Hey Chick stamps don't have to be bright and bold.  I also think this card would be a lovely one to send to an  expectant parent or grandparent . 

Many Messages stampin up watercolour card


The sentiment is from a set called Many Messages.  It's one that a think is rather lovely.

For the front of the card I first stamped the chick in stazon ink three times across the long card mat. The reason I used stazon is that I wanted the image not to bleed once I applied water.

I then took 3 coloured water based marker pens, a water spritzer and an acrylic block. First I  scribbled small spots of the markers randomly onto the acrylic block.  Then I spritzed water over the block. How much to spritz is a question of practice so my big tip is practice on scrap cardstock until you're confident of the look you're after.

Now flip your block over onto the stamped image. I chose to use the dame size block that I'd  used to hold my stamp so that it would fit appropriately.  As you watch the cardstock soaks up the ink and water and your acrylic block will become clear and cleam that is when it's time to remove the block.

Easy Watercolour colouring stampin up Hey Birthday Chick

Once I'd coloured all three images I left it to dry and made my card base and sentiment. You can use a heat tool , gently, to dry the piece but it doesn't  take too long honestly.

Once the card was completed I was very happy with the end result a soft and gentle Hey Chick card. 

Easy watercolouring congratulations card stampin up Hey Chick


Tuesday, 16 February 2021

Tips Tricks and Techniques Tuesday Hey chick

 Today I've gone all pop art! Inspired by Andy Warhol and his Marilyn and soup can works I took the idea of bright colours and sets of four of the same image. I thought that this technique would work well with the cool chicks in the Hey Chick and Hey Birthday Chick stamp sets. 

Pop art stampin up ink blending bright colours fun card

I started by masking the white cardstock into 4 panels using sticky notes.  I then used a blending brush and waterbased inks to apply colour to each quadrant.

 To add some more interest on the panels I spritzed them with water and allowed the panels to dry. As the water dries it leave behind a lovely speckled effect that is very pleasing and give texture without depth.

Hey chick hey Birthday Chick blending tequnique water spritzing fun colour card

Next I stamped and die cut 4 of each of the chicks. Then I coloured them. For the large A5 card I coloured all over and for the standard A6 card I just coloured sections. Which way do you prefer?  I can't  decide!!!


Which ever you prefer I hope you'll give this fun technique/ style a go. 😀


Monday, 15 February 2021

Make it simple Monday Hey Birthday Chick

 This week I'm sharing a super cute set of 2 stamp sets and their coordinating dies.  One is called Hey Birthday Chick and the other is Hey Chick.  Now if you've been arpund Stampin' Up! For a few years you might recognise the chicks in these sets! Hey Chick  was a Sale-A-Bration stamp set from 2017 and the designers just couldn't resist returning to them!!! 

So let me introduce you to the gang. First up is this cute little  happy egg .

Hey Birthday Chick  simple stamping stampin up

Then we have the dancing chick.

Simple stamping easy card

Now this chick is the adventurous one.

Hey Birthday Chick  stampin up easy card making

And last but by no means least we have crazy chick!!


Now can you help me?  who's your favourite?  Coz I just can't decide ðŸĪĢðŸĪĢðŸĪĢ

Friday, 12 February 2021

Fun Fold Friday - Meant To Be

 Here we are at Friday already, where has the week gone? It really has gone by very quickly for me possibly because I had my covid vaccine booked in for this afternoon. Now I'm not a coward for needles at the best of times but I guess with all that's been going on in the kitchen and Theo suddenly walking, it completely slipped my mind until my D.I.L. Jemma reminded me yesterday! Oh well! It's all done now, here's hoping it's not too long for everyone else to have their vaccines too.

For my last card for the week, I have decided to make a Kite shaped card. It's a style of card that I have wanted to do for a very long time but have never got around to it. I have used the gorgeous colours of Bermuda Bay for the card base and Coastal Cabana for the Kite.  I also added a few pieces of paper from the Playing with Patterns papers again. I embossed 2 white mats with the Painted Textures embossing folder. It really does give a brilliant finish to the paper. I placed the kite inside the card and some of the die cut and stamped hearts. The card can actually be reversed too. The kite can go outside and the hearts on the inside. Pretty cool I thought. 

If you would like to know more about the stamp set or other products, please click HERE and it will open a new window to our shop. 


That's it from me this week, thank you for stopping by. I hope you've had some ideas about making some cards. Cary will be back on Monday with her creations. Please stop by and see her amazing work.
Until then, please take care, stay safe and KEEP ON CRAFTING.  😍😍😍


Thursday, 11 February 2021

Throwback Thursday - Meant To Be

 Well, have you ever had one of those weeks when you wonder what happened to the days? I have this week! It's been crazy here. My son and daughter in law decided to replace some units in the kitchen. Sounds simple enough, you may say? Yes it would be until Jonathan is involved! They asked for my input as obviously, I live here too. Now please bare in mind that I have designed and fitted a number of kitchens in my life and have a little experience. We talked about the possibilities, complications, doing things half-heartedly and doing them properly. We can't afford to go the whole hog, they said. We'll just have to do what we can afford. Agreed we all were on that statement. Last night I left them to it. Today was the electrician adding some power points and new light switches. This morning came and they greeted me with a cup of tea before he got here. That was it!  Unbeknown to me they had talks last night and are now decided on taking the whole lot out and replacing all of it! Oven, sink, cupboards, a wall, the works!!  

OMG!!! I want to leave home!!!

So I came back into my room and tried to relax. Well, I did, sort of! I went a little over the top on this card as it was going to be quite plain but as you can see it isn't at all plain. The background paper is from the Playing With Patterns designer series paper or double sided papers from Stampin' Up! Don't get me wrong, I am pleased with the outcome but it's far from what was in my head when I started. I will let you decide. Too much or just right?

If you would like to see the products please click HERE and it will open up a new page to our shop. The first page will be the stamp set that I have been using this week.