Thursday, 16 December 2021

Throwback Thursday - Bright Bauble - Special Cards

Hello again on this chilly Thursday. Today the card is fairly straightforward but there's lots of card and paper involved. Using the Detailed Bauble dies, I die cut several of the baubles out in Red Foiled card. I also die cut some large panels in Basic White card from Scalloped Contour Dies and stamped them with the sentiments and stars from the Bright Bauble stamp set. 

I have used the lovely, proper red for Christmas called Real Red. One of my fave colours. I started with an A4 piece of card then scored and folded it in half. I added a further piece of card this time 21cm by 15.85cm. This was scored at 1cm down the 21cm edge, so the panel was now 14.85cm by 21cm. Adding tape to the 1cm folded strip and fixing it to the end of the card, this then gave me another panel the same size as the front and now the centre panel.

 
  I fussy cut around the sentiment on the front of the card and added it to some of the Real Red card and fussy cut again. I adhered the ribbon behind this sentiment to stabilise the bauble.
                                                                                                                                                                                            
 
Once the back panel was added, I scored down the now centre panel at 7.4cm, once it was folded to point into the card, it gave me the v shape in the centre. 

 
Using several panels of Peaceful Place paper (DSP) I added them to the red card after I had added the Real Red Sheer Ribbon to the baubles and the back of the DSP panels.
You may be able to see that the baubles inside are only fixed by the top of the ribbon and left to dangle into the card.

 
I found that I had an abundance of die cut snowflakes so decided to splatter them liberally over the card.
 

If you look at the card from above now, you will see that it gives the shape of the letter M

Wednesday, 15 December 2021

Watercolour Wednesday - Special Cards - Bright Baubles

Today's card is not really a watercolour card. So... I cheated! oops! This time I used a dark blue A5 card base (A4 folded in half), Designer Series Paper (double sided paper) and a shape from the set of dies called Stitched So Sweetly. Bright Baubles stamp set today was used for the stamping and the sentiments the rest is all the beautiful DSP of Peaceful Place. These black, grey and white papers have silver embellishments all over one side of each sheet.

This time, I measured half way down the length of the centre fold which is 21cm and marked it at 10.5cm and then cut down to the 10.5cm mark. I turned it around and cut straight through to take the top of the front panel off. Then it was just a case of choosing and using the papers for the card. The panel that I removed from the top of the card is in use with a piece of DSP. One of the papers has been split into 4 of the same images and this is one of them. Once again, if you were lucky enough to buy some of the papers before now, then you've been lucky. They are now sold out! I had great fun adding all of the paper to this card and I know that I've probably gone overboard but I honestly don't care. I know exactly who this card is for this Christmas too!


 The small decorative panel at the bottom on the front is the rest from the square of dsp


Tuesday, 14 December 2021

Tips, Tricks, Techniques Tuesday - Special cards

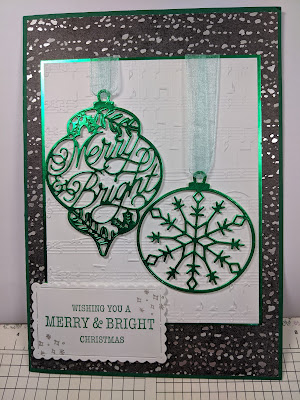
 Hello and thank you for joining me again. I'm so sorry for not being able to show you any cards yesterday but as Cary explained, the dentist treatment I went through was rather bad! I will be ok as it was only the dentist  but when you are left with bruises... It makes you wonder why we go to them! 😬 Anyway, this week I will be cheating a little as these were cards that I made for our recent C5 all day class. I used the stamp set called Bright Baubles along with the matching dies which are called Delicate Baubles. A really lovely set of baubles they are too. 

Now as I said all of the cards are twice the size of the normal sizes that we do and these will be going to my special friends and family members. My first card is very straightforward. I folded a piece of A4 card in half to give my C5 cards base. I then cut a piece of the dark grey paper from the Peaceful Place, Designer Series Papers. The one side of all the papers have a silver effect on them. They are stunning. No colours, just black, white, grey and silver. Perfect. 

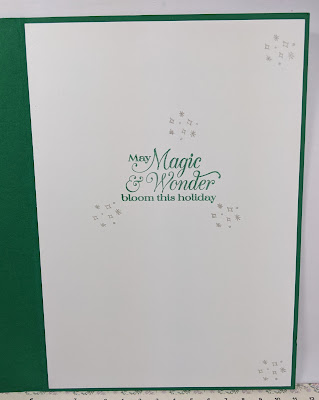
I cut a mat of green foiled card and embossed a piece of white card with the Merry Melody embossing folder. I matted the foil and white card together and die cut some of the baubles out too. I threaded some of the Pool Party Sheer ribbon through the holes at the top and then added a few small pieces of double sided foam (Dimensionals) behind the baubles Before the ribbons were fixed behind the white and green mats.


Monday, 13 December 2021

Make it simple Monday

 There is no project to share with you today from Gill sadly.  Gill had to have dental surgery on Friday. She is at home recovering well but hasn't been able to get to her desk to create a project for today. She hopes to get to her desk today and fingers crossed will have one of her creations to share here tomorrow. 

Please join Cary for her weekly Facebook live over on the 2 Big Girls Crafting page at 4pm GMT as usual. 

Friday, 10 December 2021

Fun fold Friday In the Moment

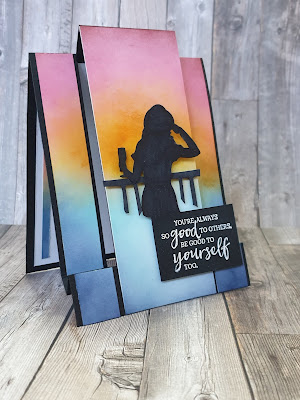
 This week has not only been about the gorgeous In the Moment stamp set it has also I've  noticed been all about the backgrounds!! So as not to spoil the run this last project foe the week had to have have both of course 😉

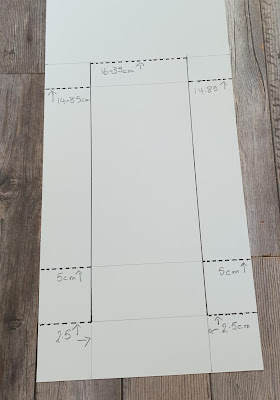
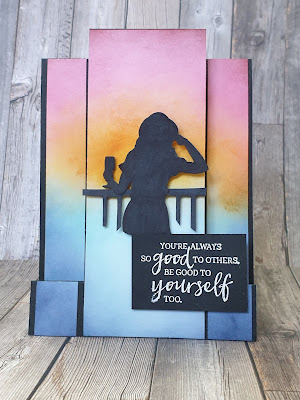
Friday's  of course mean a fun fold so after lots of thought I went with one called a center stepper card. There are many tutorials and templates for these style cards on the internet. For those who want my version below is a hand drawn template. 

In the moment stampin up center stepper silhouette card

I started with a piece of cardstock measuring 10.5cm x 29.7cm. I then drew lightly in pencil at 2.5cm, 5cm,  14.85cm and 16.35cm along the long side. I then drew at 2.5cm and 8cm upto the 16.35cm line. 

Next I scored all the dotted lines in the photo. I  then cut the solid lines in the photo. To fold the card start at the 2.5cm score lines. They are a mountain fold. The 5cm lines are valley folds and the final 2 score lines are both mountain  folds.

To decorate  my card I cut a piece of white cardstock measuring 10.5cm x 16.35cm. I then used my inks and blending brushes to create a sunset blended background. 

I then cut the panel to fit the card base. Next I stamped the image from the In the Moment stamp set in black ink onto white cardstock.  I then used my black alcohol marker to colour it all in. Next somee fussy cutting to create the silhouette.  I then went  over the image with my black marker again.  I also coloured all the cut edges. 

In the moment stampin up center stepper silhouette card

I stamped the sentiment from the In the Moment set in versamark and heat embossed it in white on black cardstock.  Remembering to use my antistatic bag to ensure that the powder only stayed on the ink!. 

To attatch both the silhouette image and the sentiment I used the fantastic  black 3d foam from Stampin' Up! . This ensures that when turned to the side there is no white area staring out  from the dark background. 

In the moment stampin up center stepper silhouette card

The only white you can see is the panel I placed inside the card to write a message on!

In the moment stampin up center stepper silhouette card


Well that's it from me this week. I do hope I've inspired you to get creative and have fun playing with stamps, ink and paper.

Next week Gill will be sharing her inspiration with us here on our blog as well as over on our Facebook page here. 

If you're interested in any of the products I've used this week they can be found in our on line shop here

If you'd like to join our wonderful community of Stampin' Up! demo's called Larger Than Life Stampers you can do so here.

Have a crafty weekend and remember..

Have fun!!

Cary xx

Thursday, 9 December 2021

Throwback Thursday In the Moment

 For today's Throwback Thursday project I'm  using a colour that hasn't seen a lot of live from me recently.  This beautiful shade of deep redy purple is just gorgeous.  Called rich razzleberry it give any project a certain class with its elegance. I decided to go the whole hog and keep it monochromatic,  using just the rich raz and white. Combining it with the fab In the Moment stamp set and inspired by a project I saw a fellow crafter called Jackie Bultje shared Im really happy with the end result.

First I stamped tone on tone . I used rich raz cardstock and ink and stamped the lady reading snuggled up with her pooch. I stamped randomly to give the plain cardstock some interest.

In the moment stampin up monochromatic card


I then die cut a rectangle and stamped the image into one corner. I then took my water painter and coloured the image usingvthe rich raz ink. I didn't colour it all in as that would be a little too much. I  also lightened the colour by using plent of water.

Next I wanted to add a sentiment but not all of it. So I masked off the parts I didn't wantbto use with sticky notes befor inking it up. Once inked I removed the sticky notes and stamped it on to the white mat.

I used 3d foam to give the mat extra hight and placed it at an angle onto my rich raz mat. I then adhered this to my card base.

A few of the gorgeous iridescent rhinestones and a small knot of glittery ribbon and my project was complete.

In the moment stampin up simple monochromatic card

I love how warm and cosy this card came out. The colour is rich and elegant but with the twinkle and sparkle it has such a feminine feel.

I hope you like it as much as I do.

In the moment stampin up simple monochromatic colour card


Wednesday, 8 December 2021

Watercolour Wednesday In the Moment

 And now for something a little bit different.... After a very subtle colour palette for the start of the week I'm  going bold for middle!! Todays inspiration is also a little different as I've  made 3 note books as well as a card all using the In the Moment stamp set.

The projects started life as some rather wet and messy watercolour playtime. I used fluid 100 watercolour paper, lots of water and 3 coloured ink pads.

I spritzed the watercolour paper with plenty of water then dabbed the ink pads along one edge . Then I spritzed the ink areas with more water to make puddles of colour. 

I took my heat tool and dried the paper before doing the same again. This time the puddles ran down the paper and created a lyered effect which is really rather pleasing. 

Watercolour puddles backgrounds

The colours I've used are a bright green called granny apple green,  a bold orange called mango melody and an almost neon pink called magenta madness. I love how the colours have blended together at some points. How the different layers of colour show through.

Watercolour puddles technique

I loved the backgrounds so much I really didn't want to cut them up to much. So I thought I'd cover a note book or 3!

The first is an A5 sketch book. I've  chosen to use basic black to really make the colours pop. The sentiment is from the In the Moment stamp set and the stars are from a set called Stitched Stars dies. The cute hexagon matte dots are super cool.

Watercolour puddle decorated notebook

The frayed  white ribbon is from the upcoming January to June mini catalogue.  It can also be cut down as it's  quite wide which is what I've done for one of the smaller note pads.

Watercolour puddle covered notebook

I stamped the sentiment ditectly onto the background for this notebook.  To ensure it was crisp I used a Stamparatus.  This is a stamp positioning tool that is invaluable when stamping onto a textured surface such as watercolour paper. 

For my next notebook I used a die cut and a simple sentiment stamped in black onto white cardstock. 

Watercolour puddles technique covered notebook

I just love these bright and bold projects. When I saw the strips of background paper that I'd  trimmed off to make the notebooks they just cried out use me!! So I did!

 I made a coordinating card using the scraps and a fabulous new 3d embossing fold . The folder is one of two in a duo pack called splashes and stripes. I love them both but just used the stupes one.

Watercolour puddles technique bright and bold card

Wow that was a lot of projects for one day but boy did I have fun making them! I'm sure there must be a proper name for the watercolour technique that I've  used but I'm  callingbit watercolour puddles because the child within me still loves to jump in puddles and a bright colourful one would be heavenly 😀 

I hope you like them as much as I do and will maybe have a play at creating your own!

Watercolour puddles technique covered notebooks and card