Showing posts with label #peacefulplacedsp. Show all posts

Friday, 17 December 2021

Fun Fold Friday - Bright Baubles - Special Cards

 Hello again on this cool and chilly morning! Ooo! It really is nippy out there today! I'm glad I don't have to go out! For my last class using the Bright Baubles stamp set, today I am showing the 1st card that I made for the all-day class. It is a little fiddly, so it's not for the faint-hearted but it's really well worth it. This is an easel card so a fairly simple one until you see that I have cut out the centres of two panels.

The best way to start this is by folding a piece of A4 in half and burnish the folds really well. The add it to the trimmer and gut the centre at 3 cm all around the 4 edges. This now gives me a folded frame in Pool Party card. Then adding a piece of card 15.85cm by 21cm. I scored 1cm down the full length and using tape, I fixed the 1cm strip under one side of the gutted frame of the card. This is now 3 panels wide so quite a large card base.  Obviously, as I've removed a large part from the centre of the card, I needed to stabilise it a little to give it a bit more strength.  To do this I used some of the Green foiled card.


I cut some pieces of green foiled card 14.4cm by 20.5cm and gutted them both 2.5cm from each edge. I now have 4 separate frames. 2 in Pool Party of the card and 2 in the green foil. I decided to emboss the foiled frames using the Wintry embossing folders. I used the pine tree one from the twin pack. I love the texture it's added to the card.   


Onto the decorating now. I stamped a bauble twice using a Memento Tuxedo Black ink pad and coloured the images in identically using my Stampin' Blends before glueing them together using Tombow multipurpose glue, adding a piece of Baker's Twine into the centres first. I die cut a 'JOY' bauble from both sides of the foil. This ensures that you will get a mirror image of the dies. I added some Baker's Twine to the inner parts and glued them together using Tombow again. Once they were both dry and able to be moved, I added them to the centre, top fold and secured them using some tape where the foiled panels are going to go.


Now onto the solid panel of card. I added one of my most favourites in the pack of DSP Peaceful Place papers. This simple white and silver design is, in my mind, simply stunning. I stamped a sentiment onto Basic White card in the Shaded Spruce Ink and mounted it onto a piece of green foiled card then placed it about 4 - 5 cm from the front edge of the card using foam shapes (Dimensionals) to enable the front mat to stand up. I had lots of die cut white snowflakes and added them around the card to highlight it.

I haven't done it yet but I will be adding a white panel to the base to write my message on. There's not really much space to add it unless I write all over my favourite paper!

That's it from me for another week. Once again, I am so sorry that I missed Monday's post. 

I hope that you are now nearly ready for the Christmas holidays and ready to spend some quality time with your friends and loved ones. If you can, please remember those of your neighbours who are on their own. Try to pop in and see them and give them some cheer.

Cary will be back next Monday, (I don't think she has any dental appointments)! Until I return on 27th December, I hope that you all have the most wonderful Christmas time and manage to get to spend some time with family and friends. 

Whatever you are going to do please 

xxxxx    STAY SAFE, BE WELL and KEEP ON CRAFTING.    xxxxx

Happy Christmas and have a wonderful New Year 

Gill xxx 😍😍😍

Thursday, 16 December 2021

Throwback Thursday - Bright Bauble - Special Cards

Hello again on this chilly Thursday. Today the card is fairly straightforward but there's lots of card and paper involved. Using the Detailed Bauble dies, I die cut several of the baubles out in Red Foiled card. I also die cut some large panels in Basic White card from Scalloped Contour Dies and stamped them with the sentiments and stars from the Bright Bauble stamp set. 

I have used the lovely, proper red for Christmas called Real Red. One of my fave colours. I started with an A4 piece of card then scored and folded it in half. I added a further piece of card this time 21cm by 15.85cm. This was scored at 1cm down the 21cm edge, so the panel was now 14.85cm by 21cm. Adding tape to the 1cm folded strip and fixing it to the end of the card, this then gave me another panel the same size as the front and now the centre panel.

 
  I fussy cut around the sentiment on the front of the card and added it to some of the Real Red card and fussy cut again. I adhered the ribbon behind this sentiment to stabilise the bauble.
                                                                                                                                                                                            
 
Once the back panel was added, I scored down the now centre panel at 7.4cm, once it was folded to point into the card, it gave me the v shape in the centre. 

 
Using several panels of Peaceful Place paper (DSP) I added them to the red card after I had added the Real Red Sheer Ribbon to the baubles and the back of the DSP panels.
You may be able to see that the baubles inside are only fixed by the top of the ribbon and left to dangle into the card.

 
I found that I had an abundance of die cut snowflakes so decided to splatter them liberally over the card.
 

If you look at the card from above now, you will see that it gives the shape of the letter M

Wednesday, 15 December 2021

Watercolour Wednesday - Special Cards - Bright Baubles

Today's card is not really a watercolour card. So... I cheated! oops! This time I used a dark blue A5 card base (A4 folded in half), Designer Series Paper (double sided paper) and a shape from the set of dies called Stitched So Sweetly. Bright Baubles stamp set today was used for the stamping and the sentiments the rest is all the beautiful DSP of Peaceful Place. These black, grey and white papers have silver embellishments all over one side of each sheet.

This time, I measured half way down the length of the centre fold which is 21cm and marked it at 10.5cm and then cut down to the 10.5cm mark. I turned it around and cut straight through to take the top of the front panel off. Then it was just a case of choosing and using the papers for the card. The panel that I removed from the top of the card is in use with a piece of DSP. One of the papers has been split into 4 of the same images and this is one of them. Once again, if you were lucky enough to buy some of the papers before now, then you've been lucky. They are now sold out! I had great fun adding all of the paper to this card and I know that I've probably gone overboard but I honestly don't care. I know exactly who this card is for this Christmas too!


 The small decorative panel at the bottom on the front is the rest from the square of dsp


Tuesday, 14 December 2021

Tips, Tricks, Techniques Tuesday - Special cards

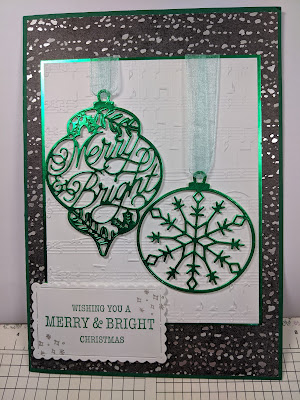
 Hello and thank you for joining me again. I'm so sorry for not being able to show you any cards yesterday but as Cary explained, the dentist treatment I went through was rather bad! I will be ok as it was only the dentist  but when you are left with bruises... It makes you wonder why we go to them! 😬 Anyway, this week I will be cheating a little as these were cards that I made for our recent C5 all day class. I used the stamp set called Bright Baubles along with the matching dies which are called Delicate Baubles. A really lovely set of baubles they are too. 

Now as I said all of the cards are twice the size of the normal sizes that we do and these will be going to my special friends and family members. My first card is very straightforward. I folded a piece of A4 card in half to give my C5 cards base. I then cut a piece of the dark grey paper from the Peaceful Place, Designer Series Papers. The one side of all the papers have a silver effect on them. They are stunning. No colours, just black, white, grey and silver. Perfect. 

I cut a mat of green foiled card and embossed a piece of white card with the Merry Melody embossing folder. I matted the foil and white card together and die cut some of the baubles out too. I threaded some of the Pool Party Sheer ribbon through the holes at the top and then added a few small pieces of double sided foam (Dimensionals) behind the baubles Before the ribbons were fixed behind the white and green mats.


Thursday, 7 October 2021

Throwback Thursday - Peaceful Deer

Today's card is another of the technique type of card that I always love to make. Using Peaceful Deer stamp set, I have matted and layered this card once or twice! I started with a Deep Gray card base called Basic Gray then added a soft, silvery grey in the Smoky Slate. On top of that, I added the gorgeous piece of Double Sided Paper or Designer Series Paper from Stampin' Up! The papers are called Peaceful Place. They are all shades of grey, black and white and on one of the sides are silver foiled patterns and designs. They are simply stunning. Well worth buying. Please click HERE for the link to see these stunning papers.

Then I started with the deer. I stamped several of them using the Memento Ink pad and coloured them in using the Ivory Stampin' Blends. I also added a strip of the gorgeous sparkly silver mesh ribbon. 

The disc for the message is made up of 2 silver foiled circles and 2 smoky slate circles. It was fun trying to get them all in different sizes but I managed it!