Showing posts with label #. Show all posts

Tuesday, 6 August 2024

Tips, Tricks and Techniques Tuesday - In My Heart

 For today's card using the In My Heart stamp set, I have gone blue. Afternoon Azure blue to be precise. It is such a vibrant blue, I love it. I added a piece of the blue card to the front of a white card base and then cut off the corners of a sheet of Designer Series Paper. I used the lovely Brights DSP and only 2 pieces of the Afternoon Azure. I place the corners in different directions and adhered them onto the blue card then having cut up several white strips of 0.5cm card, I added them to the edges of the shapes. I believe that this is called a fractured card as it  is in lots of pieces. Though I may well be wrong!!

I measured the centre that was left and found a square die from the Stylish Shapes dies and die cut one out. I then cut it down along one side to make it into a rectangle. It's very easy as you just add the die over the shape and trim off the part you don't need. Once that was done I repeated the same with a piece of white card for the image to be stamped onto. I stamped the little boy reading and then using my Stampin' Blends, coloured him in. I attached them both together using Dimensionals and placed them onto the card base. I then went on to adding some 0.5cm strips of the Azure Afternoon card next to the white strips to complete it. 


Tuesday, 28 May 2024

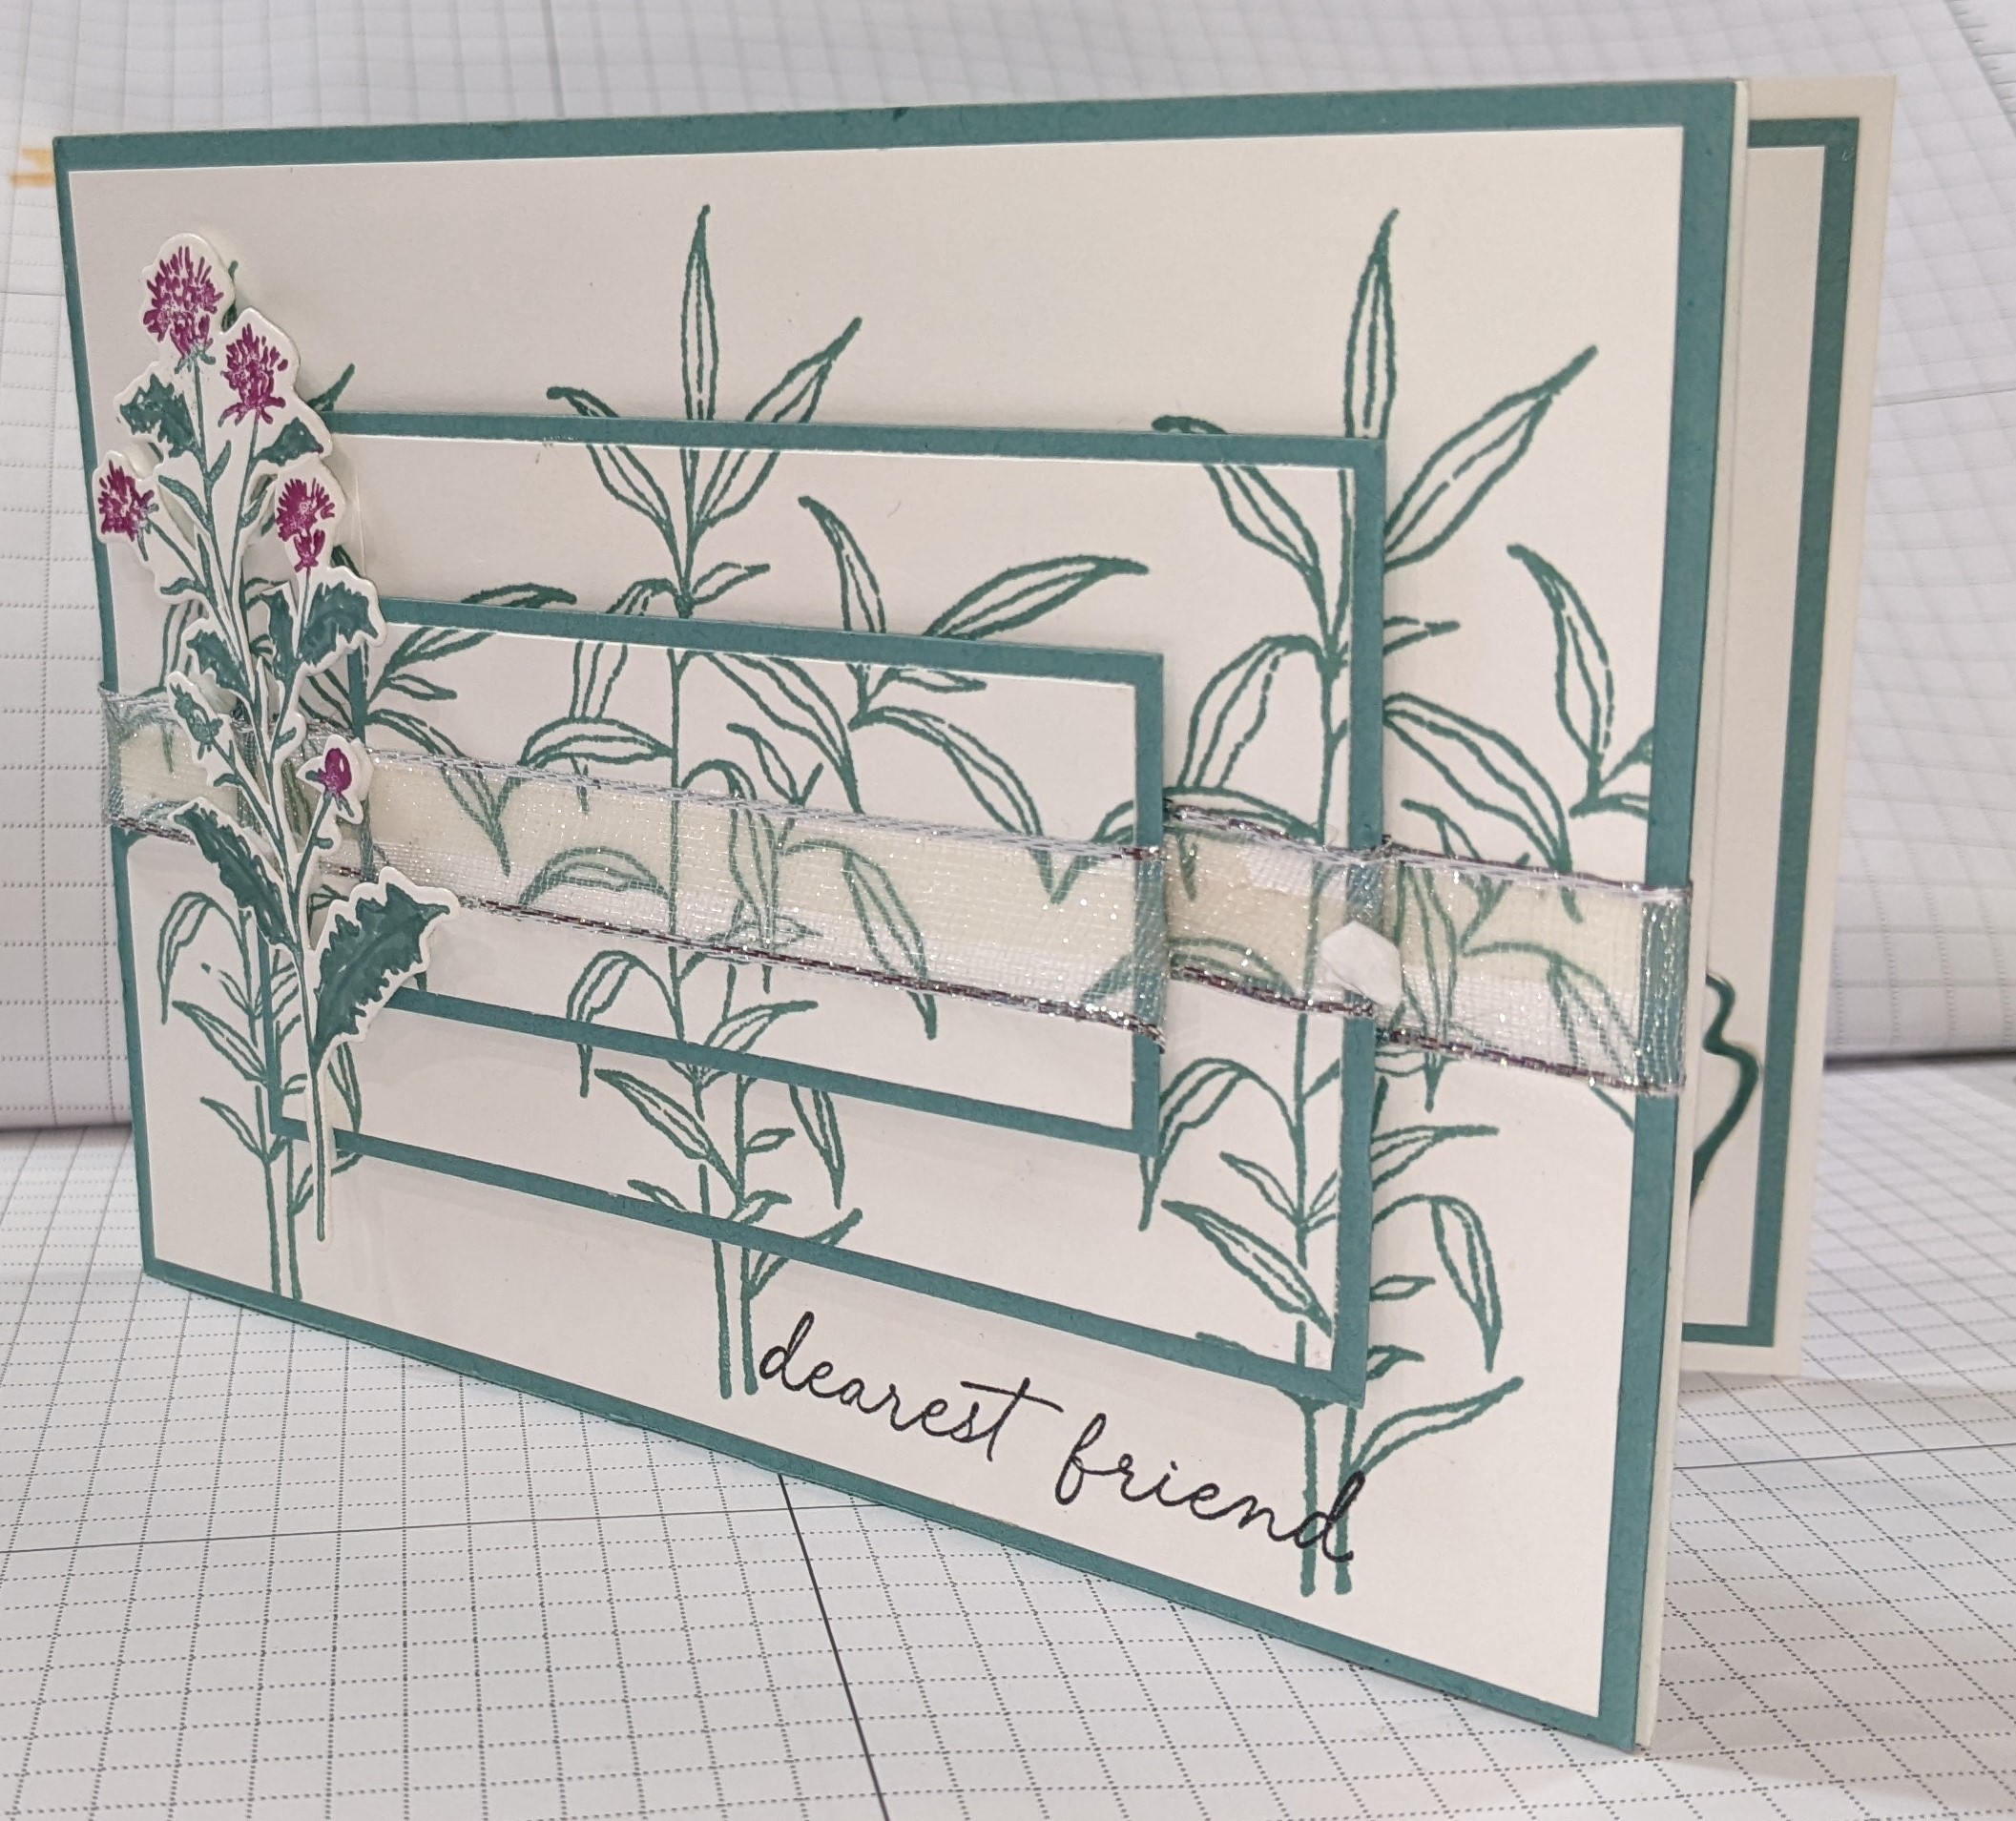
Tips tricks and techniques Thoughtful Wishes

Hello and thank you for joining me today. I must apologise for missing the blog out yesterday. It was my son's 30th birthday and I haven't seen him since the middle of last year so it was important to see him and like a twit I forgot to make a card for the blog! Today though, I have not forgotten. This week I will be using the lovely Thoughtful Wishes stamp set and dies. My card is a very simple one by stamping the image onto a piece of card 10.0 cm by 14.4cm I stamped the large leaves 3 times. Then I chopped it up. I started with a 2 cm border and once the outer edge was cut I trimmed again at 1.5cm that left me with a small rectangle for the centre. I matted each rectangle onto a piece of gorgeous greenish blue of Lost Lagoon. I then added a piece of retired ribbon in white going across the centre of the 3 pieces and then once they were all ready, I added dimensionals (double sided foam shapes) to the back of each piece. It was then a case of adding each layer to the card base and matching the pattern that I had stamped onto the white. I stamped a sentiment at the bottom and stamped and diecut a flower from the stamps and dies to complete it.


Thursday, 22 February 2024

This or That throwback Thursday. Thursday's gone by

 Hello, as many of you know ... cos we've mentioned it so much... we have our retreat this weekend and Cary and I are up to our eyeballs getting ready. So apologies from me as today's post is this and that from a little while ago. I will start with one of my fave's of long ago. Well, not that long ago as it was on 12th of January 2023. I love this set so much that I still use it. it is called Dainty Delight. 

Using the Dainty Delight stamp set, I stamped the largest image and coloured it in using my Stampin' Blends, alcohol Marker pens. I picked a piece of the Silver foiled papers and embossed it using the Twigs and Sprigs gorgeous embossing folder. Sadly the folder has now retired but as always why stop using it just because it has retired? The detail on it is stunning! I adhered that to a piece of the Granny Apple Green mat and then to a White Card base. The stamped image was then cut down and adhered to another piece of the green and mounted onto the card using Dimensionals, 3D foam shapes. A simple message and the 2 mats on the inisde and this one was finished. 

THIS

 The next one is this weeks THAT card, this gorgeous blue flower,  was posted on 23rd of March 2023. We really did have some beautiful stamp sets last year too didn't we?

The gorgeous new stamp set and dies etc are called Irresistible Blooms. The images are beautiful and added to the dies too, they just go so much further.  My THAT card today is an all white based card and added a white mat with a piece of DSP from the Fitting Florets papers which have also retired. Just this simple strip of DSP adds a lovely hue through the card. I used one of the dies from the set which literally die cut the stripe going through the card. What a difference! 

Fortunately, both stamp sets are still current in the catalogue too so if you like it as much as I do and don't yet have it....now's the time to treat yourself.

So simple but I think so elegant. What do you think?

THAT


Please do let us know which is your prefered card again.

Thursday, 25 January 2024

This or That Thursday - Sale-a-bration - Flight and Airy DSP

 Hello again. As it's Thursday I have, of course, 2 cards for you. For these cards I have used some more of the gorgeous Flight and Airy DSP again. I coordinated it with the Heartfelt Hellos stamp set once more. Either of the 2 products are available for FREE when you place an order worth £45 or more. In fact for every £45 you spend on products you get another Saleabration, so, £90, £135 etc etc. This time it's all about colour. I used a coloured card base. 

THIS card is in Lost Lagoon card stock and the birds on the DSP the patterned paper is the reverse of the front ones. I used the Nested Essentials dies for this one and I only fussy cut out the one bird which is on the inside of the card.


For my THAT card I used the gorgeous In Colour Boho Blue card stock for the card base and inkpad. I started by taking a strip of the DSP which happens to go in a line going across the page. I then sort of fussy cut around, very slighlty, around the birds and branches until I had a shape that fitted onto the page. I used a scrap piece of the DSP and using the Deckled Circles I die cut out a half circle by placing the die across only a folded half of the DSP. When it was unfolded, I had a wiggly oval which was perfect for the birds to go onto. The pink DSP behind the blue is Bubble Bath and is the reverse of the birds that I used on the front.  Using a mask, I stamped 3 little birds for inside to complete this one. This little bird many of you will recognise as coming from Happy Hedgehogs.


Wednesday, 20 September 2023

Watercolour Wednesday - Designer Series Paper - Happy Labels

 Today's card is a bit of a cheat to be honest! I took a White card mat, stamped an acrylic block onto Pretty Peacock ink pad and added some water to it. Once mixed up, I sprawled the watercoloured ink over the centre of the mat. I didn't delicately brush it on, I just swirled it over the mat and left it to dry. Once dry, I dry embossed it using the striped mat from the Stripes and Splatters set of 2 folders. I then used a silver marker pen that I had and ran it along the stripes of the embossed mat. It gives it a little sparkle.

I added the mat to a Pretty Peacock card base along with some scraps of DSP from the Delightfully Eclectic, large pack of papers. A few of the scrap flowers from another set of dies and the sentiments from Happy Labels stamp set completes this one. I love the special sentiment on the inside of this one...I just want to hug you... isn't that just gorgeous?


Friday, 24 March 2023

Fun Fold Friday - Irresistible Blooms

 Hello again and thank you for stopping by. Today's post using the Irresistible Blooms stamp set and matching dies I have made a really fun fold. Now it looks very difficult and that's the response that I got from everyone in a class a few weeks ago. They were so surprised how quickly they made it and accepted that it was so much easier than they first thought!

Using a piece of A4 card, I cut it at 14.85cm in portrait so, once cut, that made it 14.85cm high by 29.7cm wide. I turned it to the landscape position and scored it from each end at 9.9cm. Now you have a piece of card that has 3 equal sized panels side by side. Using the piece of card that I removed, I cut it into 2 long strips each approximately 3cm wide. These 2 pieces were then cut into 4 lengths of 10.5cm. I scored each of those 0.5cm from each end and in half too. These centre of the 4 pieces were placed over the right hand fold and the 0.5cm folds at each end I added adhesive tape and sealed them to the card base. I placed the top and bottom pieces first and then laying the other 2 in the gap, I spaced them out and then adhered them too. That was the basic cutting and scoring of the card.  

Now to decorate. I used some of the beautiful papers that coordinate with the stamp set and dies called Hello Irresistible papers. I know that I say this every-time but they honestly are! I cut a piece of DSP 10cm by 14.4cm for the front and 2 strips for the inside 4.8cm by 14.4cm. I did add some DSP strips behind this one as I rather like the papers showing in the background. I added some fussy cut flowers and leaves from another piece of the DSP and I stamped a few sentiments and adhered them to the card base to complete it. I added a Petal Pink mat to the back of the card for writing on and used Memento ink pad for the stamping.


I hasten to add that the card was not my design, I found it on Pinterest. It was made by thestampinninja.com by Melissa Seplowitz. It is beautiful design so I must say a huge thank you to Melissa for her beautiful design. The card that I made for the class a few weeks ago is below.


I made a one sheet wonder design using the Nature's Prints stamp set and then chopped it up. 
Thank you so much for joining me once I got here eventually this week.
Cary will be back to share her designs on Monday so please stop by. 
 
Until I return, please take care, stay safe and well but as always.....
 

KEEP ON CRAFTING!! 

Bye Bye. 
xxx 😍 Gill 😍 xxx


Tuesday, 7 March 2023

Technique Tuesday - Love Cats

 Todays card is a simple one. All I have done is matted and layered the mats on the card. Something so simple but I rather like the simplicity of the effect it gives. Using the Love Cats stamp set, I stamped the image of the catonto a mat of white card. I then stamped another and fussy-cut it out and layered it over the top of the stamped image. It was then just a case of adding mat after mat until I got the required effect. I repeated the same with the sentiment. They were both adhered to Gray Granite card stock.


Friday, 27 January 2023

Fun Fold Friday - Happiness Abounds

 Hello again, thank you for joining me again today. Today's fun fold is a simple folded card plus a slightly smaller one. I started with a regular sized C6 card mat and took some of the paper from the Hues of Happiness DSP then added it to the front of the card. Once that was on, I took another card mat and trimmed it down to 14.4cm high by 20cm wide than scored it at 5cm and10cm. I adhered it to the card so that it opened the opposite way to the card base with the fold folding outwards. Using the Happiness Abounds stamp set, I stamped several of the flowers on the inside of the card base in Smoky Slate ink. I prefer to use the lighter ink now as it's not so pronounced as black ink.


I then took my largest stitched circle and die cut from the centre top of the card front. As I hadn't glued all over the inside of the DSP, I was able to have the 2 circles cut out for me. All I needed was the White circle. I then stamped the sentiment on the inside middle of the card before adding some flowers from the papers and then colouring in the stamped flowers using my Blends pens. I used Daffodil Delight in light and dark and also Granny Apple Green light pen.


The fussy cut flowers were slightly curled with a ball tool and I added 2 rows of dimensionals in the centre of each flower to make it stand out.

Well, that's it from me this week. Thank you for stopping by and seeing what I have made. I do hope that you've found some inspiration to make your own cards.

Cary will be back on Monday so please stop by to see what she has been making. Until I come back, please stay safe, keep well but as always...

KEEP ON CRAFTING

😍😍xxx😍😍

Gillxx

Tuesday, 10 January 2023

Technique Tuesday - Dainty Delight

 Hello and thank you for stopping by. I have changed tack on what I was using for this week as I had forgotten that Cary used the Beautifully Happy stamp set a few weeks ago. I really paid attention didn't I Anyway I am now for the rest of this week, going to use the gorgeous Dainty Delight stamp set.

 Today's card is lovely and bright then cut into 4 pieces. I stamped several of the flowers from the stamp set using Versamark and added them to a white mat. I used White embossing powder and heat set them before I started to blend several different colours across the sheet. I cut it into 2 strips then each one into 2 more pieces. That was it. From there I added the pieces to another mat in a different order to before and then adhered them onto a Granny Apple Green card base.