Wednesday 31 August 2016

Night of Navy

The card here today was one that I made for the recent all day class.  
I have used the most BEAUTIFUL paperss, Floral Boutique Designer Series Paper. 
12 double sided sheets of 12" by 12" papers with 2 of each design for only £10.00 

 The lovely Phrases are from Thoughtful Branches stamp set.

This looks like a basic shaped card...Until you open it!

Tuesday 30 August 2016

Night of Navy

For today's card I've used the Birthday Blooms stamp set.
The flower was heat embossed in White onto Cardstock Vellum then, using a dauber I coloured in with Whisper White Craft Ink and Pear Pizazz ink pads. 
  
Cut and layered it over a piece of Night of Navy DSP Stack.
48 sheets of 12" by  12" double sided paper for only £20.
  BARGAIN! 
I finished off with a few strips of Melon Mambo 1/8" ribbon.


Monday 29 August 2016

Weekly Inspiration

Night of Navy

This week I have had fun playing with one of my favourite colours from the Stampin' Up! Regals range...Night of Navy. Love it!
 
These 2 cards were made using the Traveler and Sprinkles of Life stamp sets, Night of Navy and Whisper White cardstock. Unfortunately the ribbon is now retired!
The background is made using Bubble Wrap which was cut into strips, inked with Smoky Slate and placed over the card with a little pressure from an acrylic block. 
I really like the way that it gives an irregular impression.


Sunday 28 August 2016

All Day Class

20th August

This month we held another All Day class. 
These are some of the amazing projects the ladies made.
Very well done ladies.


I love the way that everyone puts there own ideas into the porjects and makes them so individual.
JUST PERFECT ladies.

The Wedding

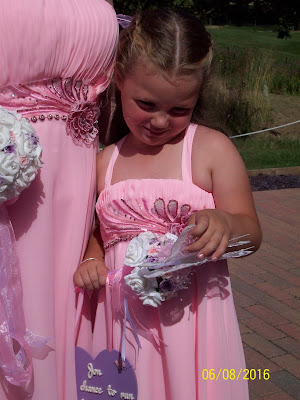
For the last few months, I have been helping with my son and now daughter in law's wedding.
As you may have read also that Cary has been covering me
for the last few weeks before the wedding.
Here are some of the photos to show how wonderful the whole day was.

Jonathan and Jemma Moore
 As you can see the weather was absolutely perfect in every way.

 My beautiful grand-daughter Olivia above
and below, is my new gorgeous grand-children Jayden (with Grand-dad) and Bella. 
Both a little overwhelmed. They soon relaxed and were playing with friends.

  My two boys Kai and Jonathan before the wedding and below
me with my best friend from our school days and the children's Godmother Kate.
Friends forever!  
Thank you for popping by. 
Gill

Friday 26 August 2016

Perpetual Calendar

Calendars

With a name like Perpetual Calendar, we have to show a calendar.
I have made this version from one that I was given by another Stampin' Up! demonstrator
in November 2015. I am only sorry that I can't remember who it is to give them the credit.


 As you will see by the pictures, I really do use my calendar.

The current month is in the holder and the other months are laid behind it on the cover.
6 pieces of double sided designs as shown below using all of the stamps.


I WILL be making another for next year too.
I do hope that you have been given some inspiration this week.
Please pop by regularly to see what else 2 Big Girls Crafting comes up with.
Thank you,
Gill

Thursday 25 August 2016

Perpetual Calendar

Butterflies

Today, I've gone Butterfly barmy!
The little set of the butterflies are really lovely and so delicate.

 I

I have added a few die-cuts of butterflies to follow the little ones.
I inked the butterflies in So Saffron then 'kissed' the edges with Calypso Coral ink and stamped 
onto the Whisper White mat.  
The mat was then embossed with Petal Burst Textured Impressions Embossing Folder.
I stamped a small piece of cardstock with the little butterflies in So Saffron and Calypso Coral.
Using daubers, I added Pear Pizazz then Soft Sky. 
Die-cut the large butterflies using Bold Butterflies and Butterflies thinlits. 
Butterflies, in my opinion, cry out for rhinestones!

 O

The message is from Over The Rainbow stamp set.
Using the names of the months stamps from Perpetual Calendar, I stamped and trimmed them to make
the small collection of the 'Sunshine' months when butterflies are around.
Just a little fun!

Wednesday 24 August 2016

Perpetual Calendar


This card I was inspired by a beautiful card that Cary made for the all day class we held this weekend.
Die cut tree and leaves from the Beautiful Branches Framelets and using a dauber, I added different colours over white to get the autumnal shades.
The 2 different leaves were again from the Perpetual Calendar set. They are perfect for backgrounds as well as individual mats too.

Tuesday 23 August 2016

Perpetual Birthday Calendar

    Today's card is another lovely and bright one.


This time I have used the Butterfly and 2 different Flower stamps from the set.
With a piece of leftover image, I've die cut the butterfly using Bold Butterflies Framelets.
The messages used are from Better Together stamp set and
 Rhinestones added to make the card nice and blingy!    
All mounted onto Bermuda Bay cardstock. 

Monday 22 August 2016

Perpetual Birthday Calendar

 Happy Birthday Cary

This week, I have the fun of showing some projects made using the 
Perpetual Birthday Calendar stamp set.


For this first card I've clearly used only the set of hearts stamp.
With some die cut hearts from the Sweet and Sassy Framelets in Dazzling Diamonds Glimmer paper and a simple message from Floral Phrases stamp set. 


  137167
As you can see, there are lots of different images waiting to be used


Thank you

Firstly,

 I must say a VERY big thank you to Cary for the past few weeks.
Cary has been updating the blog and Facebook for almost a month now due to 
me being so very busy with everything and altering 
bridesmaids dresses for my son's recent wedding.
So for that Cary, an enormous BIG thank you for all of your hard work.

Secondly, 

I hope you will all join me and wish Cary a very, very Happy Birthday for today.
Unfortunately, she won't be celebrating until tomorrow as she has a 
family bereavement to attend today but for tomorrow Cary, 
please have the very best day you can possibly have. 
Gill


Friday 19 August 2016

And finally. ..

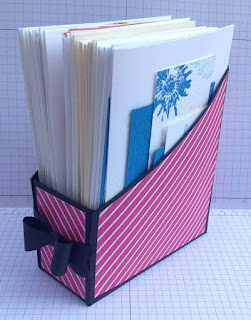
Today's one sheet wonder is not a cutting guide for cards...its a cutting guide for a file box to hold all the cards I made this week!
The box only takes one 12"×12" sheet of card plus paper to decorate ☺
So here is the cutting guide.
I've marked the score lines with a broken line, ------ and the cut lines with a solid line, first score the card at 5" and 7".
Then rotate the card 45% and cut at the 5" mark to the first score line then from the 9.5" mark to the first score line.
Turn the card 90% and repeat the cuts.
Turn the card 45% and cut 1" out from the score line on each side to create the tabs. Turn the card 90% and repeat. 
I've used black card so have shown the lines in white below


Here is a photo of what the template looks like once all the cutting and scoring have been done
Now to create the sloping sides of the file box.measure in 4.5" from the outside edge at the 9.5" cut line and mark. Cut from the mark to the 5" line diagonally.  Repeat on the other side.
Once cut the template should look like below
I've decorated mine simply by adding pattern paper on each of the panels. I've then applied strong tape to the tabs as shown below
Fold the side panels up and and attatch to the tabs.
This is my finished example
And here it is holding all the cards I've made this week using the one sheet wonder technique that I've share...A total of 30! Yes 30 cards ready and waiting to be sent out! 😀


Well that's it from me next week's inspiration will be provided by Gill ☺
Have a crafty weekend
Have fun
Cary ☺ xx