Thursday 30 April 2020

Throw Back Thursday and 

a NEW SPECIAL PDF

Today is my opportunity to use something that I haven't used in a while. I chose 
the beautiful Butterfly Beauty Dies. 
I haven't used them in the best part of a year but I just love them. The dies are so delicate.
Today however, changing the subject, Stampin Up! have released a special purchase of a NEW PDF called Share Sunshine PDF. It is a very special download of printable images and messages that no one can make money from. All of the proceeds, exactly 100%, will go to the Covid 19 charities     The World Health Organization’s COVID-Solidarity Response Fund and United Way Worldwide’s COVID-19 Community Response and Recovery Fund
It cost only 12 USD and has 15 pages of printable images and messages.

The following is from Stampin' Up!

Making a Difference: COVID-19 Product Giveback
Stampin’ Up! is committed to making a difference in our global communities and caring about people first. As part of our Making a Difference program we are offering a product giveback opportunity to support organisations that are helping COVID-19 frontline responders and communities vulnerable to the pandemic.
You and your customers can purchase the Share Sunshine PDF Download and we will donate 100% of the proceeds to COVID-19 efforts.
The Share Sunshine PDF Download is a digital stamp set that’s packed with both light-hearted and heartfelt sentiments and imagery relevant to the unique COVID-19 and social distancing situation we’re currently experiencing–including many ideas that came from you and your customers! You can use the download in your cardmaking and papercrafting projects. Simply print the imagery on cardstock and cut it out using our Paper Trimmer, punches, or dies. Since we are physically distanced from each other, now is a perfect time to share sunshine with our friends and family by sending cards!
Click HERE and it will take you to the place to purchase. 
No demonstrator or company will profit from this purchase, only you. Once paid, you will get an email to download the paperwork. It was so simple, I even managed to do it. If you want to use it again and again, make sure you save it to your pc or tablet etc and you can print as many times as you want for only the one payment.
Anyway here is my card using the messages from the PDF download.
Click HERE for the link to the Butterfly Beauty dies.
I started with a C6 mat in Whisper White and coloured it in using several shades of pink and red in the watercolour pencils. I only scribbled the pencils across the mat then water brushed it and put it to one side to dry.
Meanwhile, I made a C6 card base and mat in Cherry Cobbler. The mat I embossed with the Country Floral embossing folder then washed a clear Wink Of Stella across the mat. It has given a lovely shimmer to it, I wish I could show it properly!
I completed the card by diecutting the butterflies out of the watercoloured, shades of pink paper. The back of the butterfly was die cut out of Silver foiled card and glued together using Tombow, then raised onto the mat with dimensionals.
Completed with the adding of messages to the front and the inside.


The words are so appropriate at the moment. I'm really pleased that Stampin' Up! have done this.

Wednesday 29 April 2020

Today's card is another family birthday card. This time it's my grand daughter Bella's card. 
She turned 9 on Monday this week. She is so extraordinarily clever in her card making. 
She has so many great ideas that she carries out on her friends birthday cards.
I used 2 A5 pieces of card joined in the centre to give it 3 panels.
I measured up from the bottom outer edges on both sides to 8cm then cut from the

 inner corner to that mark on both sides.
I stamped mermaids, unicorns and fairies on several pieces of white card and fixed them on.
I had great fun colouring them in with the watercolour pencils.
Once again, as with my family cards, I used several different stamp sets and messages for her card.
These include, Leave a Little Sparkle, the unicorns which are sadly now sold out, Magical Mermaid and a host set called New Wonders, for the fairies.
For Magical Mermaids please click HERE and like the Unicorns, the fairies too are sold out now. Sorry :{{


I'm pleased to say that she was delighted with her card.

Tuesday 28 April 2020

       Hello, sorry for the delay in posting this week but unfortunately, life has just got in the way!

Anyway, today I'm showing the card I made for my daughter in law's birthday a few weeks ago.
It's a C5 sized card but can be made as a C6 smaller card too.
I used half a sheet of A5 card, cut the other piece in half again and used one piece for the top flap and cut the remaining piece in half again.
I used Bermuda Bay card stock and the gorgeous Noble Peacock Foiled card and the DSP.
It really is gorgeous paper.  I embossed the top panel with the Hammered folder and added Stitched Nested Labels in Bermuda Bay and Foiled card to make the lift up flap. 
I coordinated it with the gorgeous flower from Forever Blossoms stamp set, which I am so pleased to say is going to continue to the new Annual Catalogue at the beginning of June.
More information on the stamp set, please click HERE

  
I always used different stamps and sentiments for my family cards so please excuse 
the miss-mash of phrases!


Friday 24 April 2020

Fun fold friday

Today I'm sharing a quick fun pop up card fold. The mechanics of this simple pop up card are super simple.
First make your card base. I made a tent fold A6 from a peice of 10.5cm x 29.7cm card stock scored at 14.85cm. (You can also use this mechanism in a standard A6 card base see photos)
Now take a piece of card measuring 3cm x 10cm ( 4" x 1") and score it at 2.5cm, 5cm and 7.5cm (1/4", 1/2" and 3/4"). Fold on the score lines as shown in the photos.
Next apply adhesive as shown in the photo. Place the mechanism so that when you close it the piece gets adhered. Then turn the card over open and repeat.
I then punched out 7 rainbow coloured hearts and placed them together together  so that they fit within the confines of the card base from the base of the pop up mechanism and the other 3 edges of the card.
I used the small heart stamps from the Lable me Bold stamp set to create a peice of cardstock to pumch out the hearts on the front of the card. The sentiment on the inside is from the  Heartfelt stamp set.
Well that's it from me this week. Gill will be sharing her talent with us next week.
Have a good weekend and stay safe.
Have fun
Cary xx


Thursday 23 April 2020

Throwback Thursday..

"Up above the streets and houses, rainbow climbing high,
Everyone can see it smiling over the sky.
Paint the whole world with a rainbow."
Now if you're singing the words above then like me you're probably British and of a certain age 😉😉😉 
My rainbow theme has ment that the theme tune from Rainbow a childrens television show from the 1970s 🌈🌈🌈 has been in my mind all the time so I just went with it and created today's project as my throwback Thursday  inspiration. 
Using the great Layering Circles dies and a beautiful array of coloured cardstock I cut concentric circles. Then layered them up and cut them on half to create rainbows 😁
The sentiment and swirl on the inside of the card are from the Leave a Little Sparkle stamp set. I used Stampin Write markers to apply ink direct to the swirl stamp in a rainbow pattern. 


Wednesday 22 April 2020

Watercolour Wednesday..

When is watercolour not watercolour? When it's alcohol!!!
Yup today's project was created using Stampin' Blends alcohol markers. I used a piece of silver foil card, Blends in rainbow colours, colour lifter , a stiff bristled brush and some isopropyl alcohol.
Then with everything to hand and working quickly colour across the foil piece. Next using the colour lifter blend the edges of the colours. Now using the brush gently dab some alcohol over the peice.
The foil give a metallic look to the piece which is like a fun watercolour wash look.
I then stamped the unicorn from the Leave a Little Sparkle stamp set from Stampin Up in black memento ink. I then coloured the mane in the same rainbow colour Blends.


Tuesday 21 April 2020

Tips, tricks and techniques Tuesday..

Do you keep your card off cuts? And pattern paper bits and pieces?  I do I have bags with scraps of card all kept by colour. My pattern paper scraps are kept in the  package with the whole sheets. How do you store yours?
Today's card is using a technique made popular by Australian demo Bruno Bertucci. Called the scrappy strip technique it's a great one for using up all those strips of pattern paper left over from previous projects.
The sentiment is from the Lable me Bold stamp set from Stampin Up. 


Monday 20 April 2020

Make it simple monday..

Welcome to this weeks inspirations. Did you enjoy seeing Gill's projects last week? I certainly did 😊.
For today's Make it simple Monday project I have a #simplestamping card and a #sharethesunshine project to share with you. They are both showcasing rainbows. Rainbows are everywhere at the moment as sign of better times to come and hope.
Here in the UK there is a lot of homes showing rainbows in their windows as a way to brighten their communities. So I have created a , very poor looking 🤣🤣🤣, rainbow in my window using bright colour card and a simple heart punch. ( see previous post for kits available to buy )
I then created a lovely sinple thank you card using a lovely stamp set called Lable Me Bold. I kept the rainbow theme in my colour palette to keep it bright and cheerful. 
This week's inspiration will all have a rainbow theme 🌈🌈🌈


Friday 17 April 2020

Fun Fold Friday  

Hello again. For my last card this week, I've made another card that really belongs to Throwback Thursday. However, this is an very updated one on the previous ones that I made and this one is fresh and clean. 
I have used Gorgeous Grape for the card base, papers from the special DSP Pleased as Punch. If you were lucky enough to get these during Saleabration, well done as they weren't available for long and in theory Cary will tell me off for using papers that have retired but you still have them and so do I. So rather than just stroke them, I'm using them! Sorry Cary! :)) 
I used the Under My Umbrella stamp set which goes perfectly with the papers and I like the message and images too. More information HERE 
It also comes as a Bundle which includes the coordination punch too for only a few pounds more. So very well worth the little extra.       
More Information HERE
Just as importantly though, it fits into a C6 envelope too. 


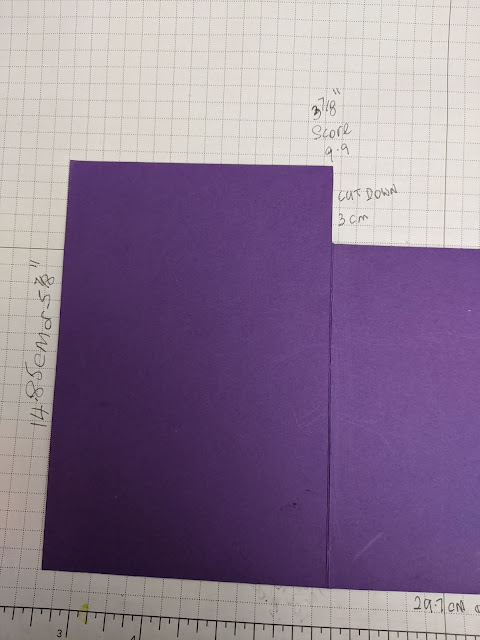
Here is the instructions for the card base. This is from the reverse but it makes no difference as it will fold the same in the opposite direction too.
It was made from a single piece of A4 cut down the long edge so the card mat measured 14.85 cm by 29.7cm or in Imperial measurements, 5, 7/8" by 11, 3/4".


 The DSP was cut about 3 or 4ml smaller than the card mats individual sizes. I like the closeness of the patterns on this one. 
Thank you for joining me this week. I hope you've managed to be inspired to make a few cards and sent them on too. 
Cary is back next week with more of her marvellous creations. Please join her and see what she has been making. :))