Wednesday 30 June 2021

Watercolour Wednesday - Timeless Tropical

 Well, the English weather is back to normal! Those amazing days of sunshine has led us back to our usual weather...rain and lots of it!! There's no better time to stay indoors and craft is there? Today's project using the Timeless Tropical stamp set is really a cheats way to watercolouring. I used an additional stamp called Drybrush. This stamp gives the effect of a watercolour background without any watercolouring! I know, it's a cheat but great to do anyway.

I started by taking a C6 card mat and gutting 2cm all around the edge of the mat. This left a frame which I placed over the next 4 mats. I inked the stamp using the lovely soft Balmy Blue and stamped into the centre of the 4, C6 mats. The frame that I made was also used for cards 3 and 4. I cut a further 1cm around the inside again and used them both to make card frames.

I used the centre panel that I had gutted from the frame to stamp some of the flowers on. Waste not, want not! I used the small flower in Memento Black with the Sahara Sand and Pale Papaya ink pads. The palm trees were stamped in Old Olive and Soft Suede using the Stampin' Write Marker Pens. I fussy cut the flowers and die cut the trees using the dies, In The Tropics.  

For more information on the stamps and dies that I have used, please click HERE. It will open up the link in a new page. Once there, you can look around and see all of the other amazing products that Stampin' Up! make. If you live in the UK and don't have a demonstrator of your own, please shop with us. If you don't have a NEW catalogue yet with all of the products in, please let us know and we will happily post a copy to you.


Card 1

 Card 2


Card 3
A simple message here and there and I had completed 4 cards really quickly. I surprised even myself! I am really enjoying this making 4 cards at a time now, it's really therapeutical!


Card 4


This was another great day for me, wet outside and I'm indoors making cards....perfection, The plants and garden get a well-deserved drink and I get to do what I love and share the results with you too.
Happy crafting everyone xxx


Tuesday 29 June 2021

Technique Tuesday - Timeless Tropical

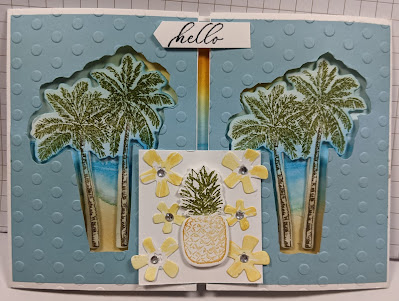
 Hello and thank you for stopping by. Today I've used a technique that I have never used before in this way. Cary is the one who, like a sponge, picks all of these amazing techniques up and makes the most beautiful projects too. This one, is masking to create separate backgrounds using the Timeless Tropical stamp set. I have used the soft hue of the lovely, Balmy Blue and Basic White card only. I started by cutting a piece of A4 cut into half along the full length. I scored at 7.4cm from each end to form the 'gate fold'. After adding the blue to the front panels, I die cut the palm trees from both sides, I only glued the outer edge of the blue so that I could use the palm trees for decorating. I stamped onto the die cuts and put them aside while I embossed the 2 fronts of the card using the new embossing folder Checks and Dots. I cut the blue mat for the inside and glued it into position.

For more information on the stamp set and the dies, please click on the link HERE.  It will open up on a new page to allow you to stay here.


Using a white mat, I started by masking off one half of the card mat with a spare piece of card across the centre. Then adding a circle lightly to the top, I started to add colour using my blending brushes. I used the Balmy Blue for the sky, the Royal Blue of Pacific Point, The sandy colour of Sahara Sand and soft yellow of So Saffron. Once those area were coloured in, I added some Brighter yellow in the form of Mango Melody and Daffodil Delight for the sun.


Laying the trees in position onto the card, I could see where on them that I needed to blend some colour. I gently added a little colour so that they toned into the view.  The band on the centre front is a closure. 2 pieces of card with a narrow strip of glue in the centre so that the piece slides up and down and forms a really good closure for the card. This is another technique that I have never done but Cary is very proficient at. 😀

Monday 28 June 2021

Make it Monday - Timeless Tropical

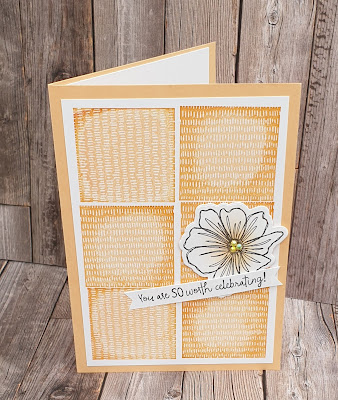
 Hello and thank you for stopping by. This week I am going to show some projects made with this lovely stamp set and occasionally the dies too. The set is called Timeless Tropical and the dies are In The Tropics. Today's card was a very straight forward one in that I used a whole sheet of A4 card in Basic White. Using the large flower in the set and a leaf, I stamped through the centre in both directions to be able to make 4 simple cards. I had to make a few post-it note masks of the leaf and the flower to place across the ones that I had already stamped to prevent from over stamping the images. 

Sounds technical? No, it isn't. I literally stamped the image again onto the top of the note so that the image would stick over my stamped images when I needed it to. I then fussy cut around the leaf and the flower. Cary showed me a cheats way to do it and that is by cutting 3 or 4 post it notes at the same time. It works really well too as the post-it paper is quite thin.


The inside to each of 2 of the cards with a few flowers and leaves. As you can see, I was able to change the orientation of some of the panels.


This last one of the 4 cards that I made was turned into a side easel card. A little trickier than the simple cards before but one that is still easily achievable.


Friday 25 June 2021

Fun fold Friday All Squared Away

 For the last in this weeks All Squared Away Bundle inspiration my fun fold is paired with the gorgeous Pattern party papers for a great card. I first found the fold on the Created the Ottaway YouTube channel. It's  called a hidden flap card. 

In her video the lady uses inches so I have regigged it for centimetres and to fit in a standard C6 envelope.  

Below is a little video of the card in action 


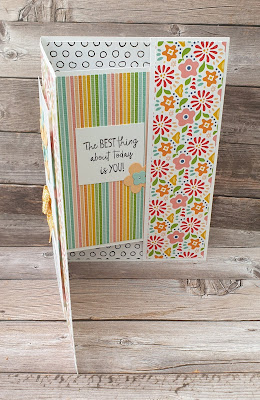
The card base is made using a piece of cardstock measuring 14.85cm x 25.5cm scored at 10.5cm and 21cm. The smaller panel folds in from the right-hand side and the larger panel folds on top from the left.

Next add pattern paper to the outside  and inside of rhe card base. I cut 1 panel in pattern 1 at 10cm x 14.4cm.  I then cut 2 panels in another pattern for the inside at 10cm x 14.4cm.  The final panel is 4.5cm x 14.4cm and fits on the small panel when it is folded in so that it is face up when the front of the card is opened.

Fun fold hidden flap card all Squared Away Stampin up

Fun fold hidden flap card all Squared Away Bundle Stampin up


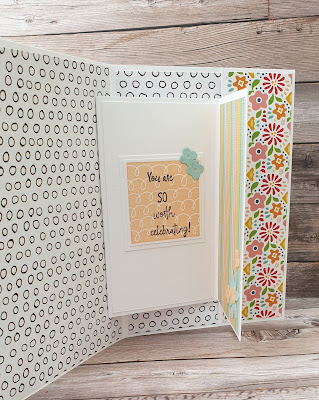
Now it's time to create the inside hidden card. Take a piece of cardstock measuring  11.5cm x 18.5cm and score it at 1.5cm, 8.5cm,10cm and 11.5cm along the long side. Now fold all the score lines as mountain folds. Next cut 3 panels measuring  6.5cm 11cm. I  used 2 pattern papers and 1 piece of white cardstock. 

Fold the 1.5cm panel behind the first 7 cm panel then apply adhesive to the next 1.5cm panel and fold over . It should now look like a right hand opening card with a narrow flat spine on the right and a narrow stip on the left folded under.

Fun fold hidden flap card all Squared Away Bundle Stampin up


Use the pattern paper and cardstock panels to decorate the 3 surfaces. Now take the narrow strip and with it still folded line the open edge to the left hand side of the fold in ths card base. With it placed upto the fold secure it.

Now the hidden flap card lays over the fold onto the right-hand side of the card base. Take the narrow right-hand panel of the card base and apply adhesive to the top and bottom of the panel only and fold over and secure into place over the undecorated panel of the inner card creating a pocket. The inner card should move freely in and out of the pocket with out completely pulling out.

Now reinforce the fold of the hidden flap card and complete decorations as you like. I used the  All Squared Away Bundle to decorate mine as a birthday card.

Fun fold hidden flap card all Squared Away Bundle Stampin up

Well that's it from me for this week I do hope you've enjoyed the projects I've  shared this week featuring the All Squared Away Bundle . 

Gill will be sharing here inspiration with us here next week so please pop by and see what she has been playing with.

Have a crafty  weekend filled with laughter where ever you are.

Have fun 

Cary xx

As always all the products I've used this week are available in our Shop. We'd love for you to shop with us if you live in the Uk, France, Austria,  Germany or the Netherlands. 

If you'd like to join our fantastic team of fellow demonstrators please ask us for more details or click Here

Thursday 24 June 2021

Throwback Thursday All Squared Away

 Thursday is throwback inspiration day. So today  I'm  looking back to... yesterday 🤣 I love the die cut appatures that the All Squared Away Bundle creates So much so that I used the same layout again!!!

These fun and funky die cuts really call out for bold colours. The way I chose to colour them today was with a blending brush and ink pads. 

All Squared Away Bundle Stampin up bold and bright colourful card


The colours chosen where light blue, pink and orange. As always they have lovely names Costal Cabana,  Polished Pink and Pale Papaya .

Once coloured I popped the panel up on 3d foam onto a black mat. 

I hope that today's card brings a smile to your face as it does me 😀

All Squared Away Bundle Stampin up fun bright colourful card


Free shipping just for today!!

 Why not take advantage of the free shipping available with ordets over £35 for today only!! 

Just place your order before 10.50pm tonight. 

Click Here to visit our online shop. 


Wednesday 23 June 2021

Watercolour Wednesday All Squared Away bundle

 The first time I saw the dies that are a part of the All Squared Away Bundle I just knew what I'd like to use them for!!

And here it is....

Watercolour wash window all Squared Away Stampin up

The DL card card base is just perfect for these cute die cut squares. I inlaid the die cuts back into the appatures to create windows in a white cardstock mat.

Then I took another piece of white cardstock that was a little smaller than the die cut mat. Using a waterpainter and ink and created 3 simple watercolour washes roughly in line withe the die cut appatures. 

I chose 3 bright bold colours of ink and once the watercolour wash was about right I spritzed and splattered them with water. This just gives the finished pieces a little more umph.

Watercolour wash splatters and spritzed all Squared Away Stampin up

The sentiment should have been stamped directly but I got carried away with mounting the die cut mats on to 3d foam 😅 . So the sentiment went onto a narrow stip and that was how I overcame that little problem 😉

This card makes me smile it's  bright and bold and a little retro flower power 🌼. I hope it makes you smile too. 🌞

Watercolour wash die cut appature dl card all Squared Away Stampin up


Tuesday 22 June 2021

One day only.... Free Shipping


Why not take advantage and get that little something you've been after and not have to pay for delivery!!

Why not have a browse of our online store Here

Tips tricks and techniques Tuesday All Squared Away

 Now if you've been here beforw on a Tuesday you might have realised that I'm all for reduce, reuse and recycling ♻️ now how does that relate to today's All Squared Away card ? Well the background was a piece that was destined for the bin!!

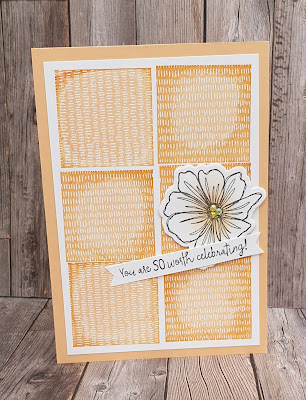
I was having a go at the rock 'n' roll technique. This is where you ink up your stamp in a lighter colour. Then take a darker colour ink and gently rock and roll the stamp around the pad getting ink on the edges. The result is a two tone image that is different every time!. Top tip remember to clean your stamp after you've stamped even if you are repeating the same process because you'll never get the ink in the same place!! Ask me how I know 😉😉😉

Rock n roll technique all Squared Away Stampin up


Well the reason I wasn't happy with the background was that they weren't perfectly lined up and as the perfectionists out there will understand I wasn't happy...... But just this once I thought no let it be as it is and go with it!!!

So my tip for this Tuesday is sometime the mistake or less than perfect can be perfextly fine in it's own right!! Well I think that today's card looks rather lovely as it is warts and all!!!. 

Card making tips rock n roll technique all Squared Away Stampin up
 

The colours I used were 2 shades of orange call pale papaya and pumpkin pie. The flower was from another stamp set stamped in black and a pop of the paler orange applied just to the center and finished with 3 jewels. The sentiment is from the All Squared Away stamp set.

So what do you think are you ready to embrace your less than perfect, wonky bits and say that you're happy with the way your project turned out? Because I am 😀

Cardmaking tips rock n roll technique all Squared Away Stampin up


Monday 21 June 2021

Make it simple Monday All Squared Away

 A super quick #simplestamping card for today whilst I'm enjoying the sunshine at my Mum's and its raining at home!!! Featuring this weeks stamp set All Squared Away 

All Squared Away Stampin up simple stamping

This fun set has 4 background stamps and some fun sentiments. And for today's card I used 2 background ones and the lovely 2 part sentiment. 

The colours I've chosen a both light summery shades of purple and blue called balmy blue and highland heather. I then stamped the sentiment in black over the square images.

Simple stamping easy cardmaking all Squared away Stampin up


 A simple quick card with a lot of impact all in all i think. What about you?

All Squared Away simple stamping easy card making Stampin up


Friday 18 June 2021

Fun Fold Friday - Lovely You

Hello again and thank you for stopping by and looking at our blog again this week. For my last card using the Lovely You stamp set from Stampin' Up! I have made a card that we made recently in one of our monthly classes. It is a very simple card with a strap across the front to form a magnetic closure. 

For more information about the stamp set or any of the Stampin' Up! products, please click HERE and it will take you to our shop where you can browse the products, get ideas, look at the clearance rack and all sorts of things. It will open up a new window for you so that you don't lose where you started.   

I started with a white card base 29.7cm by 10.5cm wide. Basically, half a sheet of A4 in the UK cut down the whole length. I scored it in half and then removed 4.85cm from one side only. The piece cut off is to make the band. I used Pale Papaya card for the mats with a touch of Granny Apple Green here and there. I added some texture by using the lovely embossing folder called Tasteful Textile. The front Pale Papaya panel was embossed then I attached a magnet to it before using Dimensionals to secure it to the front of the card. 


I took a piece of white and blended Pale Papaya ink across the centre of this panel using my Blending brush, a few more flowers here and there and then the message. The message was inked using a Stampin' Write Marker Pen in Granny Apple Green for each individual part of it. Happily no marks were made as a result of using the pen.

 I attached the strap to the inside of the card and then added a Pale Papaya mat with some little decorations on. I embossed and cut to size another piece of the card for the strap. At this point, I needed to add the other magnet. I dropped it on top of the other one and it found the correct place. Adding a glue dot to the top of it, I placed the embossed piece of card over it to pick it up. Once fixed to the panel, I added the mat to the strap, a few flowers on top and it's complete. 


Thank you once again for stopping by this week, I do hope that you've seen something that may inspire you. I love to create things and share them around so I am delighted that you spared some time to look. 

Cary is on holiday next week but has prepared some amazing projects to inspire you. Please stop by and see her creations. 

Until I come back, please keep well, stay safe and keep on CRAFTING. :) 

Gill xxxxx


Thursday 17 June 2021

Throwback Thursday - Lovely You

Well the weather is supposed to turn very wet all day today......watch this space. It's my great grandson's 1st birthday on Saturday and we are holding the party here for him. I do hope that it's good weather then! Today I have gone what I call slightly vintage. Using White card mats, I sponged a very light grey all around the edges. I couldn't decide which colour base card to use so I made 2! Then using the Lovely You stamp set I stamped just some leaf stems on both sides. A simple message which was punched out using the Oval duo punch and it was complete. I had some extra die cuts available so added one to each card. 

I used Night of Navy on the first card and Merry Merlot for the second one which has ended up as an easel card. I have also added some of the Gray Granite Shimmer Ribbon to both. It's really lovely ribbon, so soft and silky. If you would like a catalogue, please send us a message and we will happily send yu one of the new ones.

More information about the stamp set and other products, please click HERE  It will open a new window for you so that you don't loose your place here.