Friday 26 March 2021

Fun Fold Friday - Classes

Today sees the start of this years 2 Big Girls Crafting Retreat. Yes, even though we are still in lockdown, everyone wanted to attend virtually. So we are in for a very long weekend of fun, laughter, games and crafting.  

Friday is always our fun fold day and there are no exceptions to that. I love to make a fun fold card and in fact you have seen a couple already this week in the Painted Poppies cards on Tuesday. I just find them so interesting that you can make a simple card with or without a fun fold. It doesn't have to be a complicated fold either, it can be something as simple as adding a pocket on the front or even inside the card. It just adds another dimension and something that you don't often see or get on the cards from the shops. Not that I have bought a card from a shop in absolutely years!

I loved making this double easel card. It is so very easy to make. If you've ever made an easel card a double or even triple is just as easy. 


Here is the cards from Tuesday again.

Thank you for joining me this week. Cary will be back on Monday to show you some more of her cutesy creations I'm sure. She's having so much fun with the cute stamp sets at the moment.

So until I return, please take care, stay safe and well and CARRY ON CRAFTING! 😍😍😍

Thank you again, Gill

Thursday 25 March 2021

Throwback Thursday -classes

Two of our regular monthly classes are held on different Thursdays of every month. For all of our evening groups, we make a minimum (usually) of 3 cards. We make samples for our groups to copy of just get an idea from. We love to see how everyone else can make the cards look. 

Here are a few of the cards from some of them. 


Wednesday 24 March 2021

Watercolour Wednesday - Blends Classes

On the last Monday of every month, Cary and I hold a monthly Blends class. Now I know that this is not Watercolouring but it's another amazing way to add colour to your projects. We have been holding this class now since Stampin' Up! started making the Blends, which I think is over 3 years now. They are amazing alcohol markers in most of the Stampin' Up! colour range. 

Here is a few that I have made over the year. I have added a watercolour card in too just to show how beautiful all of the colours are whether they are Blends or watercoloured.


Tuesday 23 March 2021

Tuesday - classes

 When the pandemic hit last year, we had just completed our last retreat 2 days before. Now that was this time last year. This coming weekend is this years retreat for us and we are completely running out of time to fit everything in. Saying that, of course we will get it all done! No, I'm not going to show you what we are using as that is part of the surprise for our attendees. 

What I am going to show you is a few of the cards that I made for the retreat using one of my favourite stamp sets, Painted Poppies which everyone received and Peaceful Moments. One has the beautiful poppies and the other the words that go so well with the  flowers. 

So here is a few of those from last year.


Friday 19 March 2021

Fun fold Friday Friends are like Seashells

 The sunny if finally shining here in my part of the world and playing with the Friends are like Seashells stamps and the Sand and Sea suite of products has made me think of beautiful days spent by the sea with my family and friends.  How does this relate to my project for today you may ask well.....

...I have created a concertina card that has lot's of surfaces to decorate that would also make a great mini album or brag book!!

The version I'm sharing here has a gift card holder on a pocket but you could use it for journaling or extra photos if you wished to.

So the basic card base requires 2 parts. Part 1 measures 14.85cm x 29.7cm and is scored at 9.5cm and 19.5cm. Part 2 measures 14.85xm x 20.5cm and is scored at 10.5cm.


Now take part one and place it landscape in front of you with the smallest panel, the one that measures 9.5cm, on the left hand side. Next you take panel 2 and place the largest panel, it measures 10.5cm, over the 3rd panel of part 1, the right hand one as you look at it. There is a slight gap on the reverse. But not to worry pattern paper can cover it 😉.


That is the basis of your project! 

Now decorate as desired and fold up. The folds staring from the left hand side are mountain,  valley and valley.

Friends are like Seashells fun fold mini album brag book

Well I hope you've had a good week and are looking forward to a great weekend. My weekend will be spent attending a virtual business retreat and preparing for our very own virtual crafting retreat the following weekend!  

Please join us next week when Gill will be sharing her inspiration. 

Have fun 

Cary xx


Thursday 18 March 2021

Throwback Thursday Sand and Sea suite

 Chatting with some fellow craft addicts at the weekend the subject of one sheet wonders, OSW, came up. Nothing special there I hear you say but it was because amongst our gathering were several crafters who are relatively new to the world of craft. They didn't have a clue what a OSW is! Ohhh thought I a perfect project for my blog post this week featuring the Friends are like Seashells stamps!!

Now this is where it got a bit controversial.  To some a osw is where you follow a cutting guide for a piece of  12x 12, 6x6 or A4 pattern paper to create a significant number of cards. Just Google one sheet wonder template to see lots or click Here for one I created a few years ago.

But there is another explanation of the term OSW,  one that Gill is particularly fond of and the first type I came across years ago... that of the making your own pattern paper type. And it's this style that I'll be using for the gorgeous seashell stamps for!

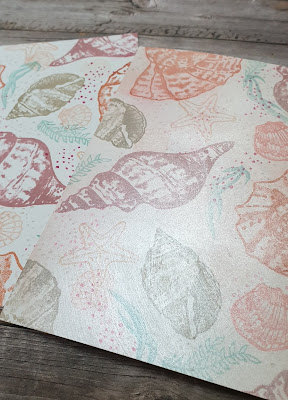
So I grabbed my blocks, inks and stamps and clean sheet of white A4 cardstock and set about stamping! 

Friends are like Seashells stampin up one sheet wonder

I stamped the large images first then filled in the spaces with the small ones. Finally I used the splatter stamp inked then stamped off onto scrap paper then stamped randomly, going over parts of the previously stamped images in a variety of colours. This gives the project some depth which I find pleasing.

I then cut my A4 piece into 4 panels and set about using them . 1 piece I did a little ink distressing around the edges once I'd cut the panel to fit the mat for my card. A simple message and that was 1 done.

Stampin up friends are like Seashells one sheet wonder

For the second panel I decided to have a go at giving my panel a pearlescent shimmer. I took some of the frost white shimmer paint and using a blending brush gently blended it over my panel. Now this does have a draw back, or positive depending on how you see it, that the paint is a waterbased one so will reactivate the ink on the page and the colour may spread.  In the photo below you can see the difference it makes to the card 

One sheet wonder frost white shimmer paint make your own pearlescent paper stampin up
 Again I cut the panel to fit my mats and made my card. The subtle shimmer real look far better in real life.

Friends are like Seashells one sheet wonder shimmer paint create your own pearlescent paper

For the next 2 cards I cut  the panels into strips and set them onto mats. The effect works both horizontally and vertically.


So there you have it 4 cards from 1 background sheet. A one sheet wonder is a great way to get the most from your stamps and spark your creativity.  So have a play and see where it leads you on your crafting journey. 


Wednesday 17 March 2021

Watercolour Wednesday sand and sea suite

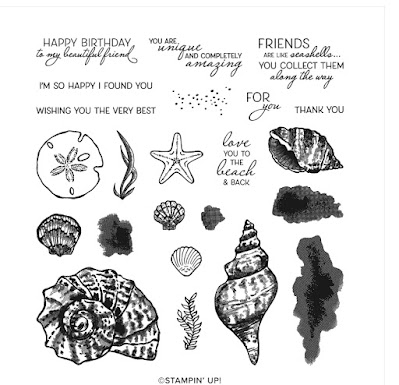
 Today is a a watercolour card..... promise 😉 It envolves ink and water so that makes it a watercolour technique for sure 👍 I know that the seashells in the Friends are like Seashells scream to be water coloured but I wanted to use the die cuts.

So in the stamp set there is a speckled background stamp that inspired me to create the splatered style background.  First I cut my watercolour paper to size and spritzed it lightly with water. Then I smoshed some ink onto an acrylic block and added a couple of drops of water.

Now the fun began! I used my brush to pick up the watered down ink and splattered it across the watercolour paper!. I also blew across the paper to create some movement of the wet ink across the paper. All in all a quite satisfying play with water and colour 😉

I then decided to add specks of gold to tie in with the gold die cut. I mixed a little water with some tombow glue on an acrylic block and using a clean brush splattered that across the piece. I then took some gold guilding flakes and rubbed them across.  They caught where the glue was and rubbed off the rest . 

Stampin up guilding flakes easy watercolour

Once the background was dry I finished my card off with gold foil die cut and embossed and cut apart elements. A simple gold heat embossed sentiment and gold foil layer and voilà 


Friends are like Seashells stampin up watercolour spatters guilding flakes die cut and embossed


Tuesday 16 March 2021

Tips Tricks and Techniques Tuesday Sand and Sea Suite

 Don't you just love it when things go together?  Well that's  exactly what the dies and embossing folder from the Sand and Sea suite do! For today's project I married them up with the pattern paper and pearlescent paper that are also in the suite. Now that's  what I call coordination... stamps, dies, embossing folder and not 1 but 2 papers!!!

Samd and sea suite stampin up tips embossing folder

What you don't see in the above photo is the beautiful but oh so different to capture in a photo beauty of the pearlescent paper. So here goes....my attempt to show off this paper...

Pearlescent paper stampin up

Now in my opinion this is a very tricky surface to stamp on. It's shiny and slippery a stampers worst nightmare! So I hear you experienced stampers out there shouting Stazon ink and yes that will work but you still have to be careful and stamp straight up and down with no rocking.

 But you know I only have black stazon and sometimes we all know we have a project that black is just to harsh on. So what to do when all you have is ink that will never dry on this type of paper? 

Well I have a tip to help get the look you want with the waterbased ink colour of your choice. All you need is your trusty antistatic bag, versamark ink,  clear embossing powder and heat tool.

First pat the antistatic bag over the pearlescent paper.  Then take your stamp and ink it up with versamark next ink the stamp again in the colour of choice. Now you're going to stamp on to the paper then cover the area with clear embossing powder.  Tap off the excess and carefully heat until all the powder has melted, clear powder seams to melt quickly so be careful not to over heat. Now you have a permanent stamped image/ sentiment 😀 

Friends are like Seashells heat embossing Stampin up

Now here is my big tip for this little technique try out your ink colours with a clear power overlay because some inks seam to change colour/tone. So the ink that coordinates perfectly when stamped directly may not be so right when you do the clear embossing powder trick! 

Below I have a picture that shows 3 attempts to find the right one. 


Example A was using a beautiful strong pink called melon mambo that ended up just looking neon... not what I wanted for my subtle project!

Example B was a mid tone pink called flirty flamingo that has become a little too orange for my project.

Example C is the one I went with and is using a colour that I wouldn't have picked at all! Called rococo rose it's a dusty deeper pink, that I have to admit is not a go to for me. But once given the clear embossing treatment it lightened and coordinated beautifully!!

My next tip is regarding using the die and embossing folder from the suite. They fit together perfectly but you need to do it in the right order. 


First die cut your paper then place in the embossing folder carefully. Now I have congenital tremors that means that being super careful lining things up can be tricky.  My best friend on these situations is sticky notes!! My tip is to stick the sticky note to the die cut peice then when its in the right place press the stick note down to hold it whilst you close the folder and pass it through you machine. 


I then made my card using a soft neutral colour base and added a layer of pearlescent paper and a layer of patterned paper from the Sand and Sea suite. Before placing my die cut and embossed focal point on top.
Sand and sea stampin up tips and tricks pearlescent paper


I'm glad I took the time to use this beautiful , if tricky,  pearlescent paper for today's project because in my opinion its just gorgeous and give a certain elegance to my card. 

Stampin up die cut and embossing soft and gentle card


Monday 15 March 2021

Make it simple Monday Friends are like Seashells

 What colour is your go to card base? Mine is white especially when I'm keeping it simple on a Monday after a busy weekend!. This last weekend we ran a fun mystery stamping videoconferencing fun event on Saturday and here in the UK Sunday was Mothering Sunday. So all in all very little time to create projects for this weeks blog post! I  will be sharing projects featuring the Friends are like Seashells stamp set. And for today's cards I have kept it #simplestamping. 

Friends are like Seashells Stampin Up make it simple monday


Now back to my original question what is your go to card base colour? Like I said mine is white especially for #simplestamping projects. But for today I've  gone a bit rouge.

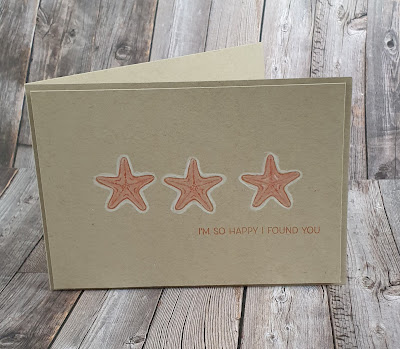
I've  created the same card using the same colour ink and colouring pencils to make a simple card but using 3 different colour card bases.

The first is white , of course,  the second is a kraft colour called Crumb Cake and the final colour is a peachy pink called Petal Pink.  

Friends are like Seashells stampin up simple stamping


All three cards are stamped in a coral colour ink and coloured in with a coral pencil. I then took a white pencil and went around the starfish on the Crumb Cake and Petal Pink cards. For the white card I used a light yellow pencil. I think that by outlining them they sit better on the page so to speak.

There are lots of lovely things that are part the Sand and Sea suite that the stamps are a part of. I shall be sharing projects using them this coming week so please join us for a week of sand and sea fun what ever the weather!

Calypso Coral clean stamping card starfish


Crumb cake easy simple clean card Seashells


Petal pink simple stamping starfish