Wednesday 30 September 2020

Throwback Thursday - Most Wonderful Time

 Oh my goodness! Have you ever had one of those days when everything you touch goes wrong? Well I have almost every day for the last 2 weeks! It's just been crazy! I will get out of whatever it is stopping me from progressing and getting on with some kind of normality!

Meanwhile this last few weeks I've been trying to work with the lovely stamp set and papers from last year which I am so pleased to say has returned this winter season too. There are some lovely patterned papers which have Gold within the print on one side but not on the other side. They really are beautiful papers. It also has Die cut sticky shapes, stick on stars, pre printed card fronts with gold patterns on, gold and white tinsel trim, 6 piece set of dies and the included stamp set too! Then, once you have the kit, you can buy a refil kit which has more of the papers, stars, trim etc. Perfect.

I made this card last week using a C6 card base but I cut off 5cm from each of the sides only on the front of the card. I added patterned paper and a white message mat and made the 2 easel cards very easily. 

I know, I said it again. Another very simple card but it actually was. I kept the 2 pieces that I cut off and used 1 for the centre to support the mat of gold foil and patterned paper. I used one of the sheets of deers and added it to some more gold, fussy cut around it and added that to the centre panel too. The main message was added and raised onto foam adhesive to give the easel space to stand.


I used the stamp set Wrapped in Christmas for the messages on this one but the messages in the stamp set are equally as good.
  

Watercolour Wednesday - Most Wonderful Time

 It certainly is getting close now! I apologise for not showing any project yesterday and the day before. Life has been so hectic that time has just escaped me! Well, have you started making your Christmas cards yet? No? Well we have started to make some examples to get us going. So here goes!

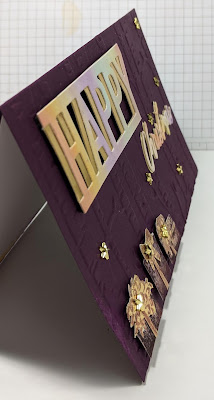
I made time today for some watercolouring. Using a large acrylic block, and most of the Subtles Ink Pads (the paler shades) I inked the block about 2cm at a time so that all of the colours were along the block. I spritzed a piece of Watercolour Paper with water and also spritzed the block so that the colours would merge on it. I'm really quite pleased with the result. I love watercolouring this way as I'm not good enough to watercolour designs, this way, not even I can go wrong. I tried by using the marker pens but couldn't add enough of the ink to make the colour strong enough. Once the paper was lovely and wet, I placed the block ink down onto it. Then slowly dragged it from one side to the other. Once dry I used the HAPPY die. I repeated it using Gold Foiled paper and used wet glue to add it to the gold like a shadow. I repeated the same with the Christmas die. The Happy was fixed using black sticky foam and the Christmas with wet glue. I fussy cut the parcels and ribbons which were stamped in the gorgeous Blackberry Bliss Ink. I embossed the card front with the Woodland embossing folder. All in all a very simple watercolour card.
Here's my piece of watercolour card that I played with.


Wednesday 23 September 2020

Watercolour Wednesday Don't Stop Believing

 Well I'm not sure if the tequnique I've used for today's Don't Stop Believing card is a real watercolour one. But it does use water and colour sooooo.....

I first die cut the rectangle and gathered my bits together. I used an acrylic block, a classic ink pad and a water filled spritzer.

I then placed the acrylic block directly onto the ink pad. Once it had some ink on it I spritzed it liberally with water. Then in one quick motion I placed it ink side down onto the card. Below are some photos and a short video of these steps.

To highlight the focal point of the card I kept everything else white. To add texture and that something else I have used some gorgeous flocked vellum and a snowflake embossing folder both from Stampin' Up!'s winter catalogue. 

I hope you'll have a go at this fun watercolour technique 😉 


don't stop believin stampin up Christmas card simple cards


Special offer for 1 day only sign up today!!


Want to know a an even better value way to get all those goodies you...uhmmm "need" ? 

How about getting 2 stamp sets, rhinestones and card kits worth over £40 for FREE? 

Plus an extra 15% of certain stamps sets today only? ( pictures below of the stamps included in the offer) included in the £130 worth of product you can choose.

The answer.... for today only.... purchase the starter kit for the amazing price of £99!!!

And  with the link below you get the additional bonus of becoming a part of our Larger Than Life Stampers community 😀

https://2biggirlscrafting.stampinup.net/join_now


1 day stamp sale today only!!

                       wahoo it's here!


Just for today Stampin Up  are offering 15% off selected stamps 😀 

Below are the stamps that are available to buy from the link below just for today!!

https://www.stampinup.uk?demoid=5001103


Tuesday 22 September 2020

Tip, Tricks and Techniques Tuesday Don't Stop Believing

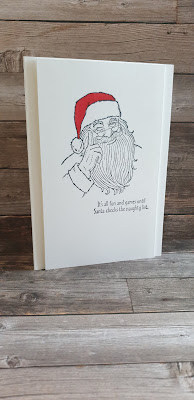
 For today's Tip, Tricks and Techniques Tuesday post I thought I'd share a super easy technique that is great for those who don't own a die cutting or embossing machine. The simple line drawn image of Santa from the Don't Stop Believing stamp set needed some texture for the background and this is what I came up with 1 traditional in colour and the other more contemporary in colour.

This quick and easy technique uses strips of card stock in the same colour as the card. All you have to do is cut a number of strips. Then lay them out in a design that appeals to you. I used 1cm for the cherry cobbler red card and 0.5cm strips for the Bermuda bay blue one. The size of the strips can be any size and will help create different effects.

Once I had decided on the layout I then used wet glue to stick them down. After trimming the over hanging bits,  I use scissors and cut from the rear so that I could keep my cuts clise to the card edge, I stuck my textured layer onto my card base. 

I stamped my image and sentiment in black memento ink and colour in using the corresponding colours.

So my question for today is do you prefer traditional cherry cobbler red or contemporary Bermuda bay blue? 

Ohhhh and we happy to share that tomorrow Stampin Up is holding a flash 1 day stamp set sale!!! 15% off certain set pop back tomorrow to see the list. We'd love for you to buy through us if you're in the Uk, Germany,  France,  Austria or The Netherlands. 


stampin up don't stop believing christmas card easy way to add texture traditional christmas contemporary christmas fun idea for scraps of card


Monday 21 September 2020

Make it simple Monday Don't Stop Believing

 wow what a weekend!! An all day class via zoom with some amazing people on Saturday.  Followed by a creatively inspiring zoom mystery card challenge on Sunday afternoon! As well as crafting some cards to share with you all this week using the Don't StopBelieving stamp set.  . I'm super happy it's #simplestamping today 😅 

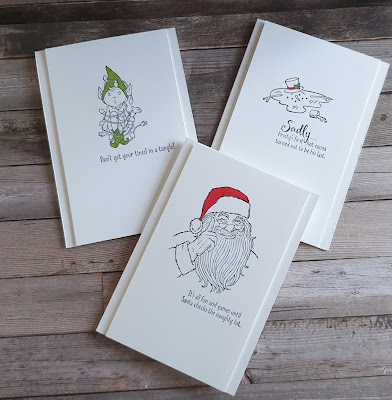
So for today's easy cards I've focused on the fun images and sentiments in the set. I've only coloured selected parts of the images just to give a pop of colour. 

The images in the set are great on their own but teamed with the super fun sentiments they are sure to be a great success with the recipients for sure! I have to say my favourite is " Sadly...Frosty's first hot cocoa turned out to be his last."

Which sentiment is your favorite? 


simple stamping don't stop believing stampin up quick cards Christmas card


Friday 18 September 2020

Fun Fold Friday

 Well, it's that time of the week again when I get to have even more fun by making a fun fold card. I have no idea why but I find making or even caseing a fun fold brings me great pleasure. 

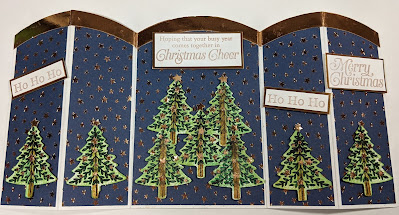
This card today one is no exception. It is a standard Gatefold card but for the 1st time ever I used a plate to give me the shape at the top of the card! A die would also work but not through 3 layers of thick card. I also used the plate to shape the Copper Foiled card too. There are always ways to improvise and make things work to your best advantage. 

I covered the white card base using the lovely returning papers Brightly Gleaming. The gorgeous shades of blue and green mixed with a little vanilla and copper decorations in the set are perfect for Christmas and many other occasions too. Love it!

Anyway, my card is another very simple card to make as the card is literally folded into 3 equal parts and then the 2 outer edges are folded into the first fold on each side again giving you the gate fold effect. I stamped several of the little trees in Stazon black ink, then using the background stamp in the set and the inked baby wipes I made up for Tuesday's post and using a block, I transferred some of the ink to the front of the Christmas Trees then punched them out. As I said yesterday, I never throw or sell much of my old Stampin' Up! products away so I used the gorgeous Stars Border Punch and some of the Copper foiled paper to make decorations for the trees. I used some more messages from the Perfectly Plaid stamp set that I have used this week and were randomly added across the card and I'm done. 

More information on all of the products and the stamp set HERE

I don't think this card needs any bling as the copper gives a lovely shine to the whole card fortunately.


Thank you for joining me this week, I hope you've had as much fun as I have. Especially the getting inky fingers bit! Cary will be back on Monday with some more or her amazing creations so please join her and see what delights that she has in store for you. 

Take care, stay safe, Gill xxx :) 😀😀😀
 

Thursday 17 September 2020

Throwback Thursday

Do  any of you tend to keep things that you bought a long time ago? I do. Anyone who knows me will testify to the fact that if anyone is looking for something, particularly Stampin' UP! products, will know that I am likely to still have the products I bought many years ago. That also include many stamp sets that I bought many years before I became a demonstrator too! In fact, I used to buy very old retired stamp sets from the different selling sites which obviously started my fascination with the companies products. 

Yes, I am an Independent Stampin' Up! Demonstrator and along with Cary, have been so for almost 11 years now! WOW! That has gone so quickly. Needless to say my stash has increased dramatically since my first interest!

That said and it is throwback Thursday, my card today was made by a card that one of our ladies, Karen Franks made a few years ago when the Cookie Cutter Creatures came first out. It was using the Cookie Cutter punch with several Santa's falling down the edge of a card. I haven't used the Cookie Cutter Punch although I do still have it.

 I have found a card similar but it's not the same as Karen's. You can see that one at the end of my post.

I used the Christmas tree punch with some of the lovely Plaid Tidings 6" by 6" papers, I embossed the white mats with the Evergreen Forest 3D embossing Folder, some narrow strips of Silver foil and a length of Metallic silver ribbon. Once again I have used the lovely Perfectly Plaid stamp set for the messages. 


Tumbling Santa Card Made Using Cookie Cutter Christmas from Stampin' Up! UK - buy yours here 
 
 
Here is a card similar to the one that Karen made but hers were literally tumbling down!
 

Wednesday 16 September 2020

Watercolour Wednesday

 My watercolour card today is the smallest amount of watercolouring that I have ever done on a card! I still got very messy though! I started by covering the white mat with low tack sticky tape along the areas that I wanted to colour in. Then I used only a few colours and one of the new water brushes from Stampin' Up! I took the largest brush which is about 1/2" wide. I added a few drops of lovely bluey green onto a clear block and then spritzed it a few times with water. I mixed it in with the brush and just literally washed it across the middle of the taped area.  Then using2 more different colours, blue and yellow I did the same. The last one, the yellow, I used with a very fine water brush and just put a few spots and dashes here and there. It's very random for me, not like me at all!

It's nothing like I had anticipated but then nothing ever is! I then die cut some of the Stars and the swirls from the Stitched Snowflakes dies. Added a few thin strips of paper from the Brightly Gleaming papers and some strips of copper foil and that was it! A very quick but simple card again, for my watercolouring. The messages were from the stamp set called Perfectly Plaid. I'm so pleased they kept the papers, the stamp set and dies from last year. It makes it so much fun, I made 2 cards again! 😀😀😀


The little copper pieces at the inside corners of the card are from the die cut swirl. To me it looks like my initials! G M . I'm keeping that one! 😂😂😂