Friday 30 July 2021

Fun Fold Friday - Wild Cats

Hello from me for the last day this week. I really have pushed myself this week by using a stamp set that needs strong, earthy colour. Wild Cats and the DSP In The Wild calls for all of those such colours. from the soft greens to strong, earthy yellow, deep, dark red to a really rich dark green. I'm really pleased with the result even though it's not what I would usually do! Today's card is the same, I've used almost all of the colours that can be found within the papers which has really surprised me! 

I fully intended for today, a simple card with lots of white space. Not a chance! I made a double Z fold card using Basic White and Crushed Curry (earthy yellow) card. Starting with a piece of A4 card I cut it at 14.85cm high along the whole length of the A4. Scored it at 14.85cm and 7.4cm. Each fold was then folded to make the letter Z. For the front Z, I used the Crushed Curry. I cut a length 5cm high by 29.7cm long and scored as before. I added a piece of DSP to the inside square and the left hand front panel. The inner panel was fitted with an embossed piece of card which I embossed using the Animal Prints embossing folder.

 
To add some extra dimension, I embossed the yellow Z with the Animal Print folder then added the die cuts, tigers and sentiments.


Well, that's it from me for another week, Cary will return on Monday to show you her lovely cool crisp cards to inspire. Please stop by and see what she is creating for you. 
 
Thank you once again for popping by and until I return please TAKE CARE, STAY SAFE, BE WELL but just as importantly KEEP ON CRAFTING.
Gill xxx :) 😍😍😍


Thursday 29 July 2021

Throwback Thursday - Wild Cats

 Hello again and thank you for stopping by. Using the stamp set Wild Cats today sees another tiger card from me. I honestly never realised that I could make so many projects with this set. I am so please that I bought it! My card base is a lovely rich dark red, maroon colour (Merry Merlot). This is coordinated with a piece of the DSP from the In The Wild set of double sided papers. I started off by die cutting 3 circles as I knew that's what I wanted to do. Then I cut some more of the tigers out from the paper pack and decided to stamp and decorate the images instead. Once stamped and coloured I die cut them using the Big Cats set of dies. Once all of the elements were stamped and die cut, I completed the card by adding sentiments. 

That's it, it was as simple as that. The worst part is deciding what to do. With me, that's what takes the time!


Wednesday 28 July 2021

Watercolour Wednesday - Wild Cats

 Oh my, did I get messy today! In actual fact I was very blue! I really did have fun too. 😀😀 However back to today's card. I placed a Stampin' block onto the ink pad and added quite a lot of water and mixed the colour well then using a wide water brush, I spread the ink all across the paper. I did this using the really gorgeous bright blue (Pacific Point), Very strong orangey-yellow (mango Melody) and of course the palest blue of Balmy Blue. Then, using the In The Wild papers and some sentiments from the stamp set, Wild Cats, the card was completed. An unusual colour for the big cats but I think they look really cute.

Although I got a little messy, I had great fun washing the ink across the white card. It's really very therapeutic. The tail on the sentiment is the vines stamp made into the banner tail.


Tuesday 27 July 2021

Technique Tuesday - Wild Cats

I was a little puzzled as to how I would sort a card technique for today but then it clicked. Today's card using the Wild Cats stamp set, I have used paper as the technique. These lovely papers are amazing. Lots of animals are printed over some of the sheets so I had to use them as my technique. I cut 3 different tigers or big cats from the DSP called In The Wild and a small piece of the timber paper from In Good Taste to make the logs. By overlapping the timber I wanted a log or a rock but don't have one so this is the next best thing. I have coordinated it with pieces of deep dark red (Merry Merlot) and the white card base. I am rather pleased with the result and hope that you are able to see  what my intention was. 


Monday 26 July 2021

Make It Monday - Wild Cats

Welcome back on this wet Monday! Well, as it always is in the UK rain follows sun and as we had the most amazing weather over the last week, it had to come to an end. For now. I'm a glass half full kind of person, I like to look on the optimistic side. Sometimes! Well, this week I have challenged myself to use a stamp set that I have no idea what to do with and here it is! Stampin' Up!'s Wild Cats is just that. I have 2 cards to show you the other 2 were torn up and thrown in the recycling! 

Anyway using only Stamps, Ink and White Card I made the first one. I stamped the big cat straight onto the card then the stripes and finally stamped the plants around and above. A simple sentiment and it's complete. 

The second card has a little extra as I used the coordinating DSP or Designer Series Paper. These double sided papers have the most amazing designs on. I chose the simple plants piece but this time stamped the cat onto a piece of white card, fussy cut it out and then fixed it to the front panel. A sentiment on White card and the insides, then both cards were completed. 2 very simple cards that when I stopped over thinking it, I found very quick to put together. Typical! That's me! 😂😂


Friday 23 July 2021

Fun fold Friday Peekaboo Farm

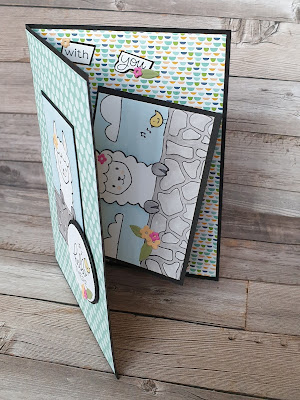
 I know I'm rather late but here is my last project using the super fun Peekaboo Farm  And as always on a Friday it's  a fun fold 😉 

Peekaboo farm Stampin up fun fold card

The gorgeous papers are from a pack called Patterned Party  The fold I've used today is called a pop up card. It's  a fun way to showcase both the stamps and the pattern papers.

The fun is when you open the card 


I've  had a ball creating with this great stamp set this week. And I hope that you've been inspired by my creations.

Peekaboo farm Stampin up fun fold card pop up

Peekaboo farm Stampin up fun fold card

Peekaboo farm Stampin up fun fold pop up card

So I hope you all have a great weekend.  Gill will be here next week sharing her creations so please join me to see what inspiration she brings us all.

Have fun

Cary xx

Thursday 22 July 2021

Throwback Thursday Peekaboo Farm

 Gill and I hold regular classes each month and today's card featuring the fabulous Peekaboo Farm stamps was inspired by a class we held recently. 

The class featured a set of dies called Picture This. This set of dies create 2 appature pieces and lots of mats. It's  such a useful die set!

Picture this dies Stampin up

In our class we placed patterned paper  behind the appatures and the resulting cards were gorgeous. 

But for today's Peekaboo Farm cards I decided to have the animals peeking out!

For the first card I took the rectangle appature dies and cut them on a mat  slightly smaller than thw front of my card. I then placed it over another piece of white card and very lightly pencil marked the appatures. 

Now I stamped ny images inside  the penciled areas and coloured them. Remembering to erase the pencil lines as I went. Then I took the appature piece  and stamped onto that. 

I placed 3d foam behind the front panel and carefully placed it over the stamped images.i then stamped the lama and horse's hooves, coloured and fussy cut them  then added 3d foam to them and placed them on top of the image to create a littlw depth to the image.  I then adhered the panel to the front of my card base and voilà. 

Peekaboo farm Stampin up picture this dies

For the second card I used the circle appature piece. Repeating the steps to stamp images on to a second mat.  But this time I used one of the circle die cuts for my sentiment.  I also stamped the appature mat using the stone wall stamp multiple times so that it looks as if the animals are peeking out through a wall.

Peekaboo farm Stampin up picture this dies

I can't decide which I prefer.  What do you like best the stone work on the front? Or behind?

Peekaboo farm Stampin up picture this dies


Wednesday 21 July 2021

Watercolour Wednesday Peekaboo Farm

 Today I'm going to share a project featuring a watercolour technique that I usually steer away from. Some talented people can create beautiful watercolour scenes in a trice. Me I struggle 😩 but tody I've  given it a go because the little pig in the Peekaboo Farm stamp set just called out to be used in this way!!.

The pig immediately took me back to childhood and reading fairytales and the like. And of course  the tale of the three little pigs. So I tried to recreate the cover of one of my story books that is long gone but still lives in my memories.

First I created the background by using a grey granite wash across the bottom of my mat.  Then I did the same in blue across the top for the sky. For these 2 parts I used my brush in  horizontal lines.  Then for the mid portion I used green but used vertical brush strokes in an attempt to make it look grass like.

Now the stamping fun began as I was able to use the stone wall stamp to make the bottom look more like a wall.

I then took a grass stamp from another stamp set and added to the center panel to hopefully reinforce the idea of a field. The little flowers are from a die set.

Next I stamped coloured and fussy cut out my three little pigs and adhered them in place looking over the wall.

Rather than a  stamped sentiment I die cut the letters to add the title to my card. A few more die cut flowers and I was done.

Peekaboo farm Stampin up three little pigs

For the inside I decided to use the grass stamped some more of the cute die cut flowers.  I like to embellish the inside of my cards to coordinate with the front.

Peekaboo farm Stampin up three little pigs watercolour scenes for beginners

 So what do you think of my very basic watercolour scene?  I know it's  not the best but I luke it and it made me smile a lot ☺ 

Peekaboo farm Stampin up three little pigs watercolour scenes for beginners


Tuesday 20 July 2021

Tips, Tricks and Techniques Tuesday Peekaboo Farm

 My top tip for today's Tips, Tricks and Techniques Tuesday is don't craft in the middle of the day in the middle of a heat wave!! I  had decided to create a blended background forgetting how quickly ink can dry!!! 🤣 but still it was worth it as I got to use the super cute Peekaboo Farm some more 😉

I used 3 colours and sticky notes and blending brushes to create the background.  First I masked off 2/3rds of the white cardstock mat. Then blended the first colour all over. I then masked of the area I'd added colour too and the middle third. Leaving the other end free to colour. Once that was done I masked off the two ends and coloured the center.

Next I stamped all the farm gang, Percy the pig, Lily the lama,  Dobbin the horse, Robert the ram,and Daisy the cow. And coloured them. Then it was time to fussy cut!! 

Once they were all ready I used thin strips of white card to act as walls to stand the animals behind. I used 3d foam to adhere the strips and animals to the card front. 

I stamped my sentiment into the middle of the middle row. And I was done! 

Peekaboo farm Stampin up blended background

Isn't it the most adorable celebrity squares every??? Now if you don't remember that tv show I'm really showing my age 🤣 ( it was a quiz show that ran on tv for about 20 years at the end of the last millennium here in the UK 🤣)


Any way I think the heat may be getting to me so I'll  sign off for now and go and put my feet in my grandson's paddling pool to cool off!! 

Peekaboo farm Stampin up

Peekaboo farm Stampin up


Monday 19 July 2021

Make it simple Monday Peekaboo Farm

 Wow it's hot here in my part of the Uk ☀️☀️☀️ and I have to say I feel for all our furry friends in the fur coats!! Which is perhaps what drew me to this weeks featured stamp set! This week I shall be sharing inspiration using the ohhh so very cute Peekaboo Farm from Stampin' Up!

Peekaboo farm simple stamping easy use of patterned paper

As always on a Monday we keep it simple. Stampin' Up! host a monthly #simplestamping challenge. This month the challenge is to use stamps, ink, paper and pattern paper to create simple thinking of you cards. Now pattern paper can be a bit intimidating for those just starting out. The patterns can be a bit intense even though they are so very pretty! My suggest is to start with simpler patterns. Most double sided pattern paper has a bold side and a calmer side. For today's #simplestamping cards I've used the gorgeous Hand-Penned pattern paper.


Hand-Penned Stampin up simple stamping

So what did I do with these wonderful goodies? Well I made 2 simple cards exactly the same layout but chose different pattern paper and colouring in.

For the first one I chose to use watercolour pencils to colour in my image and inspired by the beautiful yellow paper went funky 😁

Simple stamping peekaboo farm Stampin up

For my second card I went a little more traditional in my colour pallette and used alcohol marker pens to colour in.

Simple stamping Stampin up peekaboo farm

So which do you prefer? Funky?  Or traditional? 

If you'd like to see how I made these cards and meet the other animals on the farm then I shall be doing a Facebook live over on our Facebook page at 4pm BST today. I'll  add a link here later once I've finished the live. If you'd like to watch my live please click Here

Enjoy the good weather and stay safe.

Peekaboo farm simple stamping Stampin Up


Friday 16 July 2021

Fun FOld riday - Bamboo Beauty

 Welcome back on this very warm Friday. We are due for a 'mini heatwave' supposedly in the UK but with our weather as it is, I'll believe it when I see it! Using Bamboo Beauty stamp set again, today's card was inspired by one that I made for my daughter in law's dad, Roy, for his birthday last weekend. I'm not sure what the fold is called but it's a Z fold with a flap on the front of it. Call it what you like but I've had lots of fun making this one. Please click HERE for a link to the stamp set and all other products that I used on these cards. It will open the link in another page to save where you were.

 I found a retired stamp set from a few years ago called Party Panda. I thought that the card needed a little whimsical touch to it so I've added a few sentiments and Pandas to the card too.  


THE CARD BASE

I started with a piece of card 14.85cm by 27cm. (fig 1) I scored along the long edge at 10cm, 15cm and 25cm. Using a bone folder I burnished all of the folds really well in both directions. I like to burnish from both sides to make sure that the card will happily fold without tearing. If a fold is scored nicely and burnished in both directions, it will usually give a really good crisp fold. I then added a piece of card 14.85cm by 14.85cm. (fig 2) This panel is then adhered behind the 2cm band on the left hand side after I gently tore the front edge of the 2cm wide strip. I tore the edge as it gives a softer feel to both layers when adding another mat to it. If you should have any difficulties making this card? Please don't hesitate in contacting me as I would be more than happy to help you. :)

fig 1

     fig 2


fig 3 the folded card


 fig 4 the 'planter' 

Once the panels were decorated, I cut a piece of card 5cm by 12cm and scored that at 1cm, 6cm and 11cm. Again, the folds were burnished in both directions. I added DSP to the front and side of this with pieces 4.5cm by 4.5cm.I cut 3 strips of card 1cm by 7cm. These were then scored at 1cm on each side then these squares were fixed to the top edge of the 5cm high panel on the left hand side. The opposite side of these strips were folded in the opposite direction to the first side to enable the pices to stretch out when the card is folded. I find it easier to decorated with leaves/ flowers etc while it's not stuck to the card. See picture below. Once the leaves were added to the strips it was time to add the whole panel to the 5cm panel on the card. I started with the right hand side and fixed the edge to match the panel front on the other panel.

fig 5


fig 6


 Tip... When adding the piece above, fold the 1cm flap under after placing adhesive on then fold the card in half at the mountain fold and fix the panel down into place.  

 fig 7

DSP and decorating

I used the In Good Taste Designer Series Papers and added a 14.4cm by 14.4cm mat to the front and the inside left front. 9.5cm by 14.4cm to the 2, 10cm wide panels and last but not least, 4.5cm by 14.4cm to the 5cm panel.

I used the Potted Succulents dies to add a little more texture behind the sentiment mats. I stamped in Crumb Cake then fussy cut several of the Bamboo sticks. The leaves were stamped onto the In Colour range of Vellum papers and of course I once again fussy cut them out. The vellum has a matt side and a shimmery side, so I stamped onto the matt side and they are shown in the shimmery side. 

My inspiration
 
Here is some pictures of Roy's birthday card. As with many fancy or fun fold cards, sometimes they may take a little longer than the norm but I hope that you think they were worth the time it took?


Well, that's it from me for this week. I do hope you have found some ideas for making your own cards in one way or another. Cary is back to share her creations next week so please remember to stop by and see what she has made. Until I return, Take Care, Stay Safe and Keep on Crafting :)  

😍😍😍