Thursday 31 October 2019

Memories and More - Day 4

 Today I have made a very simple card using a very beautiful card. I have used one of the cards in the Bird Ballad Laser-cut Cards and Tin. These gorgeous cards are in a soft vanilla card and very gorgeous. 
I used one of the small cards from the Come Sail Away set of cards again. I added a Night of Navy mat to both sides on the inside of the card. Then a vanilla mat over the inside right, which I stamped onto using the Sailing Home stamp set and Night of Navy Ink Pad. 
More information on the stamp set, please click HERE
More Information on the cards, please click HERE


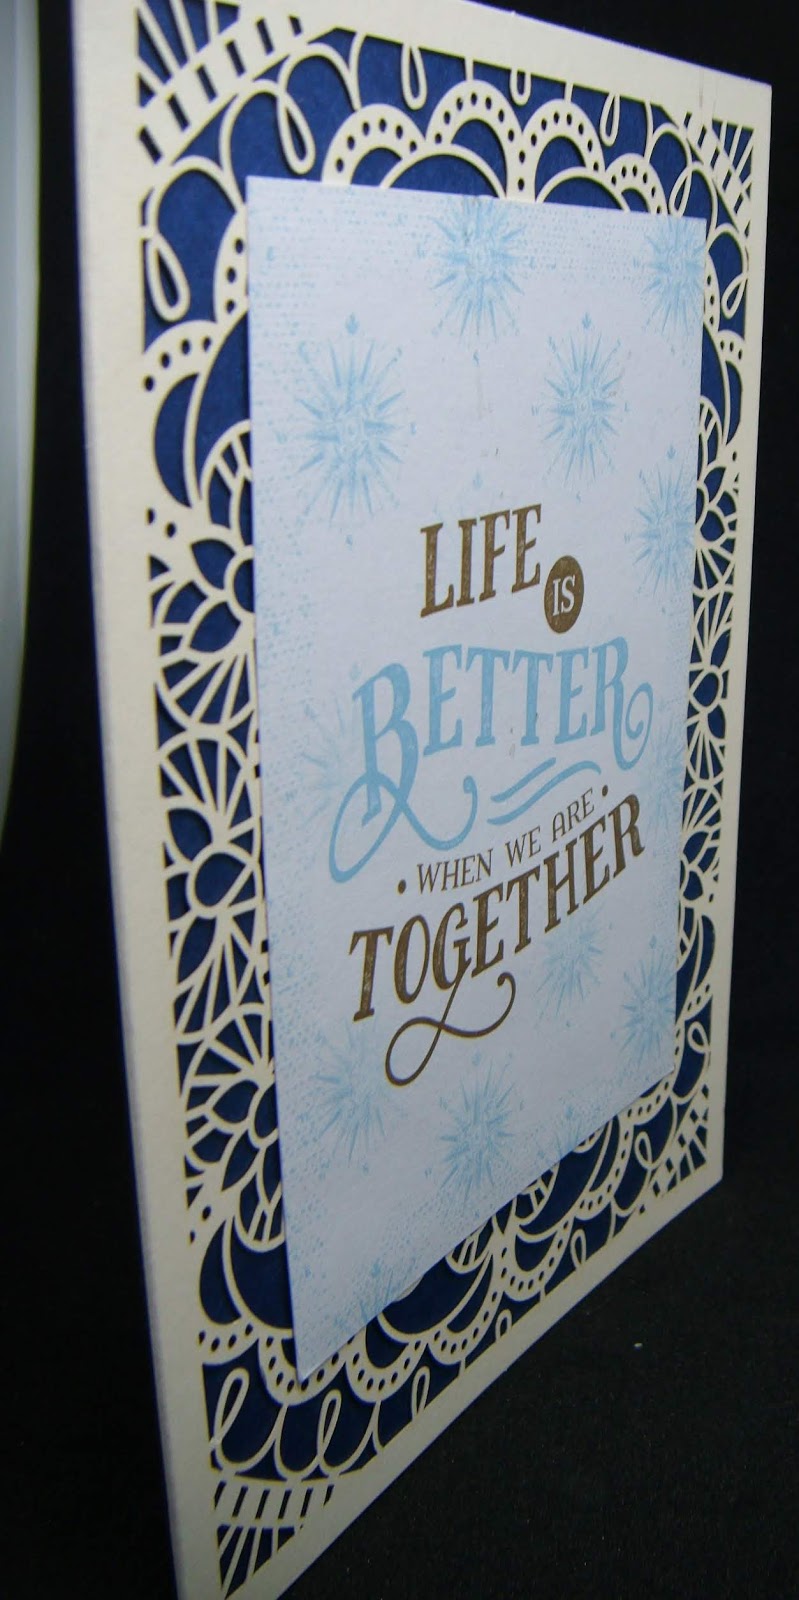
I really like the way the card looks onto the laser cut cards. It changes the outside really well.

Wednesday 30 October 2019

Memories and More Cards - Day 3

Today, I used the lovely Come Sail Away Memories and More cards. The gorgeous fresh hues on 
the cards are perfect for anyone you know to make a card for.
This first one is simply a card from the pack, cut down to show a small border of the card base. 
I peeled one of the frame stickers from the adhesive sheet and stuck it onto a scrap of white then fussy cut around it. I stamped a few seagulls and the lovely message before mounting it
using Dimensionals. I used the stamp set Sailing Home. 
More information on the stamp set, please click HERE
For the Come Sail Away cards, please click HERE
The compass sticker was stuck onto a Night of Navy 1" punched circle.
The anchor was stuck straight onto the card.


The inside was another Whisper White mat edged in Night of Navy ink then stamped with a message from the stamp set. Then a few seagulls randomly stamped around.  
                                                                                          

The 2nd card I made with these cards is once again different from the 1st.
Using the same patterned card as before but this time added onto a Night of Navy mat then onto the White card base. Before I stuck it onto the card, I added a piece of the Seaside Spray Ribbon and fussy cut around the large label message. I added that too to a Night of Navy mat then using Dimensionals added it to the card. 


The inside mat was mounted onto Night of Navy card then stamped and placed onto the card base.
Both of the cards were very simply made and not difficult for anyone to make. 

Tuesday 29 October 2019

Day 2 - Memories and More Cards.

Today I have used the gorgeous Magnolia Lane Memories and More cards.
I just love magnolias so much, I have 10 different varieties of them in the garden at home.
Simply beautiful. 1 of them is budding up now! In November!!!
Within the pack are some vellum printed sheets and once again some peel off embellishments and signs. The image is on one the various cards and I have fixed to the vellum on this one.
Before adding the vellum, I embossed the front of the card with the Magnolia embossing folder.
When the front of the card is moved, you can see the flowers embossed into the card.
For information on the cards, please click HERE 
For more information on the stamp set, please click HERE
For information on the embossing folder, click HERE


You can just see the embossed image above right. The message is already printed onto the card and I fussy cut around the frame before adding it to the front of the vellum using Glue Dots.
I used a peel off Congratulations, to add to the card but as I like them raised, I used dimensionals again.


I stamped a flower and another message on the inside mat using the Magnolia Blooms stamp set.
Then I embossed the mat with the Magnolia folder.

Obviously, there is no need to emboss, fussy cut or anything else as the cards are so versatile you can add just the whole card to the front and stamp or stick a message on the inside.
There are so many possibilities with these cards. I LOVE THEM!

Monday 28 October 2019

Weekly Inspiration

Day 1 - Product  

Hello. Thank you for joining me today. I have a product to chose this week and I have chosen
Memories and More Cards as my products to work with.
There are 3 sets of Memories and More cards in the Stampin' Up! catalogues this year and 
the first one I've chosen to use is the Night Before Christmas set.
I have made 2 different versions on the same card, the first is so quickly made. 
For more information on the cards please click HERE


I used one of the Memories and More cards and envelopes for the card base, as you can see it has a Red front and White inside. I cut the M&M card image smaller to show the red cards border underneath. All I have added to the front is one of the little peel off messages. 
Inside I added a White mat and used the stamp set that matches the suite called 
Holly Jolly Christmas for the message inside.


This 2nd version was a little more fiddly of course. I fussy cut all of the baubles out then mounted them using dimensionals onto a Very Vanilla mat. I embossed the mat beforehand 
using the Beads and Baubles Embossing Folder. I think it goes really well.

       
    I cut the message from the bottom of the cut and mounted that with dimensionals too. I added another mat to the inside and stepped the edges onto a Pretty Peacock Ink Pad to add dimension.
Then using the same message as the 1st card I finished this one off.


 Please stop by tomorrow and see what else I have made using these lovely sets of cards.

Friday 25 October 2019

#Simplestamping Thank You - Day 5  

Hello. This is my last time for this week with ideas for #simplestamping.
For this card I wanted to show that you don't have to use Whisper White card stock for 
simplestamping. I used Cherry Cobbler. A gorgeous, rich and warm colour. 
Ideal for this time of year. 
I used the lovely stamp set called A Little Lace and a Whisper White Ink Pad.
More information HERE
It looks really good against the darkness of the red.


I added the use of the Timeless Label Punch to add another dimension to the card. Not essential but I have it, so I used it. As simple as that. 
If you've got something you could use to add to any project, give it a try.
 There are no mistakes in card making. Only happy accidents !
Trust me, the best things come by happy accidents, I can assure you!


 I finished this last card for this week by adding a little border along the edge and another 
lovely little message to the inside of the card.
Thank you for joining me this week. 
Please come back next week and see what else is in store as I'm working with a particular product. What will I chose??? Any suggestions? Please?????
 
I hope I've given you some ideas in how you can create something beautiful but simply too.
Please don't forget to share your cards with us as we love to see what you all make.
Thank you :)  

Thursday 24 October 2019

#Simplestamping Thank You - Day 4   

Today's card is a little stronger in colour than yesterday's. I used ordinary colouring pencils!
The stamp set is called Free As A Bird. For more information, click HERE
In my opinion, it's one of the best stamp sets that Stampin' Up! has designed. 
I do hope they don't replace it for a long time as I can see lots of used with it.
This time, the simplicity of the birds on a branch, is all that's needed.


#Simplestamping is basically what I have done, Stamps Ink and Paper. A perfect collection of product for the crafter who is starting out, or even an experienced or avid crafter.
I'm sure that if I used Watercolour pencils, that the colours would be softer. 
However, I quite like the simple way this has turned out.


Another simple message and a few leaves stamped to the inside completes this one.
It goes to show that you really don't nee to have lots and lots of crafting equipment,
All you need is 1 Stamp set, an Ink Pad and some Card/Paper to make a beautiful card for 
someone special.

Wednesday 23 October 2019

#Simplestamping Thank You - Day 3 

Hello, today I've another very simple project that anyone could make with 1 stamp set, Card, Ink Pad 
and on this occassion, a punch too. Yesterday's I used a retired stamp set. Just because it's retired, doesn't mean that we can't use it! Today is another current stamp set.
 
I used A Big Thank You set which is a lovely mixture of images and expressions.
Therefore making it very versatile. I used the new in colour that weve been waiting for customs to release called, Purple Posy. Its a very, very soft lilac and because the card base is white, the whole card is very pale too. For more information, click HERE.
 

Using the mixture of stamps, I made a pattern over the card mat then added a lovely message from the set. I punched the message out using the Timeless Label Punch.


I completed the card by adding a simple 'Thank You Friend' 
and a few more of the flowers to the inside. I really learn how to take better photos!
 It's very easy to step this card up as I did before this week. 
Add some bling, Piece of Ribbon or even Rhinestones. 
It will make a lovely card to give or send.


Tuesday 22 October 2019

  #Simplestamping, Thank You- Day 2

Hello, today's card was made as I'm going to be a nana again in January
 and I thought that I had better get making some in advance of his arrival!
I used a retired stamp set called First Steps and Balmy Blue Ink pad. 
 I also used the stamp set A Big Thank You. More information HERE
#Simplestamping is literally just that. Card, Ink and Stamps.
 

I used another piece of card for the front and the inside as I wanted to add definition
 to the otherwise very flat card. I also used the Timeless Label Punch for a little more definition.

I cut 2cm off the front of the card and masked the inside the same distance from the edge.  
Then I wiped the ink pad along the edge until I got the depth of colour I wanted.
Thankfully, the family are pleased with it! PHEW!!

Monday 21 October 2019

Weekly Inspiration 1 Stamp set, 1 Card Base, 1 Punch

#Simplestamping - Day 1 

Hello and welcome back. Didn't Cary do some lovely, amazing projects last week? 
Pumpkin Pie...Very autumnal colour. 
This week as you can see it's my turn at #Simplestamping. 
My first card is just that. 
1 card base, 1 Ink Pad and eventually, 1 Punch.


Very simple, straightforward and easy for a beginner to make.
I used Memorable Mosaic stamp set amd Pool Party Ink pad.
Then added a simple Thank You to the inside. 
For more information on the stamp set, please click HERE   
It comes as a Bundle too with a punch, for more information, click HERE


The second version was stepped up a little by stamping the message onto a scrap of Whisper White.
Then using a mat for the front stamped the tree then added the message to the lower edge.


I cut a mat slightly smaller than the card base and tapped it across the ink pad on each edge.
I love the way that this simple technique adds another dimension and makes it stand out more.
Once the message was stamped onto a punched circle, 
I gently rolled it through the Ink Pad to make it stand out against the white.


To the inside, I added a row of the curls under the message and along the edge.  
The last version was stepped up even more.

I added Bling! Beautiful Rhinestones always add a lovely sparkle to any project.

Friday 18 October 2019

Pumpkin Pie...

So for the final post of the week I thought I'd  share a great  technique that uses the fabulous alcohol markers from Stampin Up  called Stampin Blends.  They come in 38 different colours with a light and dark shaded in both.
First I took a piece of black card stock and useing the embossing buddy to ensure that the embossing powder only sticks to the versamark stamped images. I used white embossing powder and the leaves from the Rooted in Nature  stamp set, then heat set the powder.
Next I took a selection  of Stampin Blends  and coloured the white embossed images.
Wow do those colours pop!! Using alcohol markers means that you can colour over shiny surfaces like a heat embossed images permanently. 
Well that's it from me this week.
 I hope you'll look to using shades of orange more in your Crafting. And join us next week when Gill will be sharing here beautiful projects with us.
Have fun
Cary xx


Thursday 17 October 2019

Pumpkin Pie....

So we had autumnal holidays yesterday but you know what I miss the summer so I thought why not make a little tropical number for today's inspiration 😁
The stamped images were created using sponge daubers with pumpkin pie and melon mambo ink. I daubered the colours directly onto the stamp to give a softer graduated coloured image. I then die cut the images and stuck them randomly onto a white mat and sprinkled a few green rhinestones in between to make a fresh and bright card.