Showing posts with label All items are available to buy from our Stampin' Up link.. Show all posts

Wednesday, 2 September 2020

Watercolour Wednesday

 Watercolour Wednesday  

Hello this really chilly morning. I really do not like the cold and I'm getting worse the older I get! Cary however, LOVES the colder weather other than the fact the sun doesnt shine. She loves the sun and I just like being warm!

Anyway, I have again been playing with the Autumn Greetings stamp set, more information HERE. This time I stamped an acrylic block onto the ink pad, dropped a little water from water brush and using a sponge, gently rubbed it across the card mat. I tore a piece of printer paper in half and placed each piece across the Whisper White mat leaving a gap between them. I slowly added some different colours using the same method and gently coloured in the band between the pieces of paper. I used Pumpkin Pie, Crushed Curry and a little Cherry Cobbler ink pads. Then using Memento Tuxedo Black ink, I stamped the large image from the set across the gap. 

Once the paper was removed I embossed the tall card with 3D Hammered Metal embossing folder. I tied a knot in a strip of ribbon and fixed it along one side before adding the mat to the Cinnamon Cider card base. A message stamped onto Whisper White card and punched out using the 1,1/2" circle punch then added it to the circle of Cinnamon Cider. I completed this one by die-cutting a few of the leaves and a message for the inside.

 In theory these were not  #simplestamping cards but they were very easy cards to make with a little die-cutting added for embellishments.


2nd card


Autumn Greetings Stampin Up Watercolour Wednesday quick watercolour simple stamping


The second card was made in basically the same way as the first but this time no embossing. A simple message added to the front and inside to complete this one as well.


Tuesday, 1 September 2020

Tips, Tricks and Techniques

 Tips, Tricks and Techniques

Hello again. Today's card is a little different for me as I don't usually work with the colours that I have. I am more of a Bright's girl and love all of the bright colours whereas, Cary has always been a Regals girl. The way that Cary can blend and mix colours always astonishes me, she has an eye for colour that I could never even imagine. Very clever lady is my Stampin' Up! partner. 

I have still used the same set as yesterday which is Autumn Greetings (more information HERE). I picked the stamp set very randomly by picking a page number and left or right. That way I get to use something that will take me out of my comfort zone which is necessary to do sometimes as I can get stuck with no idea what to do with something new!

Anyway, saying that, I knew exactly what I wanted to this time thankfully! I stamped the main image from this lovely stamp set in Gray Granite Ink Pad. Then came out my Blends pens. I just love the way the colour rolls onto the paper so smoothly and leaves such a lovely colouring behind. Simply gorgeous. I would normally fussy cut the image out but chose to be lazy this time and used the matching set of dies that go with the stamp set. I embossed the white mat with Pinewood Planks embossing folder and mounted the main image using Dimensionals. The card base in Mango melody is one of the gorgeous Bright's colours but it really matches with the colours that I used when colouring in.

It reminds me of the Harvest Festival when I was at school when all of the produce was laid out on the tables for all to see. Amazing times. However, another simple card but I had such a pleasure colouring the image in.


I added a message to the front and also inside along with another pumpkin to complete today's card.

#simplestamping, #easy card, #Stampin' Up!


Monday, 31 August 2020

Make It Monday

Make It Monday  #simplestamping

Hello, I hope you have all had a good week? Mine was crazily busy just for a change! NOT!  

I have no idea what's happening with me at the moment all sorts of things are going wrong!  😬

Last week for example, the memory foam cushion I sit on exploded! 💥💥 I would never have believed that a cushion would be filled with oil! It was. The oil (supposedly gel) had leaked everywhere just like all liquids do. My son thought that I'd had an accident of all things! Definitely not!!!

It transpires that my cushion was filled with gel and enclosed in a bag inside the seat cushion cover. The bag just decided to burst open with a bang! I must admit, I did think I had broken my chair initially but thankfully I hadn't! Phew! 😁 A new cushion will hopefully arrive this week.

Anyway, I've had a job to decide what to show this week so I decided on a stamp set that I don't normally use. 

As we are now at the end of the summer and the children are going back to school into the Autumn term I chose to use the new stamp set called Autumn Greetings.  I rather like this set as it clearly shows all of the gorgeous autumn produce. I just love the colours of the trees and leaves in autumn, it's really stunning. More information HERE on the stamp set.

I have only stamped a few of the edges of the stamp along one edge for which I used Gray Granite Ink Pad. As the grand children were in bed, I borrowed their colouring pencils again to add a little sparkle of colour. I stood the edges of the card onto the Crushed Curry ink pad which was also used for the messages.  


A very quick and simple card for this really cold but bright Monday.

#simple card #quick card  #Autumn Greetings  #Stampin' Up!

Friday, 21 August 2020

Fun Fold Friday

 Fun Fold Friday

Hello on this lovely sunny Friday. Today's card is one that I have made for my daughter in law's mum. 
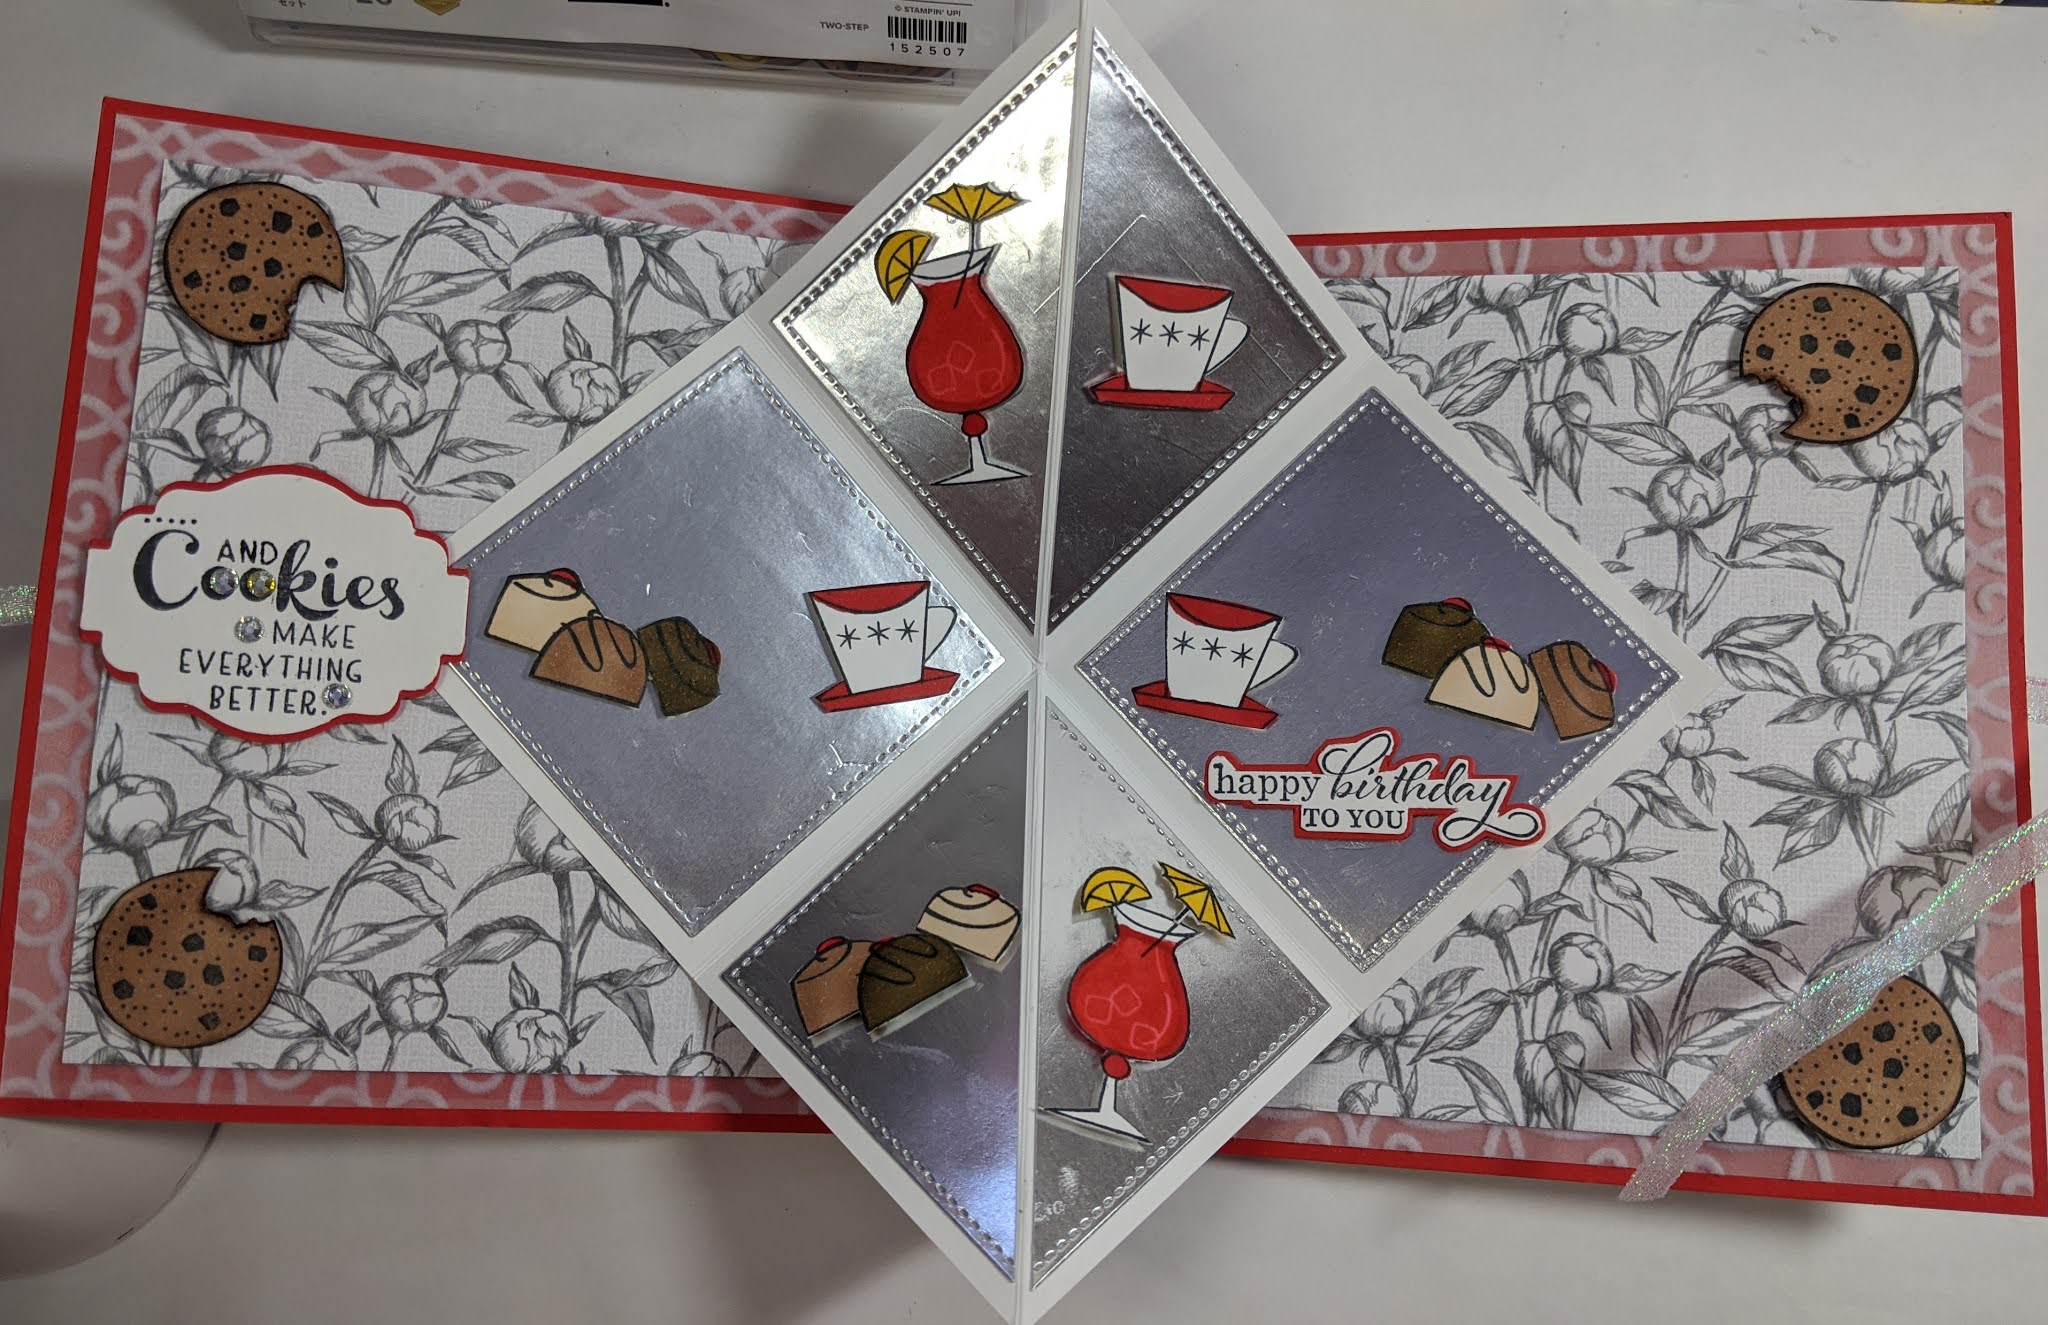
It's her birthday on Sunday and you know the expression, 2 birds with one stone... That's my card for today. This simple folded card is made from either a 14.85 cm square card or 6" by 6" square card. Either set of measurements will work. The stamp set is as all of this week, Nothing's Better Than.
More information HERE
I used metric so starting with a piece of A4, I cut it portrait style, at 14.85 cm. Then scored it also at    14.85 cm. The White card mat inside is also 14.85 cm square. I scored that at 7.4 and a smidge horizontally in both directions and then once diagonally. All folds must be nice and crisp so I used the bone folder to reinforce the edges of the folds.
Using a sheet of the white vellum, Plush Poinsettia papers, I cut 3 squares of 14.4cm by 14.4 cm or 5,3/4" square. I added those to the front and inside of the card. I took some DSP double sided paper or in Stampin' Up! terms Designer Series Paper and cut 2 squares of 14.4 cm square. I found the centre of the papers on one edge and in the middle, then pencilled a line from centre to outer corner on both pieces. These were then cut out. I added the 2 pieces of DSP before adding the White square or diamond as it was turned around. When fixing this centre piece to the card, make sure that you glue or tape 1 whole, unscored square at a time. I fixed the one on the right first then closed the card on top of it to make sure it was closed properly. Then repeated the same for the other side.
I added Silver Foiled card squares from the Stitched Shapes set of dies. I love those dies, they are so very versatile.
The 2 pieces of DSP cut out from the other earlier, was then trimmed down to fit the front and the points meet in the middle.
The rest was just decorated using the Nothing's Better Than stamp set. 
I added a white mat to the back of the card to write on and then added a couple of messages from the Best Year stamp set for the birthday greetings. 


My card is a standard opening card but it could just as easily be an A framed card. Either way will work really well.
Thank you for joining me this week. I hope my cards have given you some inspiration to make your own cards and projects. 
Please keep well, stay safe and keep on crafting, until next time xxx
:)) 
Cary will be back on Monday to show you some of her amazing designs.   

Thursday, 20 August 2020

Throwback Thursday

Throwback Thursday  

Thankfully, I haven't spilt my tea over this card so it's nice and clean! Yesterday's ... now that's another matter! However, after my disaster with my cards and the cup of tea yesterday, I went on to work on today's card. This card is based on a similar one I made last year. It's my cheats version of the floating card. I stamped 6 of each of the images from Nothing's Better Than stamp set in Memento Black ink. Then had great fun colouring them all in using my Blends pens. I love my Blends. They have such amazing colours and tones that you can match and shade in so many ways.I then had the fun of cutting them all out. I know, I'm crazy but I just love the fussy cutting. It really is relaxing, I promise.

Nothing's Better Than information HERE

Once I had finished, I added Dimensionals to the backs of each and placed them all close together onto a C6 mat in Whisper White which I had embossed before hand using Dainty Diamonds 3D embossing Folder. Then I die cut a Stitched Oval from the centre of the whole mat. I added the mat to the card base, stamped and die cut some messages and a mat, then added a bow to complete this one.

Then, not wanting to waste anything like all crafter, I made another card using the centre oval that I cut from the centre of the first card.


2nd card


Again, this card is made in the same way as before,  another simple but this time a slightly fiddly card. These are the cards I made last year which have inspired me for today's cards.
I do hope you can get some ideas from them. :)


Wednesday, 19 August 2020

Watercolour Wednesday

Watercolour Wednesday #quick card 

Hello again. Well! Am I ever glad that I take photos of my weeks cards as I go because in my eagerness to show the family, I knocked my cup of tea all over the cards yesterday! I was gutted! As Cary and I say thought, it's only paper and ink! Still frustrating after making something it gets ruined so very quickly!

Never mind, today's card is a watercoloured card. I used a C6 card mat and stamped a few of the glasses of cocktails from Nothing's Better Than stamp set on one side and just watercoloured them using Daffodil Delight and Magenta Madness with a small touch of Granny Apple Green for the fruit.

More information on the stamp set HERE

I embossed the mat using the Subtle embossing folder and added it to the card base which is also       Magenta Madness. A simple message for the front and inside with another glass to complete it. I'm too ashamed to show the results after my fruit tea landed all over it but here is the card beforehand.


 As I said, a very simple, quick card today that anyone can achieve easily (as long as their tea doesn't land on it)!


Tuesday, 18 August 2020

Tips, Tricks and Techniques Tuesday.

Tips, Tricks and Techniques Tuesday.  

Well, today I'm showing a card style that I made on Sunday. In our Stampin' Up! team on a Sunday, we hold a challenge. One of us designs a card and giving descriptions and basic measurements only, we all make the version of the card that was designed. This card today was designed by Claire Keifer. 

I used Mango Melody for my card base and die cut a hole from the centre. The front of the card base was then embossed, I used the new Evergreen Forest 3D folder for this. A white piece of card inside which was scored and folded. Then decorated all around. The hole that was cut out originally was stuck to the front right hand side of the white.

I have used the stamp set, Nothing's Better Than for this, more information HERE

I'm really pleased with how everyone's cards turned out, they were all really stunning.


I hope that you like it too.

Monday, 17 August 2020

Make it Monday

Make it Monday  

Hello again, it seems such a very short week last week since I was last here! 

I believe that Cary told you that we have most extraordinarily hot weather her for the last 2 weeks. It's very unusual for the UK as I'm sure that you are aware.

        Anyway, I'm back with some more projects to hopefully give you ideas to make your own cards.                   I have started by using the stamp set called Nothing's Better Than. A very fun set of stamps that I hope you'll have as much fun with as I have.

|More information HERE

A very #simplestamping card for today. I started with a plain white card base and stamped all around the front edge with some of the words, Coffee, Cookies and Chocolate all stamped in Memento. I then added some of the images to the centre and coloured them in with basic colouring pencils. I had great fun.

A simple message and another lot of images in the inside too completes this very quick and simple card.

 simple cardmaking Nothing's better than stampin up


As I said, very simply made today.


Friday, 7 August 2020

Fun Fold Friday

Fun Fold Friday  

My last card this week, is a tri-fold card. I have made it a slightly special one as it's my
son Jonathan and daughter-in-law Jemma's 4th wedding anniversary on Thursday just gone. 
So a very happy anniversary from me to them both.
Anyway, my card is initially an A4 piece of card cut at 29.7cm by 14.85cm or 5, 7/8"
Unfortunately, A4 card is not a universal measurement. It varies from the UK and Europe to USA and Australia and so on. So if you use your standard A4 card length and measurements close to that, you'll make a beautiful card.
Once cut, I scored it into 3 equal sections, here it is 9.9cm or 3, 7/8th". Yes in the UK we still use both Imperial and Metric measurements. As I grew up with Imperial, I now still use both.
I then took a piece of Window Sheet or acetate slightly larger than the Stitched Rectangles that I die cut out and stamped the Poppies in Stazon on one side.
Once it was thoroughly dry and no risk of smudging, I used my Stampin' Blends in Poppy Parade to colour the images from behind. You cannot colour in Blends onto Stazon as they are both alcohhol based inks and used together they would blend right into each other. Water based marker pens cannot be permanent on Acetate. I then added the frame to the front of the image on the window sheet and finely cut it out. I cut out a rectangle from the front of my card the same size as my frame then using the Adhesive strips I mounted the framed acetate and placed it around the aperture in the card.
As it is a special card I added the retired Painted Poppies sequins from last year and then another Stitched Rectangle frame the same size as before and secured that over the aperture with the sequins in.
Once they are secure, I went onto the inside mats. The mats inside are 14.4cm by 9.5cm and I cut 2, one for both inside faces. I embossed them both using the Subtle embossing folder. From there, it was just a matter of adding the mats to the card and finishing off the messaging.
I added a little Happy Anniversary as a stand to make the card stand like an Easel card.
I really hope they like it?


Here are the products that I used on this week's and today's card.
Painted Poppies stamps, Peaceful Moments stamps, Poppy Moments Dies, Subtle Embossing Folder,  Stitched Rectangles Dies, Stitched Shapes Dies, Blends, Ink pads, Ribbons. Card = Whisper White, Pool Party, Basic Black Daffodil Delight, Blushing Bride and Flirty Flamingo.
Painted Poppies Sequins (sadly now retired), Foam Adhesive Strips, Dimensionals, Window Sheets, Tombow Multipurpose glue.
Follow this link HERE to see all of the products you will need.

Thank you so much for joining me and I really hope that I've been able to
inspire you in some way this week.
Have fun, keep well, stay safe and keep on crafting.
Please stop by and see what creations that Cary hopes to inspire you with next week.
Gill xxxx 😘😍😘

Thursday, 6 August 2020

Throwback Thursday

Throwback Thursday 

Today I have been reminiscing over a stamp set that Stampin' Up! used to sell called Pleasant Poppies.
It was 1 stamp with a row of poppies right across the paper. I used that stamp set a lot.
The one I used today, reminds me of that stamp too only this one is very small.
I stamped the image twice across some sticky notes. Then yep, I fussy cut the images out to give me a mask. I stamped the poppies twice across a Whisper White mat then added the mask.
As I had left some of the sticky on the mask, I was able to put it directly over the previously stamped images. That then covered up what I had stamped and I stamped the images again and repeated it once more.
I then had 3 rows of poppies. Yes, the poppies are rather tiny so I did miss a little of the image in a few places. I used my Basic Black Stampin! Write Marker Pen and just drew the few images that were needed.
Using Daffodil Delight Blends in light at first then the in the dark repeating again the light pen all over.
I added a little strip of the Daffodil Delight Ruched Ribbon and a small bow to the White mat.
That was glued to a Daffodil Delight and then in turn to a Basic Black card mat. I repeated the coloured mats inside to add balance. I stamped 2 poppies to a die cut Stitched circle  and coloured them in the same as before, then added them to the card.
A lovely message, Life is better with a friend like you, added to the front  and Wishing you every happiness this special day will bring to the inside.
The messages are from Peaceful Moments and the images Painted Poppies stamp sets.
More information HERE
Should you decide that you would like to buy the stamps and the matching dies, you can save 10% by ordering the 'bundle'.


Below is the mask that I cut out in Sticky notes.


Here is the gorgeous stamp set that inspired me to make this card, Pleasant Poppies.