Friday 29 May 2020

Fun Fold Friday  

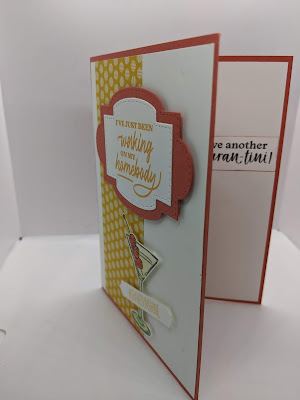
Well you guessed it, I've made a fun fold card.
Today is my favourite of the In Colours for 2019/2021 Purple Posy.
The soft and subtle tones of Purple Posy is really beautiful. 
I have coordinated the card with some of the DSP from the Best Dressed DSP's.
Continuing on, I have also been using the PDF from the Share Sunshine launch.  
The PDF has been produced by Stampin' Up! and is full of messages and images regarding the Covid-19. It cost only $12 or approximately £9.50 in the UK  100% of the proceeds will go to a number of charities, the details are on the link too.
Please click on the link HERE for more information. 
It really is a bargain. A very useful tool to have. 15 pages of light hearted, serious, sensible images and phrases to send to anyone and everyone whatever the situation. It's worth every penny and it doesn't cost a lot of them either!
I intend sending this card to someone special so I have made this a slightly larger card than my usual cards.
I cut a piece of A4 card longways/portrait, at 14.85cm. This was scored and folded at 14.85cm and 7.4cm. The second piece was cut at 12cm by 25cm. Scored and folded at 12.5cm and 6.25cm.
I added the 2 different dsp's from the pack and then chose the messages. 
There were 5 messages in a row on 1 sheet which were just perfect for this card.
Using punches, several dies and fussy cut the outer white card pieces beneath them.


From this last picture, you can see how the front piece was added to the base card.
Here is my double Z fold card.
Thank you for joining me this week, I do hope that you've been able to get some inspiration to 
make your own projects. Please share them with us if you wouldn't mine?
Cary will return next week with some more of her beautiful creations.
Thank you again, Gill :))

Thursday 28 May 2020

Throwback Thursday  

Yep, today is Thursday again and I've made a card with retired materials and coordinated it with the Share Sunshine PDF (More information HERE)
The PDF has been produced by Stampin' Up! and is full of messages and images regarding the Covid-19. It cost only $12 or approximately £9.50 in the UK  100% of the proceeds will go to a number of charities, the details are on the link too.
A very useful tool to have. 15 pages of light hearted, serious, sensible images and phrases to send to anyone and everyone whatever the situation. It's worth every penny.
I have continued my cards this week using the current In Colours from Stampin' Up! Today is the Rococo Rose. I have coordinated it with the DSP Flowering Foils.
Using a marker pen in Rococo Rose too, I have only coloured in the flowers in the one row.


I also embossed the Rococo Rose strip with a retired Basket weave embossing folder.


Wednesday 27 May 2020

Watercolour Wednesday  

Today I started by using watercolour paper. I spritzed the mat with water in preparation for the stamping. I then inked up the background stamp called Birch with Smoky Slate ink. 
I stamped it onto the damp paper and while still wet, I brushed across the stamped image.
It then gave a very smooshed background so I inked up the stamp again and stamped it onto the mat.
It gave a lovely image across the whole mat. Then using the Very Versailles stamp set, I stamped the words on both sides with Night of Navy Ink and left to dry.
On a separate scrap of white, I stamped the leaves twice in Pretty Peacock ink from the same set.
Yes, I fussy cut them both out too!
Going back to the watercoloured mat, I die cut the centre of the mat using Stitched Nested Labels.
I used Dimensionals to fix onto the white embossed mat which was embossed with 
Bricks and Mortar embossing folder. 
The leaves were added too and the whole lot were placed onto the Seaside Spray card base. 
I finished this one off with Just Breathe from the PDF Share Sunshine. 
More information HERE
No demonstrators or Stampin' Up! will profit from purchasing the PDF.  ALL proceeds from the sales will go to the following charities...
  • The World Health Organization’s COVID-Solidarity Response Fund
  • United Way Worldwide’s COVID-19 Community Response and Recovery Fund


I finished this one off with the birthday message and some more leaves on the inside.

Tuesday 26 May 2020

Tips, Tricks and Techniques Tuesday  

Today Ihave continued with the Share Sunshine or Covid 19 PDF from Stampin' Up!
By purchasing the PDF at a cost of $12 or £9.50 approximately. 
In UK Pounds you get 15 pages of images, messages, in several different colours and fonts and you can print it off as many times as you choose without any further payments.
Follow the link HERE for the PDF
This card I have made in Terracotta Tile with Whisper White mats. 
I die cut the message mats from the lovely set Stitched So Sweetly. More info HERE
Lots of lovely shapes and sized dies. 


My tip for today is to use the PDF as much as possible as it's yours to keep for ever.

Monday 25 May 2020

Make It Monday or #simplestamping 

Hello and welcome back. 
Well, what can I say about Cary's posts from last week? Weren't they just beautiful? 
I loved all of the fresh colours she used and the fun fold on Friday, 
well, that has to be my favourite! Which was your favourite or was it too hard to choose?
Anyway, on to this week. I have decided that I am going to concentrate on the gorgeous
PDF that Stampin' Up! have just released called #Share Sunshine.
I love all of the images and the amazing messages in the PDF. There are 15 pages and they 
cost only $12 or about £9.50 in UK Pounds. A Bargain!
Follow this link HERE to buy the PDF
No demonstrator (not even me) gets any commission for selling the pdf, all of the proceeds will be going to the following charities:
                         The World Health Organization’s COVID-Solidarity Response Fun                                                 United Way Worldwide’s COVID-19 Community Response and Recovery Fund           Anyway, here's my first very easy #simplestamping card. I used Pretty Peacock as my card base and a white mat which was cut from the pdf. Nothing technical but the message hits home!


I drew some lines with a ruler to add a little more interest on the card. I used the same colour marker pen.

Friday 22 May 2020

Fun Fold Friday...

Fun folds don't always have to be complicated or complex to create a wow effect. And today's card packs a punch for very little cutting or technical folding.
In fact there is only 1 cut and 2 score lines used to create today's card
First take a piece of card measuring 29.7cm x 14.85cm .
Now score along the long side at 9.9cm in from each end.
With the card landscape mark the right hand edge at 5cm up from the bottom. Now cut diagonally from the top left hand point to the 5cm mark. ( see photos for a better idea)
This piece is the base for your card. I cut another piece of card at 28.7cm x 14.4cm scored it at 9.4cm from each end. I then stamped all over it. I cut up the scorelines to make 3 panels. I then took the center panel and used it as a template to cut another one. I stamped this 4th piece on the revese side. Now when I attacked the panels to my card base I double ched that they left a boarder on all sides and trimed if needed.
Now you can fold this card 2 ways. And I did it the wrong way!! 😒 but hey its my card so....it is what it is 🤣
Well that's it for me this week. We have a team zoom get together tomorrow and a team challenge on Sunday via zoom too so the weekend should be a very sociable one even though I won't be leaving the house 🌞
I hope you have a good weekend and will join me in watching for Gill's creations here next week.
Have fun
Cary xx


Thursday 21 May 2020

Throwback Thursday

Now there are some techniques that just keep coming around because they never really go out of style.  And that's what I'm doing today sharing a project using a technique I first used in 2015!!
Called Bokeh its a photographic term meaning the way the lens renders out-of-focus points of light. For papercrafter like myself it means applying circles of white ink over the top of a background to blur it. 
First I used the retiring 2018/2020 In-Color's  to create a blended background. 
I then created some small circle stamps by die cutting circles from self adhesive funky foam. I used these as stamps and using Stampin Up white kraft ink and randomly stamped over my background. 
The overall effect is rather pleasing to the eye in my opinion. 
Do you have a technique that you like to return to often?


Wednesday 20 May 2020

Watercolour Wednesday

I love a watercolour wash.
Do you?
But are you always happy with your first result?
I'm not!
Sometimes it's didn't work out quite the way I wanted or the effect was too big or the colours didn't merge quite the way I wanted them to....
But stop!
 Don't disgard them they maybe just what you need to complete your project!
Today's card is a perfect example of that. I created a wash wasn't keen so did a second and I'm glad I did!.
My sample looked ok but was missing something...but what?
Then I spied my cast off piece and my brain whirled and bing the light went on!
I dug out some beautiful butterfly dies and set to work.
With careful placement I die cut the embellishments for my card that were perfectly coordinated to the project!
So my advice today...don't thow away your less than perfect attemp at watercolour washes... they might  end up being the  crown jewels on your project!


Tuesday 19 May 2020

Tips, tricks and techniques Tuesday

Today's sample shows 2 little tips. I think they  help with 2 techniques that divides crafters like Marmite ( a savoury spread here in the UK)  you either love it or hate it!!
One is fussy cutting and the other is distressing. I've used both on today's card.
Now my card might not look distressed in the usual way but rather in a clean modern way. Now that sounds rather contradictory I know but bear with me. One of the things that is often used when creating a distressed card is splatering.
Now I use my alcohol blends but rather than tap the pen on another pen. What I do is use the brush end and the cap of the pen. Put the brush into the cap slightly and flick onto your project. I think it gives quite a controlled splatter.
My second tip is about fussy cutting. Now lots of people don't like it as it can be tricky but my best tip is one that might help make it easier for you. Get your comfy scissors and image that you want to fussy cut out. Now move the paper not your scissors I know that sounds very basic but it really is the best tip I know! Practice and I promise it will help you fussy cut with ease 😁