Friday 30 October 2020

Fun Fold Friday - Christmas Rose

 For my last card this week, I started simply. 

Once again using the lovely Christmas Rose, 2 boxed stamp set, I stamped the edges of the main image all around a white card mat in Versamark and then heat embossed the Gold embossing powder. 

More information about Christmas Rose and all of the products from Stampin' Up!  HERE

A simple Old Olive green and Whisper White was all that I used. With exception to some of the gorgeous paper from Ornate Garden double sided papers. They are double whammies as most of the sheets have gold embossed images on! Lovely! So, I used only a small strip of the paper but I think it's all that it needed. I started with a full piece of A4 card and cut it on the short side at 14.85cm by 29.7cm. I folded the card in half and then one side only, folded that in half too. I then added the white embossed mat onto a piece of the Old Olive and adhered it to the front left hand panel. I double sided the Old Olive and added another of the full images on the reverse which I had also heat embossed in gold and die cut out. 

I added a Happy Christmas onto a white mat and adhered it to one of the gorgeous laser cut shapes in the pack of Gold foil papers called Forever Gold Speciality papers. They are absolutely stunning!! I am so grateful that Stampin' Up! had these made they are wonderful!


Thank you so much for joining me this week. It's been a very confusing one for me but I managed to get here in the end!
Please pop by next week and see what delights Cary has in store for you. 
Until I return, take care, stay safe and keep well xxxx :)) 😍😍😍


Thursday 29 October 2020

Throwback Thursday - Christmas Rose

 Today's card is one that really threw me at first but once I got hold of the idea, I just went with it. Once again it's a completely different style of Christmas card which can be happily adjusted to become a birthday or any other celebratory card too. The card was one that I made last year of the year before. A die cut image over a doily and that was it!

This time I stamped the image in the centre and coloured in parts of it with watered down ink from a block. I stamped the image again and coloured in and fussy cut the roses only. They were then mounted over a square, vellum doily which I coloured in with Highland Heather Blends pen. 

A message added inside and out and some of the gorgeous Playing With Patterns Resin Dots again coloured in with the Highland Heather blends pen, is all that I used to complete it.


The card above was my inspiration for today's card.


Wednesday 28 October 2020

Watercolour Wednesday - Christmas Rose

Hello and apologies for my lateness in posting today! Yesterday I packaged up lots and lots of parcels amid making a card. When I went to make the card for today, The stamps were missing!!! I searched high and low for them, I thought they may have fallen in the parcels bags too but no! They had fallen under a unit! Thank fully, I've now made a card albeit very different from my normal traditional style. Using again the lovely set of Christmas Rose. More information HERE

For the watercolour theme today, I have gone completely off piste! 4 squares of bright colours. Red, Yellow, Green and Purple. Or in Stampin' Up! colours, Poppy Parade, Daffodil Delight, Granny Apple Green and Gorgeous Grape. I inked a large block with each colour in 1 quarter of the block, then spritzed it with lots of water. Using Watercolour paper, I spritzed that too then added the block ink side down onto the paper. I gently moved the block so that the colours weren't too regimented. 

Once dry, I stamped in Versamark Ink Pad the main image and after using silver embossing powder, I heat set it. It was added to a Poppy Parade mat then fixed to a White card base then a strip of the lovely Real Red Sheer Ribbon, a bow and a few messages and my very different style Christmas card is complete. 


Not at all like the kind of Christmas card that I am used to making but this certainly makes a change and I know exactly who WILL appreciate this one! Thankfully, :))

Tuesday 27 October 2020

Technique Tuesday - Christmas Rose


 Today's card is supposed to be a technique but it's actually very similar to yesterday's simplestamping card. The difference is that I cut the card front in half. Using the Christmas Rose stamp set, I stamped half of the image on the front mat and using a dauber and the very pale green of Pool Party ink and coloured roughly over the whole mat which started out as white. On a separate piece of white card, I stamped the image 3 times then coloured in only the flowers using the stamp once again. Yes, I did my lovely fussy cutting and cut all of the flowers out. The yellow (Daffodil Delight) rose was placed over the stamped area and the other 2 roses (Poppy Parade) were separated and placed either side.

When I open the card, the 3rd large rose was placed directly below the front one and a message added. 

Very simple and straightforward. More information in our shop HERE


Monday 26 October 2020

Make It Monday - Christmas Rose

 Hello and welcome. This week I had intended using a kit called Boho Indigo but as Cary made such a lovely job of the Gorgeous Posies cards last week, I changed my project to the Christmas Rose double stamp set. More information HERE 

This gorgeous set arrived last winter ready for Christmas and I am so pleased that it's still with us now so I can show you some of the amazing projects that can be made using it. It has a set of dies to go with it, some of which are really intricate, so please have a look around in our shop and see what other amazing things you can find too.  The set is a box of 2 lots of stamps, 1 is the whole image of the Christmas rose and the other is lots of different elements of the 1st image and more. The whole stamp is in red rubber clear mount and the other set is photopolymer. I thought I was going mad when I first received mine but no. It's done for a reason. I am a very strong believer that we must still use the stamp sets from previous years as a. I still have them, b. I still love them and c. just because they have retired doesn't mean they are no longer needed! That goes for people too. Just because people retire doesn't mean they cannot be very useful still. They are invaluable!

Today's project is of course a #simplestamping one. I used the whole stamp image, only 1 of the other images plus messages. I love the way that the roses can both be coloured in together with the one stamp or not if you don't want to.

All that I used for this card today was Memento Black, Night of Navy and the gorgeous Mango Melody ink pads. The Mango Melody is a gorgeous deeper yellow than the beautifully bright Daffodil Delight.


A few of the little branches and another message for the inside to complete this card today. 


Friday 23 October 2020

Fun fold Friday's Gorgeous Posies

 Wahoo the weekend is here !! 😀 But sadly that means the my last day sharing the Gorgeous Posies with you all 😪 

So for today's final post using these beautiful stamps and kit I  have made a card using both the stamp set and the card kit!!

Called a diamond spring fold card it looks impressive and very 3 dimentional. It starts with a piece of card measuring 14 85cm x 28cm. You then score it at 7cm and 14cm along the long side. 

Next mark both sides at 21cm. Now score diagonally from the 21cm marks to the opposite 7cm scoreline. 

Next mark the center point at the top of the cardstock and cut diagonally to the 21cm marks to create a diamond shape.

Now fold the 7cm score line as a valey fold, the 2 diagonal scorelines as mountains and finally the 14cm score line as a valley fold. 

The photo below best explains all of the above! 

To decorate my card I tool one of the beautiful printed panels from the Gorgeous Posies kit and trimmed it to fit on the diamond. I mounted it onto a gold mat as the card fronts in the kit all have gold foiling on them!

For the sentiment and focal point I used the laser cut circle and long piece from the kit. I decorated them with the die cut flowers also in the kit. The leaves I fussy cut from another card front.

For the base and side panels I created my own background paper using white card and pink ink. I started by gently blendingbthe ink over the card, I wasn't going for complete coverage as I wanted to replicate the splotchy background.  Next I splattered some pink ink using my water brush. Then finally using the spotty stamp from the set and 2 and 3rd generational stamping randomly stamped all over.  I mounted these pieces on gold foil as well to create quite a luxurious effect.

Well thats it from me this week I do hope you've enjoyed the projects and feel inspired by them. As always all the products are available from our online shop HERE

Have a great weekend and please join us next week when Gill will be sharing the inspiration.

Have fun

Cary xx

 Gorgeous Posies stampin up fun fold diamond spring fold


Thursday 22 October 2020

Throwback Thursday Gorgeous Posies

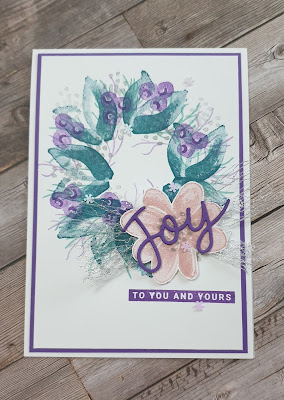
 Today's Throwback Thursday card is a throwback toooooo...christmas card making 🤪!!!! what can I say? I straight away saw a wreath when I saw the stamps and wreaths mean Christmas so here we are a Christmas wreath card inspiration to share today 😉

Making the card was super simple I took a circle and using a pencil lightly drew around it. This gave me a rough idea of where to stamp but after that it was free style all the way. 

I did emply the generational stamping technique from Monday's post. It's such a great simple way to add depth and texture. I stamped the leaves first then filled in as I  saw fit. 

I then stamped 1 large flower and fussy cut it out. Then die cut the word joy , 2 short pieces of metallic mesh ribbon later and my focal point was made.

I then stamped the second part of the sentiment directly onto the card front and sprinkled liberally with my favourite adhesive-backed snowflakes ❄  and voilà!!

I kept the colour pallette simple with a white card base and gorgeous grape purple mat to tie it all together.

I love when I can use stamps work for different occasions like non Christmas for Christmas and visa versa! Do you do this? It's  a great way to get more bang for your buck as they say 😉 

To purchase any or all the products used in todays card please click HERE

gorgeouse Posies stampin up wreath christmas card


Wednesday 21 October 2020

Watercolour Wednesday Gorgeous Posies

 Well it sure it full of water this watercolour Wednesday here in my small part of the world!! It's raining cats and dogs!! I'm so glad that the colour pallette I chose for today's Gorgeous Posies inspiration has flashes of bright colour! Far more cheerful than the grim, grots and grimey weather I've got. I hope some of you are having far better lucky in the weather department.

Well there is one thing about the rain that's always fascinated me and thats when you see water on the oily patch of road. What's  that got to do with today's card I hear you cry!! Well hang in there and I'll explain.

For the watercolour background today I mixed water and alcohol! First create a nice wet watercolour wash over wet watercolour paper. Now the trick is to get it wet but not too wet so I suggest you play with this technique a few times to get the right amount of wetness. Next put some isopropyl alcohol into a spritzer bottle. 

Now the fun begins spritzer the alcohol over the wet watercolour paper and watch the effect. The alcohol and water don't mix and the alcohol pushes the water away. It's great fun to watch. The finished effect is spots and speckles on the background. Sadly my photps don't do the effect justice so you'll have to have a go yourself to get a better idea 😏

Anyway I'm off with my brolly and wellies to face the wet stuff. Have a fun day x

All products used, except the isopropyl alcohol,  can be found HERE


Tuesday 20 October 2020

Tips, Tricks and Techniques Tuesday Gorgeous Posies

 Today I'm sharing a card that has a twist on a technique that is called Triple Stamping. Of course I've used the Gorgeous Posies stamps and a piece of the beautiful white and gold ribbon that comes from the Gorgeous Posies kit,  you get so much that I thought this card just called out for it!

So for today's card I started out with a white mat that measured 13.9cm x 9.5cm, but you can use any size to fit your card. I then had fun creating a pretty stamped background that extended roughly 3/4 of the way up the card in a portrait orientation. I then stamped my sentiment in the open space at the top.

Next I took out my nesting dies. I have chosen to use the Stitched Nested label dies from Stampin Up but any nice layering dies would work. Then I worked out the sizes that worked for me by laying them onto the card working from the top leaving the top edge straight. When happy I die cut them all out at the same time.

Once I'd die cut I cut a mat for the main piece of the card and stuck it together.  Now using the same colour card, a beautiful rich shade of purple called Rich Razzleberry ( fab name!) I matted the die cut layers. Once I'd mounted them on their mats I layer the whole thing together. 

I like the effect that having all the layers start at the same point gives do you?

All materials used can be purchased HERE


Monday 19 October 2020

Make it simple Monday Gorgeous Posies

 Hello and welcome to the first of this weeks posts. I had an amazing weekend!! On Saturday we held a charity crafting session all day via videoconferencing.  The wonderful participants all received the stunning Gorgeous Posies kit. The stunning Gorgeous Posies stamp set is available separately.  So having had a fab day playing with the kit I thought I'd share some inspiration using the stamp set this week.

So for today's #simplestamping project I have created 3 samples identical in design but using only one colour ink for each design. I have chosen to use the three primary colours of red, blue and yellow. I have also used a technique that is great for beginner stampers called generational stamping. This simple technique makes the most of an individual ink pad and is the reason I always advice those starting out on their stamping journey to choose a darker shade of ink.

Generational stamping is where you ink once and stamp multiple times. In the photo below I stamped the flower 6 times from just 1 inking! So ink up your stamp and stamp. Now gently breathe, or huff as I call it, onto the stamp to reactivate the ink left on the stamp. (This only works on water based ink pads as the moisture in the breathe adds water to the remaining ink.) 

Now stamp again and repeat for as may times as you like or until all the ink has been used 🙂

I find this simple technique adds depth and texture to a project as well as allowing you to create gorgeous tonal colours on a project.

Well I hope you'll have another look at the inks you have and explore the other colours that you can create using them. 

You can purchase the beautiful kit HERE

simple stampin gorgeous posies stampin up ink technique


 gorgeous posies stampin up easy card


Friday 16 October 2020

Fun Fold Friday - Joyful Holly

 Welcome back for this fun fold Friday.  The sun is shining but it's bitterly cold here today so I'm glad that I'm here indoors trying to warm myself up! Though saying that, my daughter in law says that she's warm! Figure that one out!! 😀😕 I must say that she is chasing my nearly 9 month old grand son Theo around! So I guess she may well be very warm! He's very active now, he stands and wants to be walked all of the time. If he's not walking, he's either crawling around at great speed, playing with the dog's water bowl or chasing the dogs! The dogs both love him too thankfully. He throws the ball for them and they nudge it back to him to do it again.                  

Anyway, back to my card for today. It is a very simple fold. I know that I say that a lot but it honestly is. I cut a piece of card at 14.85cm by the full length of a piece of A4 card, which in the UK is 29.7cm. I have again used the lovely Joyful Holly stamp set. At the beginning of this week I said that it wasn't for me but I have now changed my mind and will be making lots more holly based cards for this Christmas and other occasions too. More information on the stamps HERE

I scored and folded it at 9.9cm and the last part at 4.8cm so that the 2 edges of the card meet each other. Very simple! Yes it is a gatefold card but a slightly irregular one. I started with a Thick white card base and used Real Red mats for the front panels. I embossed them using the embossing folder called Brick and Mortar. I love the finish it gives on the card. I then stamped the image of Santa onto a white mat and coloured him in using the Stampin' Up blends pens. Once finished I die cut the image mat and some white frames using the same die set and made a frame to go on top. I added Foam Adhesive strips along the border of the frame where I had fixed a piece of acetate to. I sprinkled several pinches of Peaceful Poppies sequins from last years catalogue onto the Santa image and squished them all into the centre then adhered the frame over both the sequins and the image. 


On a separate piece of white card, I stamped and coloured in the Holly sprigs and again fussy cut them out. Using Dimensionals (foam shapes) I added them to the card. A couple of messages and some more holly on the inside and the card is complete. 

As I said earlier, a very simple, fun folded card today. 

That's it from me for this week, Cary will return on Monday to show you some of her creations. I hope you'll join her and see what she's been up to. 

Meanwhile, have a good weekend, take care, stay safe and keep well. Gill xxxxx 😘😍😘