Friday 31 May 2024

Fun fold Friday Thoughtful Wishes

 Hello and thank you once more for joining me this week. If you have been watching this week you will know that I have been using the gorgeous Thoughtful Wishes stamp set and some of the rest of the suite. It truly is a really gorgeous set. Today's card is of course as it is Friday, a Fun Fold card. Now I know a lot of you don't think that there is much fun in making a fun fold card but trust me...there really is. :)) 

Today's card is no exception. I started off with an A4 piece of Thick, white card and cut it down portrait style to measure 14.85cm or 5,7/8" by the full length of the card. I then folded it at 9.9cm from each side and scored again at 4.95from each side so there are now 2 score lines on each side. This makes a type of Gate fold card or I believe in this case I think it may be called a Balcony card. I folded the first 2 folds outwards and the next 2 folds inwards. So basically a mountain and a valley fold on both sides. 

Taking 2 sheets of DSP from the Thoughtful Journey Designer Series Papers and trimmed them to 14.4cm high and placing them face to face, along the outer edge again at 14.4cm or 5,5/8". I joined them at the back of the paper straight along the centre and then adhere them onto the card base. 

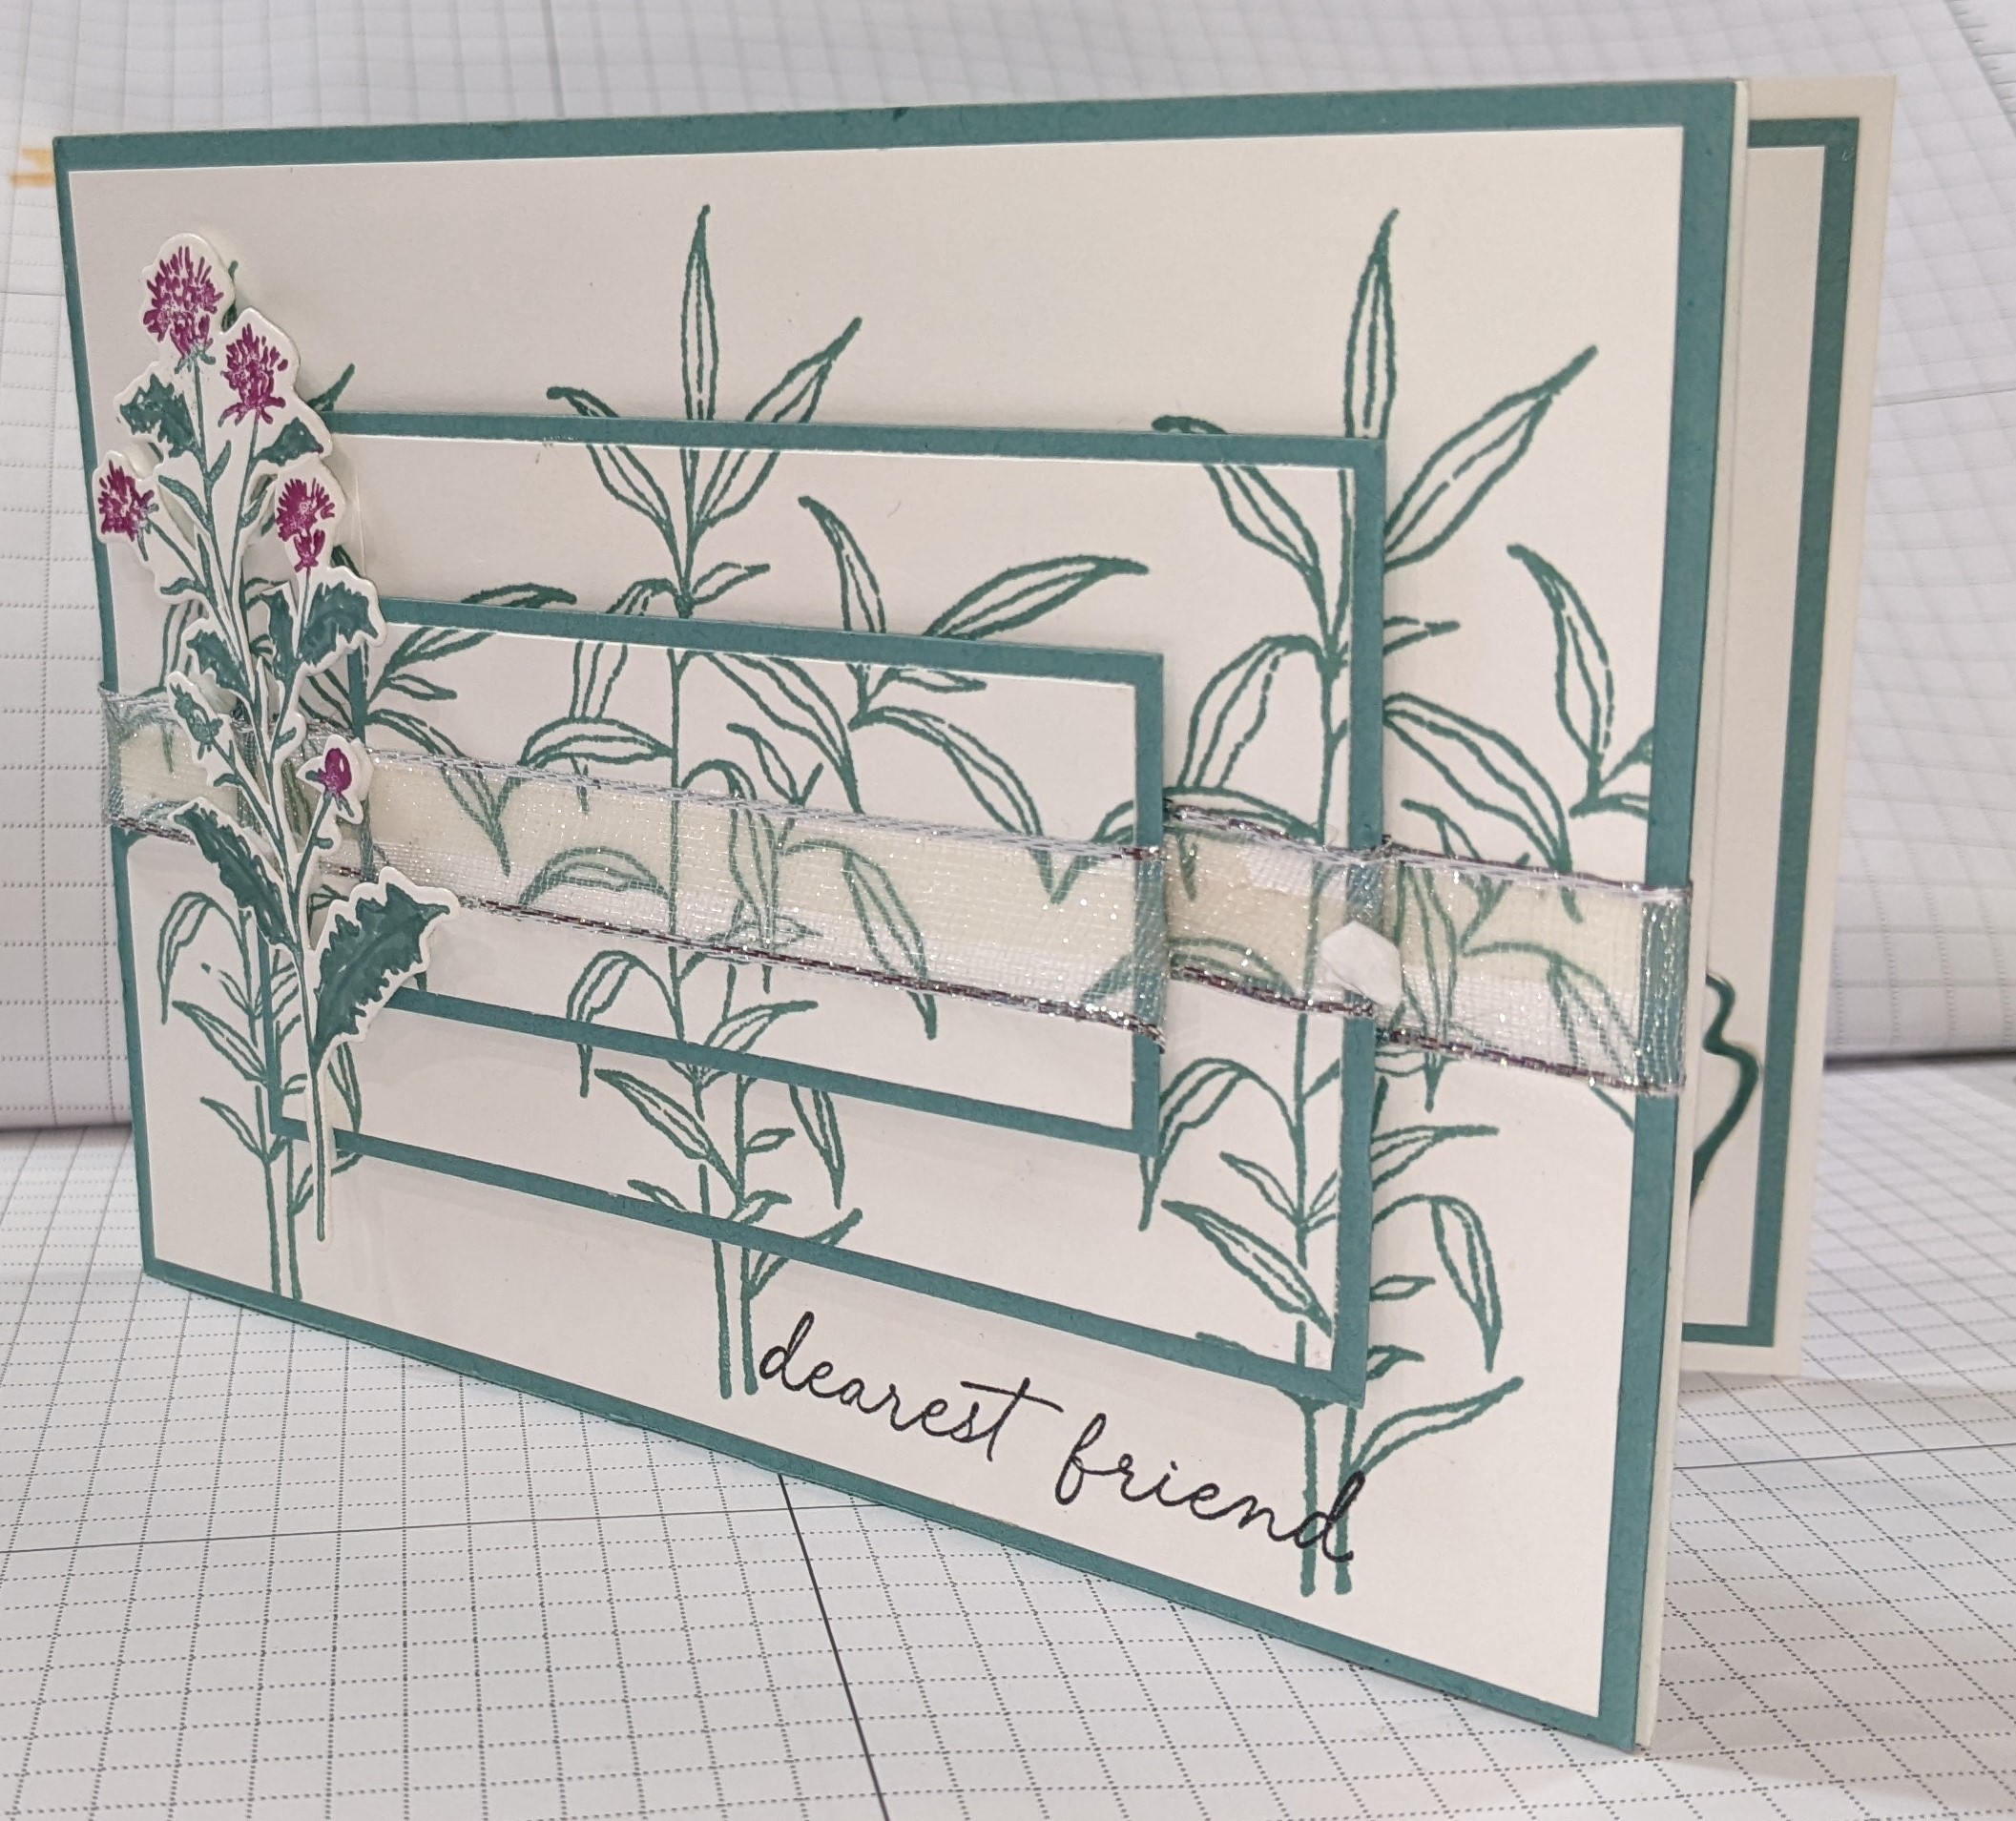
After the card was completed, I started to die cut. I rather like the Elegant Borders dies and co-ordinated them with the Delicate Forest arch die. I used a piece of Fresh Freesia for the borders and Misty Moonlight for the archway. Attaching the edges of the borders to the arch on both sides, I then laid them onto the card base so the inner edges of the card base were perfectly straight facing towards me and added the pieces 1 by 1. A few sentiments added to the front and some more die cuts to the back (for the message to be written) and this one is finished. I used Adoring Hearts sentiment for the back of the card. It seemed to fit perfectly.


Well, once again, that's it from me for another week, Cary will be back on Monday to share her creations so please stop by to see what she will be sharing. 

I will be back the following week but as always and until then ... TAKE CARE, STAY WELL AND ALWAYS.....

KEEP ON CRAFTING!!

😍😍 xxx Gill xxx 😍😍

Thursday 30 May 2024

This or That Thursday - Thoughtful Wishes

 Hello on another cool and wet Thursday. Unfortunately, unlike Cary I am a very cold mortal and Cary is the complete opposite! She is constantly wanting all of the doors and windows open and I want them shut! So while she will be happy with the weather that we are to expect today, I for a change (NOT)  will not be! I will be putting my jumpers on once again and wishing for the sunshine :)) Today's cards are both similar of course but obviously different. Using the Thoughtful Wishes stamps, paper, card and dies, I have used some of the In Colours like Shy Shamrock, a lovely fresh and bright green and also Peach Pie which is a gorgeous beautiful peach colour. I have used some of the papers from the Thoughtful Journey's DSP and matted them onto a piece of the colour matching card. I have layered the smaller pieces over the larger pieces and added a few die-cuts from the range of dies in the suite. On the peach a simple Dearest Friend with a Night of Navy die-cut and strip of the same ribbon. Then on the green, I have added silver foil with Missing you....

THIS


THAT


Wednesday 29 May 2024

Watercolour Wednesday - Thoughtful Wishes

 Hello on a very wet Wednesday! Yes, it's here again in the UK. It has barely stopped in 3 days. That's the UK for you we most definitely can have all 4 seasons in the one day! Not fun. Anyway, I'm indoors so able to stay nice and dry so today is Watercolour Wednesday and I have made the cheats version of a watercolour card. Using a piece of Designer Series Paper (DSP) from the Thoughtful Journey set of papers, the stamps from the Thoughtful Wishes set. I cut a piece and added it to the front of a Pretty Peacock card base. I then started stamping and die-cutting some of the lovely leaves from the Thoughtful Wishes set of dies. Once they were done, I added them to the front of the card. A sentiment on the front and inside completes this card. I am sorry there is no water in sight on my card today! I did say it's a cheat's card! :)


Tuesday 28 May 2024

Tips tricks and techniques Thoughtful Wishes

Hello and thank you for joining me today. I must apologise for missing the blog out yesterday. It was my son's 30th birthday and I haven't seen him since the middle of last year so it was important to see him and like a twit I forgot to make a card for the blog! Today though, I have not forgotten. This week I will be using the lovely Thoughtful Wishes stamp set and dies. My card is a very simple one by stamping the image onto a piece of card 10.0 cm by 14.4cm I stamped the large leaves 3 times. Then I chopped it up. I started with a 2 cm border and once the outer edge was cut I trimmed again at 1.5cm that left me with a small rectangle for the centre. I matted each rectangle onto a piece of gorgeous greenish blue of Lost Lagoon. I then added a piece of retired ribbon in white going across the centre of the 3 pieces and then once they were all ready, I added dimensionals (double sided foam shapes) to the back of each piece. It was then a case of adding each layer to the card base and matching the pattern that I had stamped onto the white. I stamped a sentiment at the bottom and stamped and diecut a flower from the stamps and dies to complete it.


Friday 24 May 2024

Fun fold Friday Simply Zinnia

 Happy Friday 😊.  Here in the UK it's  a bank holiday weekend woo hoo! It's also a bust weekend for me as we are hosting our catalogue launch event tomorrow which will be great fun for sure. And on  Sunday I'm going to take my partner to Wembley football stadium for her teams cup final! Soo I'll need a rest on the bank holiday Monday for sure 🤣 just as well it's Gill's turn to share her inspiration with us all here!

So back to the real reason for your visit the final card of this weeks inspiration using the fantastic Flowering Zinnias suite

Simply Zinnia stampin up flowering Zinnias paper basket thank you card

The card is a basket full of flowers fussy cut from the amazing pattern paper. 

Simply Zinnia stampin up flowering Zinnias paper basket thank you card

The card starts out with the basket made from a card base with the scoreline at the top. A slit is then cut into the scoreline to allow a separate piece of card to slip throught.
The top of the inset is decorated with the flowers from the pattern paper. 

Simply Zinnia stampin up flowering Zinnias paper basket thank you card

When the whole insert panel is removed you can see the hidden sentiment .

Simply Zinnia stampin up flowering Zinnias paper basket thank you card

On the reverse of the insert is where you would write your message. One of the advantages to double-sided pattern paper is that when you fussy cut or die cut images out the reverse is still pretty !

Simply Zinnia stampin up flowering Zinnias paper basket thank you card

I do hope you'll have a great weekend whatever you're doing and will join me back here on Monday to see what delights Gill will be sharing with us all. 

Simply Zinnia stampin up flowering Zinnias paper basket thank you card

Have fun

Cary xx


Thursday 23 May 2024

This or That Thursday Simply Zinnia

 Let me introduce you to a new core colour from Stampin' Up! Called Basic Beige it's a new addition to the neutrals colour family.  It's a great addition that will work so well with so many colour palettes. It comes in ink, cardstock, reinker and ribbon.

Simply Zinnia stampin up tonal blended cards
 
So with this neutral in mind I wondered how it would work with the pretty floral Simply Zinnia stamp set. Well I chose other shades of beige/light brown for the colour palette and am very happy with the final result!

Simply Zinnia stampin up tonal blended cards

I stamped the large flower head randomly across a piece of basic white cardstock in the basic Beige,  crumb cake and pecan pie ink. I then went around the edges of the card and blended first the Beige then on the very edge crumb cake with blending brushes. I stamped the sentiment on white in pecan pien the darkest shade, and blended the dies as with the stamped piece. A few pearl gems and it was complete.
As it's This or That Thursday there had to be another card to chose from so using the same designe I have created a version using one of the new 2024-2026 In-Color's called Peach Pie. I used 2 other peachy /orange colours to work with it to complete the card.

Simply Zinnia stampin up tonal blended cards

For the inside of each card I stamped and blended around the white mat .

Simply Zinnia stampin up tonal blended cards

So which do you prefer 🤔 This with it's neautral colour palette?  Or That with it's  bold orange colour way?

Simply Zinnia stampin up tonal blended cards


Wednesday 22 May 2024

Watercolour Wednesday Simply Zinnia

Watercolour Wednesday's are so much fun when you take the pressure off! Using  watercolour techniques can be a bit intimidating... but not the technique I've used for today's Simply Zinnia inspiration! 
It all starts with a piece of grey board from the back of a pack of pattern paper.  Add some low tack tape,  reinkers, water, basic white cardstock and a waterpainter and your set for a fun easy way to create watercolour backgrounds that you can use in so many ways!
Cut your cardstock to a size slightly larger than the size you want it to end up at. Next use the low tack tape and tape the cardstock onto the grey board creating a narrow boarder all the way around. Taping onto the grey board helps keep the cardstock flat when dried.
Next drop a few drops of reinker onto a wipeable surface or into a clean bottle cap and add a drop or two of water. Next with your widest waterpainter load up the ink and swipe it across the white cardstock continuously until the colour runs out.  Continue until the panel is coloured the way you want it to be. You can add layers of colour to the cardstock but don't be tempted to add too much water as it's not watercolour paper 😉 Then either leave the panel to dry or use a heat tool to speed up the process. 

Simply Zinnia stampin up watercolour background card

You can also add splatters of colour across the panel too. I used white and black on the piece I created for the flowers on the card.

Simply Zinnia stampin up watercolour background card

Top tip if your tape doesn't want to lift easily the use your heat tool or hairdryer to gently warm the tape. The warmth will loosen the adhesive and help it come away easily. 
Once the backgrounds were dry I adhered the green one onto a card base. 
The pink one I stamped the single flower from the Simply Zinnia stamps in black ink onto it. I ended up with 5 full flowers and 2 partial flowers which I die cut out using the coordinating Dies.

Simply Zinnia stampin up watercolour background card

The leaves were stamped in black ink onto green cardstock. Then I used my watercolour pencils to add shadows and highlights to the leaves befor die cutting them out. 
I used the white watercolour pencil on the leaves and a white gel pen on the stamps of the flowers. These white highlights really help make the finished piece look beautiful. 

Simply Zinnia stampin up watercolour background card

The part flowers are used to decorate the inside panel of the card... you can't waste such pretty things 😉.
The flowers and leaves are adhered flat but with some of the leaves just not completely adhered down to give a little texture. The sentiment is adhered using 3d foam .


Simply Zinnia stampin up watercolour background card


All in all a fun and colourful card that doesn't rely on colouring in to give the flowers their colour.. great for those of us who aren't that way inclined 😉


Tuesday 21 May 2024

Tips tricks and techniques Tuesday Simply Zinnia

 Do you like pattern paper? Do you stoke it and look at it lovingly only to put it back in it's pack ? Do you? Well I do! There the truth is out I love pattern paper but rarely use it! Usually because it's too nice to waste 🤣 The other side of the coin is what do you do with those papers that just aren't quite you? You know the ones that just don't spark your creativity!  Well I have a rule that may help. When you get a pack of pattern paper tell yourself that you can't use any of it until you've made a card using some of the paper you like the least! And that is just what I've done for today's sample!

The amazing Simply Zinnia stamps are a part of a gorgeous suite of products that include the awesome Flowering Zinnia pattern papers! The colours are bold and bright as are the images. Some of the flowers can be cut out using the coordinating Simply Zinnia dies

Simply zinnia stampin up pattern paper techniques

These papers sure do pack a punch ! But for me there is one that just didn't speak to my creativity.  The paper is the top left corner one so following the use the one you like the least first rule I knew what need to be done.

My top tip for papers that are not to your taste, to bold for you or ones you just don't like is to use it in one of 2 ways. The first is to cover the piece entirely with a piece of vellum . This mutes the paper and allows it to receed into the background and allows your focal point to shine.

The second way that you can use the paper is to use  small pieces. This is what I've done for today's sample. The card is clean and simple yet uses the most powerful of the papers! 

Simply zinnia stampin up pattern paper techniques

Top tip for doing this technique is to remember to place the pieces in order as you cut them so that you don't have to spend time matching the patter up! Ask me how I know 🤣
By keeping the colour palette white with just pops of colour the overall effect isn't as super busy as it might be .
For the next sample I have used the same idea but stepped it up a little. The paper isn't quite as busy as the first which allows there to be a little more going on. 

Simply zinnia stampin up pattern paper techniques
 
Because the background of the paper is white this makes it a little less busy. So adding texture to the panel behind the paper strips makes the card a little more. Splitting and fussy cutting the sentiment out also brings another touch of something something along with the sequins.

Simply zinnia stampin up pattern paper techniques

All in all both these card show how you can use those bold papers to create beautiful cards using the simple trick of cutting the paper up!

Monday 20 May 2024

Make it simple Monday Simply Zinnia

 Hello and welcome to our blog. My name's Cary and I'll  be sharing post's this week using the Simply Zinnia stamps as well as other coordinating products. The stamps are great for all types of styles and techniques. 

Simply Zinnia stampin up clean and simple easy quick thank you card


Monday's are always make it simple projects and it doesn’t get any simpler than the sample I'm sharing! Sometimes all you need are stamps, ink, paper and a little colour inspiration. 

Today's card was inspired by a pack of seeds! The picture on the front of the packet of zinnia seed showed beautiful bold and bright flowers. So taking the colours from the packet, and after stamping the largest stamp from  the Simply Zinnia set onto a basic white card base, I grabbed my watercolour pencils and copied the colours!

Simply Zinnia stampin up clean and simple easy quick thank you card

Can I share a secret 🙊?  I'm a frustrated painter 🎨 I've always wanted to be able too draw and paint beautiful things! Sadly I'm not talented that way 😔 But using stamps and ink and a colouring medium it's possible to pretend that you can paint!

Simply Zinnia stampin up clean and simple easy quick thank you card

This stamped image and the addition of some watercolour pencils has created a beautiful image that I'm proud to say I made and I just know that anyone who wanted to could make one too!

Join me tomorrow for more Simply Zinnia inspiration ✨️ 


Friday 17 May 2024

Fun Fold Friday - Crafting With You

 Well, I can't believe that it's Friday already! Where has the week gone? Anyway, for my last card this week using the Crafting With You stamps and dies, I have had a ball!! I have really gone to town on this one as it seemed appropriate to go out with a pop!


I made an Easel card with a difference. A standard square card base 14.85 x 29.7cm and scored at 14.85cm again. This is a 5,3/4" square card as I used a piece of A4 card and scored it in half and then made the height the same as the width. I have used a sheet of Stampin' Up! grid paper to cover the whole card back and front and then edged it off with some of the remnants of the Bright and Beautiful Designer Series Papers which have carried over to this years new catalogue fortunately.


 I then went die cutting mad! I have literally almost die cut every shape and image several times and splattered them all over the card. I am chuffed with the final result! It's different but I like it! 😍


Thank you for joining me this week again. Cary will be back on Monday to share her creations. 

Until I return the week after next, please take care, stay safe but as always...

KEEP ON CRAFTING. 

😍😍😍  xx Gill xx  😍😍😍