Showing posts with label #2biggirlscrafting #avoidthestresscraftinstead #stampinupuk #funfoldfriday. Show all posts

Friday, 27 September 2024

Fun fold Friday Snowy Wonder

 Where does the time go? All of a sudden it's Friday 😜 Fun Fold Friday to be exact! So if you haven't already guessed today's Snowy Wonder inspiration is a fun fold 🤣. I'm calling today's fun fold a stepped pop out card, not sure it's the correct name but it's what I'm going with 😉

The card starts with a basic top fold card, 10.5cm x 29.7cm scored at 14.85cm.  You're then going to create 4 tubes of cardstock.  The first being 10.5cm x 17.5cm scored at 3.5cm, 7cm, 10.5cm and 14cm. Reinforce all the scorelines and fold all the lines as mountain folds. Next apply adhesive along one edge and fold into a tube.

The next tubes are  made the same but with pieces of cardstock getting progressively smaller...

 Second piece measuring 7.5cm x 15 cm scored at 3cm, 6cm, 9cm, and 12cm.

Third piece measuring 5.5cm x 12.5cm scored at 2.5cm, 5cm, 7.5cm and 10cm.

Fourth piece measuring 3cm x 10cm scored at 2cm, 4cm, 6cm and 8cm.

The next part is all about decorating the inside of the card base and 2 sides of the 4 tubes. I suggest adhering any pattern paper before adhering the the tubes as it might otherwise get a little tricky. 

Once the tubes and inside of the cardbase is decorated take the largest tube and adhere it just above the center scoreline of the cardbase. Place adhesive on the 2 undecorated sides with one side on both top and bottom of the cardbase.

Next adhere the other tubes, stacking them one on top of the other with adhesive adhering them to the tube below and the card base. This is then your stepped pop out card base.

Don't forget to decorate the outside of your card. Mine is decorated quite plainly... 

Snowy wonder stampin up funfold Christmas card stepped pop out card

as all the wow is on the inside....

Snowy wonder stampin up funfold Christmas card stepped pop out card

Aren't these dancing penguins just the cutest? Dreassed in their top hats with their candycane canes? And did you spot the cheeky little undressed penguin? He's there because you can't have an even number of penguins can you 🤣
Here is a side view of the steps and our cheeky number 11 penguin.

Snowy wonder stampin up funfold Christmas card stepped pop out card

You can decorate the back of the card as a place to write your personal message too 😉

Snowy wonder stampin up funfold Christmas card stepped pop out card

All in all I had great fun making this dancing troop of penguins and I hope you have enjoyed this week's inspiration using the fun and cute Snowy Wonder  stamps and dies.


Snowy wonder stampin up funfold Christmas card stepped pop out card

Well that all from me this week.  I'll be back after Gill has shared her talent with us all next week. 
Have a great weekend and whatever you're upto  remember..
Have Fun!
Cary xx


Friday, 13 September 2024

Fun fold Friday Leaf Collection

 Brrr it's certainly autumnal 🍂 in my small part of the world! The temperature has dropped significantly down to 8°! But the sun is shining and the rain has stopped, for the moment! Why is the weather important I hear you ask.... Well it brings my mind to richer colour palettes and thoughts of Christmas with all it's glittey goodness. Does the weather influence your crafting mood?

With all that in mind about my colour palette,  as today is fun fold Friday, and the wonderful Leaf Collection stamp is soo elegant here is the final card of the week....

Leaf collection stampin up puzzle birthday card

The called is called a puzzle card and is easier than it appears at first glance. All you need for the card base is a piece of cardstock measuring 10.5cm x 29.7cm (4¼" x 11") . Then score at 3.7cm and 7.4cm in from each end. (1⅜" x 2 ¾") Burnish the folds well as mountain then valley from each end. This is your cardbase it should look like a gatefold with the front folded back on it's self.

Leaf collection stampin up puzzle birthday card

Next take a piece of cardstock measuring 14.85cm x 10.5cm ( 5½" x 4¼") and with the cardstock landscape cut in half at 5.25cm (2⅛") then cut 5cm (2")from each end so that you have 4 pieces in total that when put back together create a 14.85cm x 10.5cm ( 5½" x 4¼") rectangle. These are your puzzles pieces.
Adhere the pieces to the narrow front panel so that they cover the front of the card. It's important that the first piece you adhere is fitted neatly to the corner where you start as the other should then fit in neatly too.

Leaf collection stampin up puzzle birthday card

Next decorate as desired. If you're using a directional paper make sure that you cut it carefully to fit the panels on the card front. For today's sample I have heat embossed the Leaf collection stamp onto white and black cardstock and used gold embossing powder. 
I used gold foil for the card front and as a mat for the inside of the card. It is also used it for the sentiment panels.

Leaf collection stampin up puzzle birthday card

A few gold foil gems and the card is ready to be sent to it's recipient. Do you like the richness of the colour palette?  Does it bring to mind autumn? Does it have the shiny touch of Christmas? 

Well that's all from me this week I'll be back next week to partake of the inspiration that Gill will be sharing as I hope you will be.

Whatever the weather where you are I hope you find time to be creative this weekend. Take care and remember..

Have fun!  

Cary xx

Friday, 30 August 2024

Fun fold Friday Beach Day

 A simple fun fold this Friday using the Beach Day stamps and Dies. I have to say I've had great fun creating with the stamps and dies. They really do make you think of sunny days at the beach ⛱️ 

Beach day stampin up simple stepper fum fold card

The fun fold is a simple stepper card that only requires 3 scorelines!  It starts with a piece of cardstock measuring 10.5cm x 20cm  ( 4¼" x 8") Now score at 2.5cm, 5cm and 12.5cm ( 1", 2" and 5"). Starting at the first scoreline fold mountain,  valley and mountain. This is the very basic card base.

Beach day stampin up simple stepper fum fold card

To decorate you can add extra cardstock to the large front panel that can measure what ever you wish just make sure it fits in an envelope 😉 For today's card I created a blended beach scene. The wave dies work beautifully to add depth and movement to the card.

Beach day stampin up simple stepper fum fold card

One of the great things with this card base is that you can decorate over the top edge. This creates lots of interest.  The seagulls are great for this!

Beach day stampin up simple stepper fum fold card

The reverse of the card makes the perfect place to write your message. 

Beach day stampin up simple stepper fum fold card

Well that's all from me this week. I have a very busy few day with my very active 6 ½ year old grandson,  wish me luck 🤣.

 I hope you'll join me back here next week as Gill will be sharing her creations with us all. 

Have fun

Cary xx


Friday, 16 August 2024

Fun fold Friday Pattern paper week

 Did you know that you can make a card base using Stampin' Up!  Pattern paper?  It's strong enough 💪 to even make a fun fold card! The fold I'm sharing today is called a faux stepper card and is a great way to showcase those lovely pattern papers you have 😉

The paper for today's fun fold is called Take to the Sky It's one of the papers in the 15% off offer that finishes at the end of the month. At first glance you might think it could only be used for plane lovers but actually if you look a little close the maps and contour lines ones as well as the checks will work brilliantly for any kind of adventures! 


Take to the sky stampin up faux stepper card

The papers also contain 2 sheets that you can cut apart to make mats and tags for easy embellishments on your projects. 

The card base starts as a piece of pattern paper measuring 14.85cm x 20cm scored at 2.5cm, 5cm, and 12.5cm. Top tips here are to remember that you don't need to use a lot of pressure when scoring pattern paper. Also to keep in mind that is the pattern is directional the first score line is the front bottom of the card. The folds are mountain,  valley, mountain. 

You then need a piece of paper measuring 10cm x 15cm scored at 10.5cm. Adhere the bottom edge of the panel to the center of the bottom of the card front. The fold the score line in a mountain fashion and adhere the very edge to the back of the card base.

Next decorate as desired. 

Take to the sky stampin up pattern paper dsp fun fold

I have chosen to add a panel of cardstock to the back of the card . Firstly to have somewhere to write a message and secondly to cover where the 2 piece of pattern paper are joined. 

Take to the sky stampin up pattern paper dsp fun fold

This card also folds flat for posting so easily... 
Take to the sky stampin up pattern paper dsp fun fold

yet stands really well on a mantelpiece!

Take to the sky stampin up pattern paper dsp fun fold

I hope you've been inspire to get you pattern papers out and give some of the samples I've made this week ago. 

And don't forget you can go see all the pattern papers that are included in the 15% off offer here.

Don't forget to pop back next week as Gill will be sharing her creations with use.

Have a good weekend and don't forget to..

Have fun!

Cary xx

Friday, 2 August 2024

Fun fold Friday Attention Shoppers

 A fun simple fold for the final card of the week using the amazing Attention Shoppers bundle. Called a pop up easle it's so simple and works well with a clean and unfussy aesthetic . 

It starts with a piece of cardstock measuring 14.85cm x 15.5cm scored at 10.5cm . ( 6 ¼" x 5½" scored at 2"). Then cut a piece of cardstock the same colour as the base measuring 3cm x 14.85cm ( 1¼" x 5½"). With a contrast colour cardstock cut a piece measuring  2cm x 14.85cm ( ¾" x 5½").

With the fold on the left-hand side adhere the wider stip of cardstock to the right hand edge. Then adhere the other strip, butting it up to the edge of the other strip as close as possible. 

Next is the pop up portion . Start with a piece of cardstock measuring 10.5cm x 10.5cm scored at 5.25cm.  ( 4¼" x 4¼" scored at 2⅛") Adhere this panel to the center of the short side of the card base so that the score line runs along the cut edge. Now adhere a mat on top measuring 10cm x 10cm (4" x 4") to the panel  only applying adhesive to the half that is not attached to the cardbase. This allows the panel to pop up and create the easle effect.

Attention shoppers stampin up pop up easle fold just for you card

This simple fold has still got tons of impact and plenty of scope for decoration. 

Attention shoppers stampin up pop up easle fold just for you card

Using the Attention shoppers dies from the bundle I created a mask using the shopping trolley basket section.  And used it to blend colour through to create an interesting background. I die cut 4 baskets part and using a small bead of liquid adhesive adhered them together. 

Attention shoppers stampin up pop up easle fold just for you card

Don't throw away all of the small pieces from the die cuts use them! They can help add more texture to you final piece with out being overwhelming. 

Attention shoppers stampin up pop up easle fold just for you card

The card folds flat for posting. And as the stamped images where stamped, coloured, die cut the adhered flat it will not even need extra postage!

Attention shoppers stampin up pop up easle fold just for you card

   
Well that's all from me this week but please remember to join us next week . Gill will be sharing her creations with us all and there's sure to be plenty to inspire us all.
Have fun
Cary xx


Friday, 19 July 2024

Fun fold Friday Simply Sparkling

 Wow where does the time go? This week has flown by! It's Friday already so it's the final post using the Simply sparkling dies and stamps. But because it's Friday it's Fun Fold Friday 😀

Today's Fold is a type of pop out card. What would you call it? I've got no idea 🤣 I just liked a picture I saw while surfing the web and decided to have a go!

It starts with a piece of thick white cardstock measuring 10.5cm x 28cm scored at 8cm, 14cm and 20cm.  Next mark at You then score diagonally between the 11cm and 17cm both top and bottom. Next score diagonally between the 11cm and 17cm marks top and bottom. This creates a diagonal cross over the center scoreline. 

To Fold the card valley fold on the vertical scorelines and mountain fold the diagonal ones. The folding will become more obvious when you see the pictures below 😉

When all folded shut the card looks like this..

Simply sparkling stampin up fun fold pop out card

Looking from the top down you can see the top of the pop out folds..

Simply sparkling stampin up fun fold pop out card

Now the fun part....

Simply sparkling stampin up fun fold pop out card

The center pop out is made using a little strip of cardstock measuring 1cm x 8cm and scored at 1cm, 2cm and 3cm from each end. Fold the scorelines as a valley,  mountain,  mountain from each end. Adhere the center portion to the back of the sentiment panel. Then adhere the first 1cm panel to one side of the center point of the fold and repeat on the other side. Now your sentiment panel will fold flat when closed but pop out when open.

Simply sparkling stampin up fun fold pop out card

I have to say I'm loving the cherries on this card 🍒 as well as the Sweet pink and red colour palette.

Well that it from me for this week. Using the Simply Sparkling stamps and dies has been such fun . Please join me here next week when Gill will be sharing her creations with us for more cardmaking inspiration. 

Hope you get to make time to craft this weekend but most of all...

Have Fun

Cary xx

PS. Sadly the Simply Sparkling stamps are no longer available here in the UK but the dies still are.


Friday, 5 July 2024

Fun fold Friday Sweet Peas

 A fun interactive card to brighten the soggy Friday here in my small part of the UK.  Using, of course, the fantastic Sweet Peas stamps 🫛. They just bring a smile to your face with their cute characters. And let's not forget the punny sentiments! 

The card style is called a peekaboo card. There are a lot of imperial versions out there but not so many in metric which is my preferred unit of measurements.  So here is a very simple conversion to use with those tutorials.  The front panel measures 10.5cm x 21cm scored at 14cm. The inside panel is 10.5cm x 22cm scored at 11cm. And finally the back panel measures 10.5cm x 15cm score at 14cm. If you search peekaboo card on YouTube you'll find a video tutorial just use these measurements 😉.

So here it is...


My favourite pea is the GrumPea so the front of the card just had to feature him.

Sweet Peas stampin up fun fold birthday peekaboo interactive card

But on the inside it's all haPea wishes!

Sweet Peas stampin up fun fold birthday peekaboo interactive card

The card does need for you to be accurate in your cutting and scoring but doesn't require lots of complex manoeuvres.

Sweet Peas stampin up fun fold birthday peekaboo interactive card

Well that's all for this week folks. I do hope that you have fallen under the spell of these cute stamps. 

Join us here again next week when Gill will be sharing her inspiration with us all.

Have fun

Cary xx 

Ps here's the Poddington Peas for those who know 😜

Poddington Peas theme tune


Friday, 21 June 2024

Fun fold Friday Citrus Blooms

 The sun is shining and it appears as if summer has decided to put in an a much wanted appearance...at last! Does the weather effect your crafting?  The sunshine certainly does make me want to use bright and bold colours. Which is why the Mediterranean Blooms suite has been perfect for this weeks posts! With its summer vibes it just brings a smile and a feeling of warmth to you.

Mediterranean Blooms suite stampin up

As it's Friday today's inspiration is a fun fold and today's is a beauty . Taking full advantage of the Mediterranean Blooms pattern paper and the fantastic Citrus Blooms dies and stamps. 

The name of the fold escapes me but you're going to love the simplicity of it!

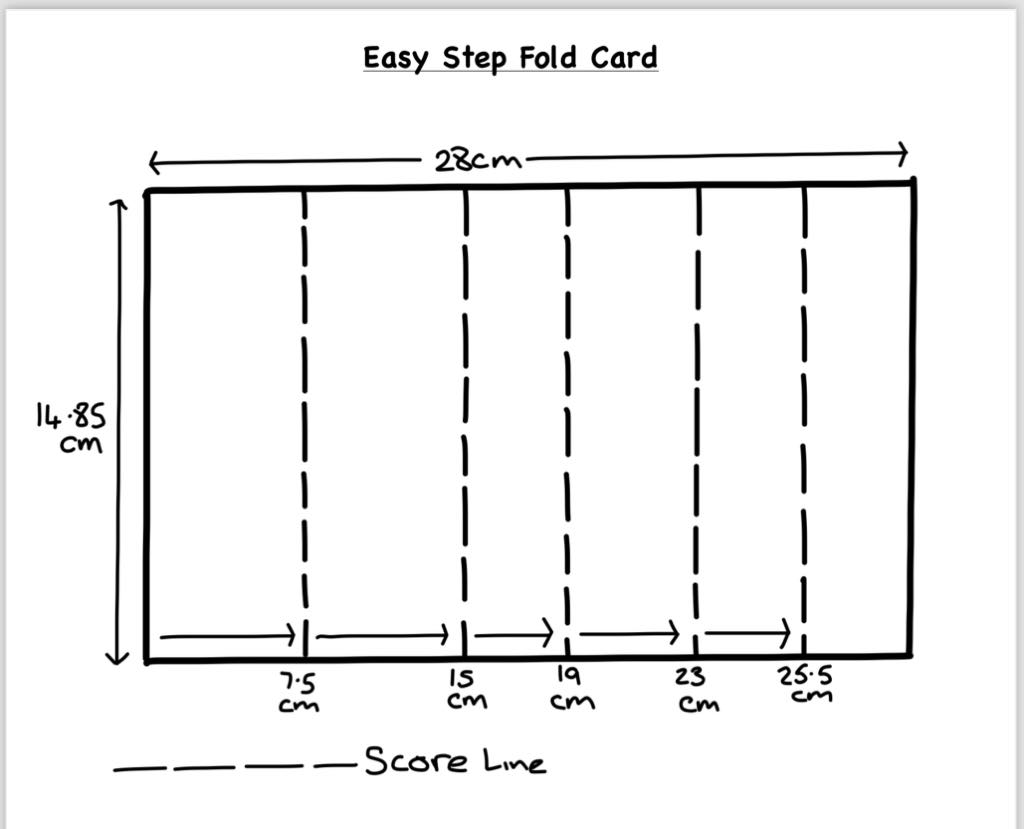
Start with a piece of cardstock measuring 14.85cm x 29.7cm.  The score at 7.5cm, 15cm, 19cm, 23cm and 25.5cm. Next reinforce the folds using a bone folder and starting with a mountain fold concertina fold them. 

Citrus Blooms stampin up Mediterranean blooms fun fold card


Now the hard part... chosing which of the beautiful papers to use! The 3 chosen papers are cut into mats. The largest measures 6.5cm x 13.9cm, the middle one is 3cm x 13.9cm and the smallest is cut at 1.5cm x 13.9cm.  These are all adhered to basic white mats that are 0.5cm bigger. Next adhere these pieces to the panels of the card base.

Citrus Blooms stampin up Mediterranean blooms fun fold card

This fun fold stands beautifully and has a multitude of opportunities to decorate! Using the dies to cut out images from the gorgeous Mediterranean Blooms paper made it a quick and easy option.  As the images would only be adhered partially I used the same die and cut basic white versions and adhered the paper ones to them for extra stability. Top tip use your envelope to measure as you go so that the elements don't overflow.

Citrus Blooms stampin up Mediterranean blooms fun fold card

The place to write your message is on the back of the largest panel. To complete the look you can decorate here too.

Citrus Blooms stampin up Mediterranean blooms fun fold card

The other nice thing with this fold is that it folds flat for posting... Today's project fits in to a standard C6 envelope.

Citrus Blooms stampin up Mediterranean blooms fun fold card

This fun fold is very versatile.  You can change the width of the card base to 10.5cm and you end up with a portrait version that still fits in a standard C6 envelope.  You can scale the width up to 21cm and create an A5 version. The length and scorelines remain the same!

Citrus Blooms stampin up Mediterranean blooms fun fold card

Well that all folks for this week from me. Hopefully you have found inspiration amongst my post's using the fantastic Citrus Blooms stamps and it coordinating products in the Mediterranean Blooms suite. 

Next week Gill will be sharing her inspiration with us all here. 

Have fun 

Cary xx

Friday, 7 June 2024

Fun fold Friday Friends for Life

 Happy Friday 😀 who's having a crafty weekend? I'm going to Southampton for a fun all day class so I'll be busy 🤣

Today's card is a fun fold that is a great one for showing off all that lovely Full of Life pattern paper that coordinates with the Friends for life stamps and dies.

Friends for life stampin up pattern paper fun fold pop out stepper card

I'm calling this fold a pop out stepper card but if you know it's  correct name please let me know 😀.

Friends for life stampin up pattern paper fun fold pop out stepper card

This style of card allows you to decorate both the front and the back of the card . Which is great when you want to use some of that pattern paper you have squirreled away in your stash. Or, dare I say it, give you a reason to perhaps buy some more 😜

Friends for life stampin up pattern paper fun fold pop out stepper card

The other nice thing about this card is that it still folds flat for posting! 

Friends for life stampin up pattern paper fun fold pop out stepper card

Well that's all from me today. I hope you've enjoyed the inspiration I've shared this week with the Full of Life suite
Please join me here next week when Gill will be sharing her creations and inspiration with us all.
Have fun
Cary xx
Ps if you'd a tutorial for this fold let me know in the comments and I'll see what I can do 😀

Friends for life stampin up pattern paper fun fold pop out stepper card


Friday, 24 May 2024

Fun fold Friday Simply Zinnia

 Happy Friday 😊.  Here in the UK it's  a bank holiday weekend woo hoo! It's also a bust weekend for me as we are hosting our catalogue launch event tomorrow which will be great fun for sure. And on  Sunday I'm going to take my partner to Wembley football stadium for her teams cup final! Soo I'll need a rest on the bank holiday Monday for sure 🤣 just as well it's Gill's turn to share her inspiration with us all here!

So back to the real reason for your visit the final card of this weeks inspiration using the fantastic Flowering Zinnias suite

Simply Zinnia stampin up flowering Zinnias paper basket thank you card

The card is a basket full of flowers fussy cut from the amazing pattern paper. 

Simply Zinnia stampin up flowering Zinnias paper basket thank you card

The card starts out with the basket made from a card base with the scoreline at the top. A slit is then cut into the scoreline to allow a separate piece of card to slip throught.
The top of the inset is decorated with the flowers from the pattern paper. 

Simply Zinnia stampin up flowering Zinnias paper basket thank you card

When the whole insert panel is removed you can see the hidden sentiment .

Simply Zinnia stampin up flowering Zinnias paper basket thank you card

On the reverse of the insert is where you would write your message. One of the advantages to double-sided pattern paper is that when you fussy cut or die cut images out the reverse is still pretty !

Simply Zinnia stampin up flowering Zinnias paper basket thank you card

I do hope you'll have a great weekend whatever you're doing and will join me back here on Monday to see what delights Gill will be sharing with us all. 

Simply Zinnia stampin up flowering Zinnias paper basket thank you card

Have fun

Cary xx


Friday, 10 May 2024

Fun fold Friday Submarine Life

 Happy Friday everyone 😀 and welcome to my final post for this week using the fab Submarine Life stamps and coordinating punch. Today as always on a Friday it's a fun fold and I had this one in mind as soon as I saw the stamp set!

Called a diorama card this version is very easy thankfully! It all starts with 2 pieces of cardstock measuring 10.5cm x 14.5cm and another piece measuring 12.5cm x 10.5cm.

Take both of the longer pieces and score at 1cm and 2 cm in from each end on the long side.  Next you'll need to create an appature in the center of one of these pieces.  Then a slightly smaller appature in the center of the smaller piece of cardstock. These appatures can be any shape you can use dies, punches or cut them yourself. 

Now I suggest that you gather all the item you wish for the scene you'll be building within the card. I chose to fussy cut a lot of the elements from the submarine Life stamps as they are just too cute 😍.  Once you have the pieces fold the score lines on the 2 larger pieces of cardstock starting with a valley fold then a mountain fold on all four sides. You are then going to sandwich the 3rd piece in-between the folds to create the diorama. But don't adhere anything until you are happy with the scene adding any stamped or texture to the panels in advance. When your happy adhere the sides together sandwiching the center panel so that it resembles the image below. 

Submarine Life stampin up diorama card

The great thing about a diorama card is that you get to create a real 3d scene out of 2d materials!
Achieve the look by adhering your details at different levels within the appature.  I have used a small scrap of acetate so that the submarine appears too be floating through the sea! It's great fun to create 😀


Submarine Life stampin up diorama card

You can add a panel measuring 10cm x 10cm on the back to give you a place to write your message and another area to decorate of course 😉 

Submarine Life stampin up diorama card

Now don't worry the card will still fold flat for posting and with the dimensions given will fit a standard C6 envelope. 

Submarine Life stampin up diorama card

Well that's  all from me this week but don't panic Gill will be here next week sharing her inspiration with us all. So please remember to pop by 😀

Submarine Life stampin up diorama card

Have a great weekend and..

Have fun

Cary xx