Showing posts with label #nightofnavyinkpad. Show all posts

Thursday, 30 May 2024

This or That Thursday - Thoughtful Wishes

 Hello on another cool and wet Thursday. Unfortunately, unlike Cary I am a very cold mortal and Cary is the complete opposite! She is constantly wanting all of the doors and windows open and I want them shut! So while she will be happy with the weather that we are to expect today, I for a change (NOT)  will not be! I will be putting my jumpers on once again and wishing for the sunshine :)) Today's cards are both similar of course but obviously different. Using the Thoughtful Wishes stamps, paper, card and dies, I have used some of the In Colours like Shy Shamrock, a lovely fresh and bright green and also Peach Pie which is a gorgeous beautiful peach colour. I have used some of the papers from the Thoughtful Journey's DSP and matted them onto a piece of the colour matching card. I have layered the smaller pieces over the larger pieces and added a few die-cuts from the range of dies in the suite. On the peach a simple Dearest Friend with a Night of Navy die-cut and strip of the same ribbon. Then on the green, I have added silver foil with Missing you....

THIS


THAT


Wednesday, 18 October 2023

Watercolour Wednesday - Beary Christmas

Yesterday's card is a similar card to yesterday's. I took some scraps of watercolour paper and washed them with Balmy Blue ink using my waterbrush. Once they were dry, I started to pencil some shapes across the paper and added some more colour onto the edges to accentuate the edges and shading of the glacier pieces. I placed adhesive onto the back of the 'glaciers' and once on the card base, I used a white gel pen and added some lines to show some movement on the water. I stamped the polar bears using a Smoky Slate ink pad. I like to use a lighter colour when working with a very light item. 

I added a little fun by stamping the hats and scarf in different colours and adhering them to the bears.


Monday, 16 October 2023

Make It Simple Monday - #simplestamping - Beary Christmas

 Welcome back for this week's projects. Cary as always made some gorgeous cards again last week didn't she? This week I am going to show you some projects made using the gorgeous Beary Christmas stamp set and double sided, Designer Series Papers. Using a C6 mat of DSP is how this card was so very simple. I chopped up some of the parcels from 1 of the sheets of dsp which is covered in parcels.


Thursday, 5 October 2023

This or That Thursday - Jolly Words

 For this week's this or that, I have made 2 cards very similar. Using the Jolly Words stamp set I made them both using Night of Navy card mats, Very Vanilla card bases and Shimmery White card. It really is a gorgeous combination. My first is the HO HO HO  design. Using the Nested Essentials frame dies, I die cut 2 of the hexagonal frames in the Shimmery White card and stamped the sleigh etc onto one of them. (they look like coffins to me)! I took a Night of Navy mat and stamped it using the It's in The Stars background stamp over 2 pieces. One was the first image from the stamp and the second mat was with the second image from the stamp.

The next one was embossed using the Snowflake Sky embossing folder. I stamped the words and chopped them out, stamped the elves and decorated them and that was that!

THIS


THAT 


Wednesday, 3 May 2023

Watercolour Wednesday - Dainty Delight

 Hello again. Today's card is a simple watercolour style of card. Using a piece of Fluid 100 watercolour paper, I spritzed it completely with water. Using a large acrylic block I spritzed that too with water and then added several little dots of ink refill from my Granny Apple Green refill. I used a waterbrush and worked the colour through the water on the block and then added the piece of fluid 100 paper on top keeping it moving the whole time. I wanted it to be completely covered with the ink and water. I took a piece of kitchen paper and dabbed the excess moisture up from it then set it aside to dry. once dry, I was able to ink my stamp with Versamark ink and stamped several of the images onto the now coloured paper. I poured White embossing powder all across, removed the excess and then heat set it. Using the coordinating dies, I die cut all of the images out. I used a white card mat with Night of Navy card on top. The front mat was dry embossed using the Painted Posies embossing folder. I stamped a sentiment onto the piece of watercolour paper and die cut it out using a circle die from Stylish Shapes dies. I die cut another in Night of Navy and another in White. It was then a case of simple construction. 


Friday, 22 April 2022

Fun Fold Friday - Whale Done

For my last card this week using Whale Done stamp set I have used a style of card that I love to make. It's an arrow fold card within a square card base. I started by cutting a piece of Night of Navy A4 card lengthways to 14.85cm by the full length of 29.7cm. I then scored it in half at 14.85cm. That has now given me a 6" by 6" card base. I took another piece of card, Basic White this time and cut it at 14.4cm by 16cm then scored it at 14.4cm. That gave me another square of card.
I marked the centre lowest edge at 7.2cm with a pencil and along both sides at 5cm and 10cm. Using my trimmer and score tool, I lined up the centre mark with the top scored corners and then scored between them both. see picture 2 for the diagram. The fold at the top will be concealed behind another white mat of 14.4cm by 14.4cm when it is adhered to the card base. 
 
 
For the paper to coordinate on this card I used some pieces from The New Horizons Designer Series Papers. Most of what you see above is the image on the paper itself. I have added a few plants, fish and birds as well as the 2 whales to the paper. The sentiment is from Peaceful Sayings stamp set. 
 
As you look to the side, you can see the inner flap of the Arrow Fold card which will show more interest to the recipient.
 
 
I would often decorate the upper triangle on the card too to add another feature to it. 
Well, that's it from me for this week. Cary will be back again next Monday with some more of her creations to inspire you. 
Until I get back, 
STAY SAFE, BE WELL but most of all 
KEEP ON CRAFTING.
xxx Gill xxx

Thursday, 21 April 2022

Throwback Thursday - Whale Done

 My Throwback Thursday card this week is one that I like to often do. I started with a plain basic white mat and started with stamping the plants from Whale Done across the lower part before I die cut the oval from the centre. I added another mat of the same size beneath the card and embossed the 2 at the same time using the lovely Seashells embossing folder. Using some plain paper, I stamped several more of the plants in different colours and then fussy cut them out. I did the same with the whale, jelly fish and turtle. I adhered the plants and used Dimensionals between the 2 layers and for the creatures too. Although there seems to be lots on the card, it was a very quick card to make. Surprisingly!


Friday, 11 March 2022

Fun Fold Friday - Slim Sayings

For my last card this week. I really have had fun making this one. This very easy fun fold is made using only squares of card or Patterned Paper if you want to as that will work too. Slim Sayings stamp set has no images only sentiments but that hasn't stopped me at all this week. I have really enjoyed playing with this stamp set and the dies too. 

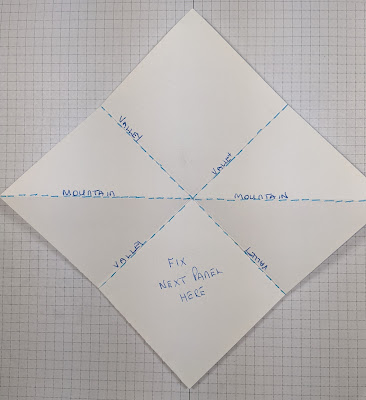
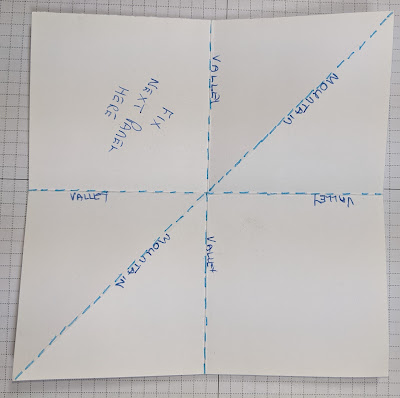
I started with 3 pieces of Night Of Navy card 14.85cm by 14.85cm or just under 6" by 6" in Imperial measurements. I then scored each piece at 7.4cm horisontally and vertically and once diagonally across from point to point going through the centres of each square. See below.


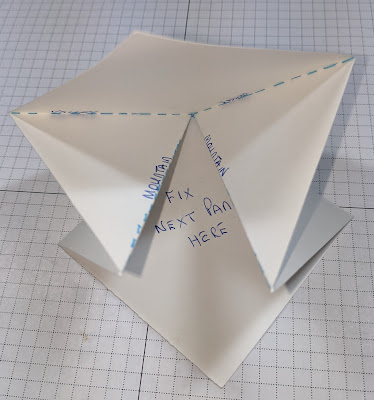
By holding the corners that were scored diagonally and pulling them together towards you get a beak like shape. Well, that's what someone called it last week! 😂 Following the folds and the direction that they go, the square will be folded into a quarter of it's size.

This can be made in almost any card size as long as it's a proper square. It can also be as long or as many panels as you want too! Once all 3 of the squares are scored and folded, make sure that the folds are burnished in both directions. That way the edges have both been stretched and will crease beautifully when the pieces are glued to each other. 

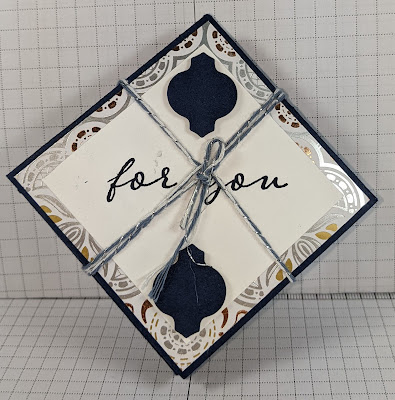
The top of the folded card above and below are side views when closed.
Below is the1st page once opened.

 
Above and below are pictures of the whole card when opened. You will see when folding your card, (should you decide to make one) that the 2 outer pieces will fold forward at the diagonals and the centre set will fold backwards. 
Another way of making this card is to use it as a brag book or memory album. Instead of adding sentiments you can add photographs or drawings. 
The shape is so versatile. When I decorated the card I used the mosaic pieces that come from the other large die. I can use the frame on another project but meanwhile the inner pieces are on this card. 
The papers that I used are from the Simply Elegant Speciality papers and Beauty of The Earth designer series paper. Both sets of these double sided papers are really gorgeous and so versatile in so many ways too.


Above is the stamp set and the dies that are Slim Sayings and the Slim Card Dies. As I said at the start of today's post I really have had great fun with the stamps and dies this week. Should you decide to buy them and I highly recommend you do, I am sure that you will be very impressed with them. 
 
Thank you for popping by this week. Cary will return next week with some more of her creations.
 
I will be back the week after Cary as usual but the weekend of the 19th and 20th March, Cary and I are holding our 1st annual retreat in person since lockdown 2 years ago and we will both be extremely exhausted when we return.
 Will we post on the blog when we return? Who knows? Hopefully we will be here in spirit if nothing else! 😂
 
Until I return, please stay safe, take care and be well but most of all.....
 
😍😍😍  KEEP ON CRAFTING!!!   😍😍😍