Showing posts with label #balmyblueinkpad. Show all posts

Thursday, 19 October 2023

This or That Thursday - Beary Christmas

This week for my This or That cards I have made 2 completely different cards. I have had so much fun working with this fun stamp set and I didn't want to do any more in a similar fashion. So making THIS card, I used the Beary Christmas papers alone. I cut the glaciers out of one last piece of the sheet of paper. Having used all of the glaciers from the bottom of the DSP and as the top is all sky, I cut a C6 mat from the sky or ocean that was left and placed the cut shapes onto the paper then arranged them as I have.

 I also fussy cut the polar bears with the glaciers too and randomly added them over the mat. All that left me then was a sentiment.


THAT
My That card, as I said earlier is completely different!
This one is a fun fold. I used a long piece of card at 29.7cm by 10.5cm high and scored it 11cm and 25.5cm long the whole width of it. I added some mats of the DSP on the front 2 sides and placed a strip of card across to a large, retired, stitched circle die cut. This then became the focal point for the centre of the card. I stamped and die cut the polar bear, tree and the presents which are from the DSP once more. These papers are so amazingly versatile! A piece of White card in the centre with another sentiment and some more presents finished this one. 


Wednesday, 18 October 2023

Watercolour Wednesday - Beary Christmas

Yesterday's card is a similar card to yesterday's. I took some scraps of watercolour paper and washed them with Balmy Blue ink using my waterbrush. Once they were dry, I started to pencil some shapes across the paper and added some more colour onto the edges to accentuate the edges and shading of the glacier pieces. I placed adhesive onto the back of the 'glaciers' and once on the card base, I used a white gel pen and added some lines to show some movement on the water. I stamped the polar bears using a Smoky Slate ink pad. I like to use a lighter colour when working with a very light item. 

I added a little fun by stamping the hats and scarf in different colours and adhering them to the bears.


Tuesday, 17 October 2023

Technique Tuesday - Beary Christmas

 Hello, today's technique is making a plain simple card look more interesting by embossing a plain background. We all know that embossing a mat gives an amazing texture anyway but this card has some of the gorgeous Textured Shimmer Paper and a plain white mat. I used a C6 card base in Night of Navy and with the white polar bears on top of the white mat just looked lost. I embossed the white mat with the new Snowflake Sky 3D embossing folder. I think it gives just the right effect, I hope you do. 


Tuesday, 16 May 2023

Technique Tuesday - Cheerful Daisies

 Continuing on with the simplestamping theme, but using a technique that I like using. By adding a piece of patterned paper to a card base and adding images or sentiments on top, you can make a very simple but pretty card. Using the Cheerful Daisies stamp set I stamped the sentiment and on a plain C6 mat I stamped another and some small flowers. I took the dies of the same name which go with the stamp set and die cut the large die which is the 3 daisies all attached together plus the inner parts of the daisies and die cut them all out in white card. Once cut out, I used a blending brush and gently brushed Balmy Blue ink across the inner parts of the 3 daisies. I left the main body white. I added some Tombow multipurpose glue to the back of the centres and placed them on top. I added the sentiments and completed the card.


Tuesday, 18 October 2022

Technique Tuesday - Joyful Flurry

Today's card is a card that I cased from Donna Gray in Australia. She is soooo very clever and inspired me to make a card very similar to the one she made using the Joyful Flurry stamp set. I used a piece of white and stamped the snowflakes onto one side only. I then used pale blue of Balmy Blue, the light grey of Smoky Slate and the lovely in colour blue of Starry Sky. Once stamped, I embossed just the left hand side and tied a piece of the in colour ribbon in Starry Sky off centre to the left. All that was left was the sentiments on the front and inside. I added some more snowflakes on the inside too but I didn't heat emboss the images at all which Donna did. 


Monday, 17 October 2022

Make It SImple Monday - Joyful Flurry

It's almost that time of year again where crafter are busy making Christmas cards and gifts. It's my turn now so I am afraid it's Christmas on the cards for me from now and until further notice. I'm sorry if  you're not ready for this yet but many of us are. This week I am playing with Joyful Flurry stamp set. It's a very simple one with some lovely sentiments. 

My first card is a very simple pale blue ink on a white card. I did however add a little more card onto it which I had stamped the snowflakes in the softest blue of Balmy Blue.


Wednesday, 4 May 2022

Watercolour Wednesday - Cup of Tea.

Hello again, today's card I really had fun making. I used Cup of Tea again today for this one and also watercolour paper. I did a wet wash across the whole mat in the soft blue of Balmy Blue. Then using 3 different colours each one at a time, I stamped onto a clear block. I dropped several big drops of water and mixed it in with the coloured inks. Loading the water brush up well with the wet ink, I then tapped the brush over my fingers onto the paper to get the spotty effect. 

After the 3 colour drops and allowing them to dry, it took a few minutes to dry and once dry I stamped the cups across the mat. I fussy cut them out as they were stamped very close together. 

Taking a white card mat, I stamped a few flowers across it in Tahitian Tide and Orchid Oasis inks. I embossed the white mat with Hammered embossing folder. Once I had fussy-cut the cups out I adhered them using Dimensionals (foam shapes) and the sentiment was attached using a piece of the new metallic woven ribbon in Orchid Oasis. 

A few sentiments inside and out and the card is complete.


Monday, 21 March 2022

Make It Simple Monday - Handsomely Suited

This week I'm actually cheating. Using the Handsomely Suited stamp set which we used for our annual mens class last year. I took a white mat of card and pencilled a little mark in the centre point. Then I took one of the tie stamps (there are 2) I stamped a cross initially making the top of the tie stamp into the centre. That means the top of the tie will be stamped over several times so that's not an issue as hid that part. Then I continued by adding the four corners in and finished off with the ties stamped either side of the images I had already stamped. Once I completed that , I cut it down and added it to a beautifully soft blue of Balmy Blue. I added a little strip of ribbon to one end and then adhered the whole lot onto the white card base.

Obviously, to hide all of the tie knots, I had to add a mat for the sentiment but I raised mine up using Dimensionals (foam shapes). 


Wednesday, 26 January 2022

Watercolour Wednesday - Happy Hedgehogs

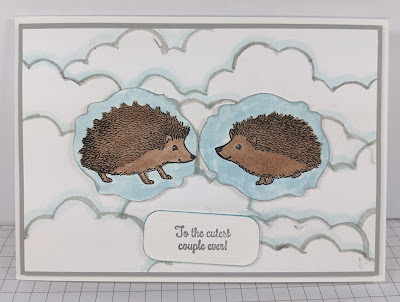
Hello, for today's watercolour using the Happy Hedgehog stamp set, I made a watercolour background and used a die cut mask. Stampin'  Up! have a set of dies called Basic Borders. There are 6 different dies in the set and there are zig-zags through to curves and points, curves to a tiled roof... I love them. Anyway, the die is a cloudy effect along the edge and using that I tried several techniques from brushing across the die cut and many other ways. I ended up by brushing a small line around the border in the very soft grey of Smoky Slate. I stamp the ink pad onto an acrylic block and add a few drops of water to make it even lighter. I moved the die cut at different angles and once done I took some of the lightest blue of Balmy Blue and washed another line across the grey. I think it adds a little dimension, What do you think?


Wednesday, 12 January 2022

Watercolour Wednesday - Encircled In Friendship

 I really had fun getting messy with today's card. Now, those of you who know me, know that I HATE getting messy when I craft. So for me to get messy it probably isn't as bad as when Cary gets messy. She just LOVES it! Using Encircled In Friendship stamp set, I took a C6 mat and washed some very light blue of Balmy Blue over it. I picked up the colour from an acrylic block that I stamped onto the ink pad. I find it's so much easier watercolouring that way. Once it was dry, I stamped the flowers across the centre using a Stazon Ink Pad in Tuxedo Black and then added a piece of paper from the NEW Sunshine and Rainbows designer series paper, DSP. Stazon ink pad is a pigment based ink pad and it's not affected by water colouring. Using the same block, I added 2 drops of ink refil in the Balmy Blue  onto the block and started to add water from my brush to it. I coloured in the flowers and then the leaves in that gorgeous green of Granny Apple Green in exactly the same way.

Once they were all dry, I added 2 more drops to the colouring block and got the darker blue to do the highlighting on the flowers. I stamped the interior with the main flowers and repeated the same process as I did on the front. I had some tiny strips of DSP left over and added them to the inside as a highlight and completed this card.


Wednesday, 20 October 2021

Watercolour Wednesday - Classic Cloche

White or Washed?

 I can't believe it's Wednesday already! It's amazing how quick time flies isn't it? For my Watercolour Wednesday card today, I started by washing the pale blue of Balmy Blue Ink across the card mat. After I let the mat dry, I used the gorgeous rich green of Shaded Spruce and stamped the small leaves to the mat and adhered it to the Silver Foiled Card.

On a separate piece of white card, I stamped the cloche and the birds into the middle of it. Using the stamp for the leaves, I used the Shaded Spruce for the leaves once again and coloured in the birds using a little pinkie/orange of Calypso Coral and the soft beige colour of Sahara Sand with a little of the soft yellow of So Saffron. I fussy cut the cloche out and then glued that to a piece of the Silver Foiled card and again, fussy cut that too. The sentiment was stamped onto white card and I punched it out using the Elegant Tag punch. I placed the punched piece back into the punch and tool a little more off the label to make it smaller. I punched another shape in the Silver Foiled card and glued the white to the silver. 

Stampin' Up! punches are so versatile as you can add them back into the punches and change the whole dimension of it. To complete the card, I stamped several of the birds again and coloured them in too. Yes, I fussy cut them out as usual and they were added randomly across and inside the card too.


 Before I had completed the card, I had made another cloche image. This one however, was with a watercolour wash across the cloche just like the main mat on the card. Below is a picture of the original piece which in the end, I chose to go with the white one.

 I think I chose right but what do you think? Which do you prefer...White or Washed?