Showing posts with label #balmybluecard. Show all posts

Tuesday, 9 January 2024

Tips, Tricks and Techniques Tuesday - Inspirational Sketches

Today's card is made by making a frame once again but this time in a different orientation. Using the Inspirational Sketches stamp set, I stamped the bird diagonally on a piece of White card. I coloured it using my blends pens and then embossed it using the Fern Embossing Folder. It was cut down to as small as it could go and set to the side. I stamped and coloured 2 more birds which were then fussy cut out, each one a little more than the last one. The one with most of the image cut away was layered on top with Dimensionals, (foam 3D shapes). 

I added a piece of DSP from the Countryside Inn papers on top of a Night of Navy card mat which was a very small amount larger. They were adhered together and fixed to the Balmy Blue card base. I added the image on the white diagonal mat to the card base then cut some strips of both Night of Navy and Basic White card 0.5cm wide. One by one, these I added to the edge of the white mat and made the off-set frame. The sentiments were from the Happy Labels sentiments stamp set.


Friday, 1 December 2023

Fun Fold Friday - Festive and Fun

 Well, here we are again it's Friday already! For my last card this week using the Festive and Fun stamp set, of course I have made a fun fold card. This is a very simple one again. I know, I keep on saying that but it truly is very easy. I started with a piece of White card 14.85cm high by 29.7cm wide. (The standard height and the full length of A4 piece of card) I made the first score line at 10.5cm (the normal width of the card base) and then 2 sets of 5cm score lines. So 10.5cm , 15.5cm and 20.5cm. The rest was just under the 10cm and I used that as it is. My last cut was across the first fold on the front left which was to cut down the score line to 10cm and then cut the piece off.

I chose paper this time from A Walk In The Forest DSP for today. It goes beautifully with the Beary Cute stamps of course but I think it goes so well with the Festive and Fun too. All I added was a few of the different patterns onto each of the individual panels. That was it. The fun part as always was the colouring in of all of the animals and then the fussy cutting!! I know that many of you don't like to fussy cut around images and for those of you who don't, punch or die cut around the characters and add them to the card on panels instead. I added the front mat of Balmy blue card and embossed it using the Christmas Tidings embossing folders. I love them! Sadly, they have now sold out so are no longer available. :((

My centre panel was a die cut from the Deckled Rectangles dies. For the colouring of my characters I used the Stampin' Blends pens.


Well, as I said at the start, that's it from me for this week. Thank you for stopping by and for those of you who do celebrate this time of year, I hope you are all getting ready to celebrate Christmas in just a few weeks. For those who are not enjoy the time anyway. 

Cary will be back on Monday to share her cards with you. Until I return, take care, stay safe and well

but most of all as always, 


KEEP ON CRAFTING


xx Gill xx

Thursday, 19 October 2023

This or That Thursday - Beary Christmas

This week for my This or That cards I have made 2 completely different cards. I have had so much fun working with this fun stamp set and I didn't want to do any more in a similar fashion. So making THIS card, I used the Beary Christmas papers alone. I cut the glaciers out of one last piece of the sheet of paper. Having used all of the glaciers from the bottom of the DSP and as the top is all sky, I cut a C6 mat from the sky or ocean that was left and placed the cut shapes onto the paper then arranged them as I have.

 I also fussy cut the polar bears with the glaciers too and randomly added them over the mat. All that left me then was a sentiment.


THAT
My That card, as I said earlier is completely different!
This one is a fun fold. I used a long piece of card at 29.7cm by 10.5cm high and scored it 11cm and 25.5cm long the whole width of it. I added some mats of the DSP on the front 2 sides and placed a strip of card across to a large, retired, stitched circle die cut. This then became the focal point for the centre of the card. I stamped and die cut the polar bear, tree and the presents which are from the DSP once more. These papers are so amazingly versatile! A piece of White card in the centre with another sentiment and some more presents finished this one. 


Monday, 4 September 2023

Make It Simple Monday - #simplestamping - Children's Cards

 Hello and thank you for stopping by. This week I am not going to use a specific stamp set, I am making cards for children. We don't often get the time for them and mine are usually made with the child in mind. So today's card is a very simple and straighTforward one for a Baby. It could double as a congratulations on the birth of the baby or even a 1st birthday. I used the New stamp set available now from your demonstrator called Beary Cute and it really is that too.

I stamped the bears straight onto a piece of white card, added the sentiments and found some Balmy Blue ribbon on as well as a little extra. 


Friday, 5 May 2023

Fun Fold Friday - Dainty Delight

 Friday is here already and my last card although is a fun fold, it is an easy one. This isn't my design it's one that I saw on Pinterest by Connie Stewart in USA. She called it her Valentine fun fold.  It's brilliant! I made my card base in the lovely Misty Moonlight card that has just been returned to us as a staple colour. It is a mid blue not as dark as Night of Navy but it's going to be used as much as it was too. I am so pleased it's back. I cut 3 white mats. One was 9.5cm by 14.4cm and 2 which are 9cm by 11cm. Using the Dainty Delight stamps, I stamped the largest image onto the largest white mat and each of the 2 other images onto a mat. I have kept the design very simple once again with just a flower and a sentiment on each mat.  


I have made my chart in metric measurements, if you would like them worked out in Imperial (inches) please let me know. I have cut a piece of card portrait style at 29.7cm by 14.8cm, I scored at 4.9c, and 9.9cm from each side landscape. I turned the card portrait again and measured 1.5cm from each side between the 2 score lines and cut them. This was repeated on the other long edge too. I then cut through the score line nearest the centre on each side. I added some DSP on the 2 outer edges and the 4 narrow 1.5cm deep bars at the top and bottom. I cut 2 Balmy Blue mats 9.5cm by 11.5cm and adhered each one to the second of the scored panels on each side so that the edge of the paper goes toward the cut inner part of the card base. I added the 2 white mats onto the Balmy Blue mats and the White mat in the centre I  have since the photos, added a Balmy Blue mat behind that too. 
I knew there was something not quite balanced in my card and only as I was writing about it did I realise what was missing! To err is human I am told and boy ... am I human! 😁😁


That's it from me for another week, thank you so much once again for stopping by. I do hope that you have been inspired to make some cards for yourself to give to others too. Today's card will be going to my Daughter in law's mum for her birthday. I do make a lot of birthday cards as I am always sending them out!

Cary will be back to share her creations with you next week so until I return the week after next, please stay safe, keep well and as always, 


KEEP ON CRAFTING.

😍😍 xx Gill xx 😍😍

Below is the link for the Imperial measurements and the video of Connies that I watched. Copy and paste the link below and it will take you straight to it.

https://www.google.com/search?client=firefox-b-d&q=connie+stewart+vaentine+card#fpstate=ive&vld=cid:c151e98a,vid:Ojxn9AXlq2M

Wednesday, 1 June 2022

Watercolour Wednesday - Wisteria Wishes

Hello again on another wet Wednesday. Today's watercolour card using the Wisteria Wishes stamp set was easier than I thought it would be. I cut 2 white C6 mats and started with the green inks. I stamped each of the 4 blocks onto a green ink pads, added a drop or 2 of water and washed in a zigzag way across the paper. I used only the tip of the wide waterbrush to get the lines to show. Once I had used all 4 colours, I put it to the side to finish drying. The greens that I used were Granny Apple Green, Pear Pizazz, Old Olive and Evening Evergreen.

I then proceeded to do something similar with the purples. Starting with the lightest colour again I sort of stippled some colour across the C6 mat. I used only the tip of the brush and just touched the paper turning the brush in different directions each time. I think it looks more like a Wisteria because of the mixture of colours. The purples I used were Highland Heather, Fresh Freesia, Orchid Oasis and Gorgeous Grape.

Once dry, I die cut several of the leaves from the green and several of the individual flowers from the purples. I cut a few of the vine stalks using the brown of Soft Suede and added them to a blue mat which has been embossed using the retired Tasteful Textile embossing folder.


Above are the pictures with how I've made the papers for the flowers and the leaves.


Monday, 21 March 2022

Make It Simple Monday - Handsomely Suited

This week I'm actually cheating. Using the Handsomely Suited stamp set which we used for our annual mens class last year. I took a white mat of card and pencilled a little mark in the centre point. Then I took one of the tie stamps (there are 2) I stamped a cross initially making the top of the tie stamp into the centre. That means the top of the tie will be stamped over several times so that's not an issue as hid that part. Then I continued by adding the four corners in and finished off with the ties stamped either side of the images I had already stamped. Once I completed that , I cut it down and added it to a beautifully soft blue of Balmy Blue. I added a little strip of ribbon to one end and then adhered the whole lot onto the white card base.

Obviously, to hide all of the tie knots, I had to add a mat for the sentiment but I raised mine up using Dimensionals (foam shapes). 


Thursday, 10 March 2022

Throwback Thursday - Slim Sayings

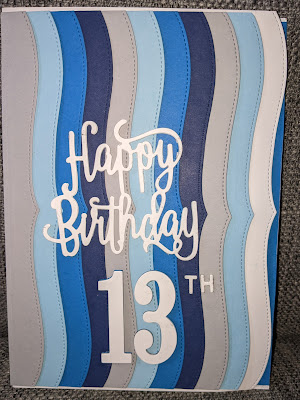
Today's card is a special one. Many years ago Stampin Up had a set of dies called Layering Alphabet Edgelits dies. The card today reminds me of just that one. Using the Slim Sayings and the Slim Card Dies, I made my Grandson Jayden's 13th birthday card in a similar way. 

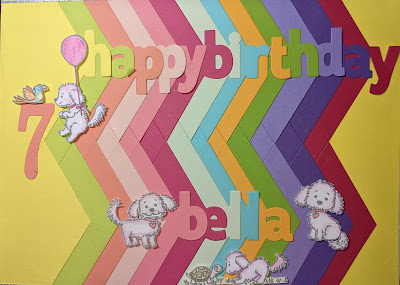
Stampin' Up! no longer sell the Layering Alphabet dies but the dies in this set reminds me of Bella's card which you can see at the bottom of the page. 

Using 4 different colours plus white card, I die cut several of the wavy shapes and layered them in a similar way to Bella's card. I did use a few other retired things on his card which I'm sure many people still have but I just love the way that the lines of colour and waves are perfectly elegant. So yet another technique to use those lovely Slim Card dies for. 


Friday, 3 December 2021

Fun Fold Friday - Whimsical Trees

For my last card this week I have made a very simple gatefold card using the Whimsical Trees stamp set. I took a piece of Misty Moonlight card 14.85cm by 21cm and scored at 5.25cm from each of the short sides of the card. Then I fold both of the outer edges in to meet each other and then using a bone folder or some other such tool, I burnished the scored edges. I added a piece of Balmy Blue card which has been embossed with the Bricks embossing folder and added them to the card front. Then I added the 2 narrow strips of DSP from the Whimsy and Wonder papers (which sadly are not currently available) down the front of the whole card. 

Using the Dies called Christmas Trees, I die cut 2 trees from Misty Moonlight card and 2 trees from the DSP. I removed the centre pieces and replaced them with the opposite pieces from the each set of die cuts. In this one, the trees are in a silver stripe from the Designer Series Paper or DSP and the centres are from the card. I made 2 further cards in the reverse so they will not be wasted at all.

A simple JOY for the centre message which was stamped onto a small die cut rectangle and adhered to one side only. A few trees stamped on the inside and another message completes my last card for this week. 


 Below is the 2 cards that I made in the opposite images. This time the trees are die cut in Misty Moonlight card and the inside pieces are from the tree die cuts from the DSP. 
Crafters just don't waste ANYTHING! 😄


That's it from me this week, thank you for stopping by and looking at what I have made. 

Until I return in a week, Cary will entertain you with her creations. 

Take care, Keep well and Stay safe please but most of all...

😄  KEEP ON CRAFTING.  😄