Wednesday 30 November 2016

Embossing Folders - Day 3


Another very simple card today using a little of Candy Cane Lane Designer Series Paper and an embossed panel using Cable Knit Dynamic Folder.


The Dynamic Folders are much thicker than normal folders and only 1 cutting plate is used when 
embossing through your machine.


The folder gives a very deep impression on the cardstock.


 Real Red and Whisper White cardstock for this card with a strip of Real Red stitched edge ribbon to cover the joins.


Be Jolly By Golly is the name of the stamp set used for the sentiments.

Tuesday 29 November 2016

 Embossing Folders - Day 2

For today's card I have used Rich Razzleberry and Very Vanilla cardstock.
Yes, I know another monochrome one. I will do a multicoloured one too this week.
 

This time I used 2 Embossing Folders. Pretty Paisleys and Floral Affection (which has 2 folders)


We used the Paisley folder for our all day class and it gave some beautiful results.


I embossed the floral impression in the centre, gently wiped the Versamark pad over the flowers and used Heat and Stick then Dazzling Diamonds glitter powder before heat setting 
I then cut around the outside and mounted it using dimensionals. 


I added some of the little flowers from the Paisleys Framelits dies.


The messages are from Paisleys and Posies Stamp set.

Monday 28 November 2016

Weekly Inspiration - Embossing Folders

Textured Impressions Embossing Folder

This week I have the pleasure of working with the wide array of Stampin' Up! embossing folders.
As with everything else Stampin' Up! I love these amazing folders.
 The simple or intricate impressions that embossing folders leave is wonderful.
Anyway, here are my first projects.


2 very simple monochrome cards again, yes, I do like monochrome effects on most things.
 

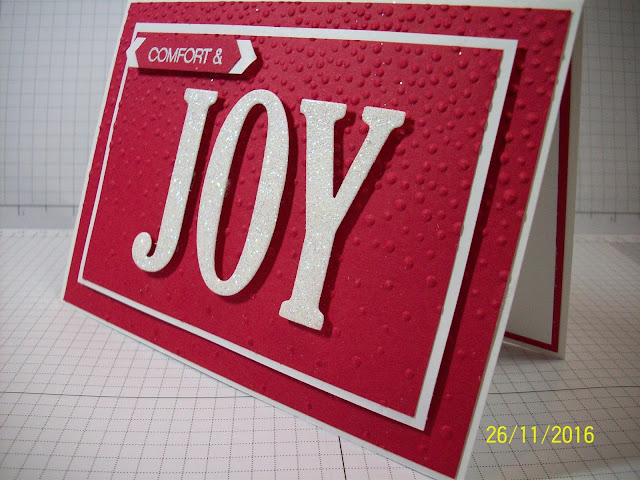
Using Real Red and Whisper White cardstock, I embossed this first one withe both layers of white laid together. It helped to continue the pattern. 
Not that it would make any difference using the Softly Falling embossing folder. 


 The word JOY was made by using the Large Letters Framelits Dies.


The 'Comfort &' on the front and 'Have a Merry Christmas' on the inside, came from  Holly Jolly Greetings. 


2 simple variations made very quickly (and quietly as my son is staying with me for a few days 
after having sinus surgery). He's quite sensitive to noise at the moment!


 I used the NEW Classic Label Punch for the 'COMFORT &' message, 
making the top layer smaller by putting the label back in and trimming the extra off.


 These 2 cards took less than 20 minutes from start to finish.

  
Simple is always easy and very effective. I hope you think so too.


Saturday 26 November 2016

All Day Class Paisleys and Posies

All Day Class pictures 

On our recent all day class we had the WOW when I showed them their first project of the day.
I cased the Picture Frame from the Autumn and Winter seasonal catalogue. 
These are some of the amazing pieces of work that our ladies made.


Some of the ladies were a little bashful and I am useless at taking photographs!
They made some amazing pictures didn't they?

wee gift box and thistle tutorial...

Today I've made a quick tutorial that id like to share of the little tartan gift box and the thistle embellishment that i shared on Tuesday 22 November it is a very picture heavy post so grab a cuppa and get ready....
OK lets get started....1st the box
cut a piece of card stock to 11" x 8" then score along the long side at 3", 4", 72 and 8" then turn and score along the short side at 31/4" and 4 1/4".
then following the cutting guide pictured below remove the areas shaded. the solid lines are to be cut and the dashed line means a scored line.
once you've cut the card reinforce the score lines with a bone folder and choose your patterned paper.
you're going to apply the patterned paper before you make the box up. 
cut 2 pieces measuring 3 3/4" x 2 3/4"
2 pieces measuring 3 3/4" x 2 5/8"
2 pieces measuring 3 3/4" x 7/8"
1 piece measuring 3" x 2 3/4"
now attach as pictured below
then take the 2 pieces that measure 3 3/4" x 2 5/8" and cut one diagonally from top left to bottom right and the other from top right to bottom left as below
now apply to the triangular sections as below
now turn the card over and apply the remaining pieces as shown below
now apply adhesive as per the red sections below
fold the side s in to create the box. 

 Now how to make the thistle
1st punch 3 bell shapes from the Stampin' Up! bell punch from the 2016 autumn/winter catalogue in purple. then another in green for the stem. I then die cut 2 leaves from the pretty pines thinlits dies from Stampin' Up! in green.
now trim the bells as shown below
next snip into the top of the bells to create a fringe effect  and layer as below
then add the green bell and leaves as below


 well i hope that this all makes sense! 
have fun
Cary x


Friday 25 November 2016

And the winner is...

Well today's  the last of the samples I'm sharing featuring Garden Green. Now on Monday  I owned up to not loving this shade of green and after challenging myself to use it to create this week's inspiration I have to admit....its not as bad as I thought! 😉 in fact if I'm honest it's quite a useful colour that works really well for traditional Christmas looks! Lol
So here's the final project from me. I have to say it was a bit of a labour of love but I think it was worth every turn of the handle on my big shot!
I used lots of pine leaves and then lots of trimmings  to create this Christmas decor piece  


Well that's me for this week next week is Gill's turn to share her inspiration with us all. I do hope you'll join us .
Have a great weekend and have fun
 Cary ☺ x 


Thursday 24 November 2016

A little something.....

Happy Thanksgiving to everyone ☺
Today's sample is a gift box that I've seen all over the place the Self closing box. I've wanted to have ago for ages and today seams a good day to share a table favour
The great thing about this box is that there is no right side so you can decorate both! Yay more to play with! Lol 😉

The embellishment are created withe the Holly berry builder punch from Stampin ' Up! .