Thursday 29 February 2024

This or That Thursday Watercolor World

 To crinkle or not to crinkle that is the question 🤔 Are you a fan of all things vintage or distressed?  Or are you team clean and contemporary? What ever you are the Watercolour World stamp will work for you!

The first sample is a vintage/ distressed one. A top tip for creating the crinkled background is to lightly spritz the reverse of the stamped image mat with a fine mist of water.  Then scrunch the paper up. The mist of water helps to make the paper more pliable and lessens the risk of it ripping.

Once the paper is flatten to the desired flatness use a neautral ink and swipe it over to catch the ridges of the paper. You may find it useful to use a sponge to add ink gently.

Watercolor World stampin up distressed vintage clean and contemporary cards

I did use vanilla coloured cardstock to add to the vintage feel of the  vintage card as it lends itself to a softer feel.
 Whereas the white cardstock used for the clean and contemporary version gives a much crisper feel.

Watercolor World stampin up distressed vintage clean and contemporary cards

For the second version the use of the lilac ink certainly makes the card have a more contemporary feel.

Watercolor World stampin up distressed vintage clean and contemporary cards

Which do you prefer This ? With its vintage looks or That? With it's contemporary look?

Wednesday 28 February 2024

Watercolour Wednesday Watercolor World

 How fun to use a stamp set called Watercolor World on #watercolourwednesday! 🤣 The sample today is created using the final pieces made during my Facebook live on Monday. A link will be posted below if you haven't already seen it or would like to rewatch.

In the video I have demo'd several ways to use Stampin' Write markers. They are fab additions to any craft stash.  

Today's sample is kind of a reverse resist technique.  The background was created using watercolour paper and lots of water! (Watch the video below to see how). Once completely dry the Watercolour World stamp is stamped in versamark over top and heat embossed in clear powder.

This allows the colours to shine through but emphasise the origanal image to be highlighted.  This in real life looks amazing!

Watercolor World stampin up reverse emboss resist stampin write markers

Once cool the panel was trimmed to cover a standard A6 card base. 

Watercolor World stampin up reverse emboss resist stampin write markers


The sentiment was also created using the direct to stamp with Stampin' Write markers as shown in the video below 

Watercolor World stampin up reverse emboss resist stampin write markers

Here's  the video which shows  how to create the background. 


Well that's  all for today please pop back tomorrow for more inspiration using this fab stamp.

Tuesday 27 February 2024

Tips tricks and techniques Tuesday Watercolour World

 Hello sorry I didn't post yesterday but I was shattered and didn't get home till the afternoon from our retreat.  It was an amazing weekend filled with laughter, good friends, crafting and good food! The perfect combination 😀 I did manage to do my regular Facebook live at 5pm and created the cards I'm sharing today using the wonderful Watercolor World stamp.

Watercolour World is a large single stamp that is beautifully textured and defined DistINKtive©️ stamp. DistINKtive©️ stamps are fantastic and give amazing detail to any project. 

Watercolour world stampin up stampin write markers how to use card

The technique used to create the cards below uses another great product you might already have in your stash Stampin' Write markers. Here is the video of the Facebook live where the technique is demo'd


Here are the cards created with 2 of the  resulting images from the video.

Watercolour world stampin up stampin write markers how to use card

The sentiments on both cards are from a stamp set called Sweetly Scripted that will be available to order from March 2024 as an online exclusive. 

Watercolour world stampin up stampin write markers how to use card

I hope you like these bright and beautiful cards as much as I do. 

Watercolour world stampin up stampin write markers how to use card


Friday 23 February 2024

Flashback to Fun Fold Friday

Today I have some of my favourite fun folds from the last few years. I am so sorry that I have nothing new for you today but Cary and I are off to our retreat today and time, as always, has run away from us!

I do hope that you have had a great week and have been crafting lots too. We definitely have!


As the sentiment on the last card says, Life is better with you. :)) 
Thank you for joining us again this week, I hope you have found some thing to interest you and given you some ideas. Cary I believe has already organised projects for next week so please stop by and see what she has to show you. 
Meanwhile, have a great week and until I return, please stay safe, keep well but as always.....

KEEP ON CRAFTING

thank you and be safe, 

xxx😍😍 Gill 😍😍xxx


Thursday 22 February 2024

This or That throwback Thursday. Thursday's gone by

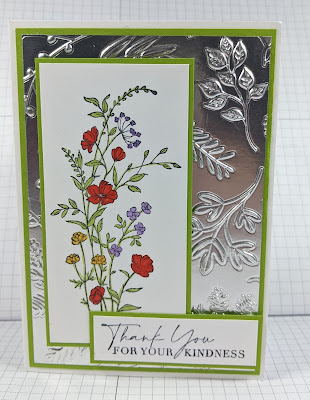
 Hello, as many of you know ... cos we've mentioned it so much... we have our retreat this weekend and Cary and I are up to our eyeballs getting ready. So apologies from me as today's post is this and that from a little while ago. I will start with one of my fave's of long ago. Well, not that long ago as it was on 12th of January 2023. I love this set so much that I still use it. it is called Dainty Delight. 

Using the Dainty Delight stamp set, I stamped the largest image and coloured it in using my Stampin' Blends, alcohol Marker pens. I picked a piece of the Silver foiled papers and embossed it using the Twigs and Sprigs gorgeous embossing folder. Sadly the folder has now retired but as always why stop using it just because it has retired? The detail on it is stunning! I adhered that to a piece of the Granny Apple Green mat and then to a White Card base. The stamped image was then cut down and adhered to another piece of the green and mounted onto the card using Dimensionals, 3D foam shapes. A simple message and the 2 mats on the inisde and this one was finished. 

THIS

 The next one is this weeks THAT card, this gorgeous blue flower,  was posted on 23rd of March 2023. We really did have some beautiful stamp sets last year too didn't we?

The gorgeous new stamp set and dies etc are called Irresistible Blooms. The images are beautiful and added to the dies too, they just go so much further.  My THAT card today is an all white based card and added a white mat with a piece of DSP from the Fitting Florets papers which have also retired. Just this simple strip of DSP adds a lovely hue through the card. I used one of the dies from the set which literally die cut the stripe going through the card. What a difference! 

Fortunately, both stamp sets are still current in the catalogue too so if you like it as much as I do and don't yet have it....now's the time to treat yourself.

So simple but I think so elegant. What do you think?

THAT


Please do let us know which is your prefered card again.

Wednesday 21 February 2024

Watercolour Wednesday - Simply Zinnia

 Hello, I am posting this quite late now as the retreat has been taking over our lives for a few weeks now but more recently this week! It's crazy!! Anyway, I have winged enough. I really am looking forward to seeing everyone again. With the lovely Simply Zinnia stamp set, today I literally did watercolour the large floral image today. I started by embossing a white mat with the Painted Posies folder, added a piece of DSP from the Flowering Zinnias designer series paper pack. The DSP was added to a white card base, then a silver foiled mat and the embossed mat. On another white mat, I stamped the large flower in Stazon Ink pad then using the block to pick up the ink with my water brush, I started to colour in the whole flower spray. I added the spray with Dimensionals to add a little height. 


Tuesday 20 February 2024

Tips, Tricks and Techniques Tuesday - Simply Zinnia

 Hello again, Today I have made a really orange card. Very unlike me as I'm not into orange very much. Fortunately, this is a soft orange called Calypso Coral and it's rather lovely. Using the lovely Simply Zinnia stamps, I started the same way as yesterday by covering a card mat with lots of the single flowers and a few leaves here and there using a very soft grey of Smoky Slate ink pad. I then coloured them all in using my Blends pens in the gorgeous colour of Calypso Coral and Granny Apple Green for the leaves. I love the name of the green! :)) Then I took another card mat in white and embossed it using one of the lovely trio of embossing folders called Basics 3D. I chose the one that looks like lots of flowers. I then die cut all of the flowers out of the first piece of card and mounted them onto the new card mat which was cut to size in advance. I used dimensionals, foam, double sided shapes. I added them all over the mat to give the effect that they are all floating. Another very simple technique only it takes a little longer. 


Monday 19 February 2024

Make It Simple Monday - Simply Zinnia

 Hello, this is our crazy week as we have our weekend retreat this coming weekend so as you can imagine we are a little busy! It is also my son Jonathan's birthday today and we have our card and a cuppa event today too! However, we still have time for the blog. This week I will be playing with the NEW stamp set called Simply Zinnia. It's due to come out very soon so look out for some more beautiful products.This is of course a really lovely set with amazing coordinating paper, dies and gems. As it's Monday, we have our #simplestamping card first. This is ideal for the beginner stamper. I first stamped the single flower several times over the front of a card mat and added a few leaves. That's it. I coloured them in using some cheap colouring pencils in a soft yellow, orange and green. It took about 15 minutes to make, so ideal if you need a card in a hurry.


Friday 16 February 2024

Fun fold Friday Planted Paradise

 Well that week went quickly! So here is the final inspiration using the Planted Paradise stamp set. As it's  Friday it must be a fun fold ... and it's  a simple one at that!

The fold is an easel card but made simple. All you need is a piece of cardstock measuring 14.85cm x 21cm ( 8 1/2" x 5 1/2") scored at 5.25cm and 10.5cm ( 2 1/8" and 4 1/4") . Now fold both scorelines as mountain folds. This is the simple easle fold.

This version of the card is made by stamping and fussy cutting our a lot of pots and plants 😅 but it will be worth it ....

Planted Paradise stampin up fun fold simple easel fold card

I used a sentiment on a die cut shape to create a stopper for the front of the card when open. 

The decoration on the front includes white panels that have been embossed using an embossing folder so that you need somewhere to write your message. I placed a white mat on the back of the card and added a little decoration for interest..

Planted Paradise stampin up fun fold simple easel fold card

... no surface left bare 😅

Planted Paradise stampin up fun fold simple easel fold card

One of the nice things about an easel card is that it folds flat for posting! 
Well that's all for this week. Please join me here next week as Gill shares her inspiration with us all. 

Planted Paradise stampin up fun fold simple easel fold card

Have fun

Cary xx 

Thursday 15 February 2024

This or That Thursday Planted Paradise

 Do you ever make cards put them to one side go back and think hmmm now why did I think that was a good idea 🤔 ? Well today I'm sharing 2 cards using the Planted Paradise that have both left me with that feeling! 🤣

The planted paradise stamps are reversible  stamps that you can use to build images using the various stamps in the set. This is made easier as they are  photopolymer stamps so see-through! 

Planted Paradise stampin up building an image card


So let me first introduce you to the radish version...

Planted Paradise stampin up building an image card

And secondly the hanging version.

Planted Paradise stampin up building an image card
 
Both cards feature some pretty pattern paper from a pack called Sunny Days . This pack is only available until the end of February with a qualifying order so if you like it head over and order some soon 😉

Planted Paradise stampin up building an image card

So which works best for you the radish ? Or the hanging version? This? or That? 

Planted Paradise stampin up building an image card