Monday 31 August 2020

Make It Monday

Make It Monday  #simplestamping

Hello, I hope you have all had a good week? Mine was crazily busy just for a change! NOT!  

I have no idea what's happening with me at the moment all sorts of things are going wrong!  ๐Ÿ˜ฌ

Last week for example, the memory foam cushion I sit on exploded! ๐Ÿ’ฅ๐Ÿ’ฅ I would never have believed that a cushion would be filled with oil! It was. The oil (supposedly gel) had leaked everywhere just like all liquids do. My son thought that I'd had an accident of all things! Definitely not!!!

It transpires that my cushion was filled with gel and enclosed in a bag inside the seat cushion cover. The bag just decided to burst open with a bang! I must admit, I did think I had broken my chair initially but thankfully I hadn't! Phew! ๐Ÿ˜ A new cushion will hopefully arrive this week.

Anyway, I've had a job to decide what to show this week so I decided on a stamp set that I don't normally use. 

As we are now at the end of the summer and the children are going back to school into the Autumn term I chose to use the new stamp set called Autumn Greetings.  I rather like this set as it clearly shows all of the gorgeous autumn produce. I just love the colours of the trees and leaves in autumn, it's really stunning. More information HERE on the stamp set.

I have only stamped a few of the edges of the stamp along one edge for which I used Gray Granite Ink Pad. As the grand children were in bed, I borrowed their colouring pencils again to add a little sparkle of colour. I stood the edges of the card onto the Crushed Curry ink pad which was also used for the messages.  


A very quick and simple card for this really cold but bright Monday.

#simple card #quick card  #Autumn Greetings  #Stampin' Up!

Friday 28 August 2020

Fun Fold Friday Rooted in Nature

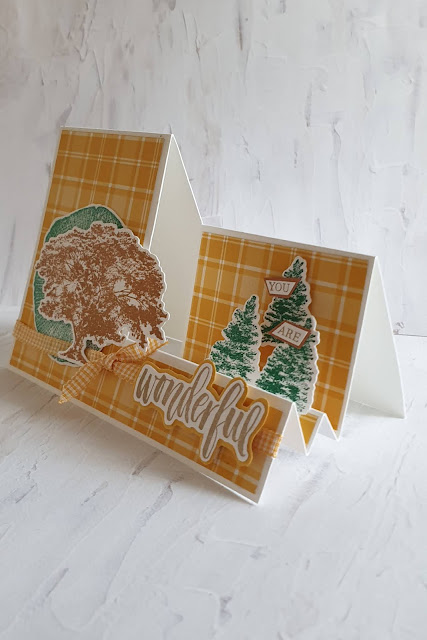
 wow what a week it's been! It started with my birthday and is ending with the amazing #SULeadersSummit !! Leaders Summit is an amazing gathering of Stampin' Up! demonstrators from around the world to share, connect and learn from each other. Gill and I are both honoured and excited to be a part of this fantastic gathering . The most amazing part of this experience for ne is being able to connect with others . Stampin' Up!  Is a family and we have branches that spread wide and riits that are deep just like  the beautiful oak tree in the Rooted in Nature stamp set so for today's fun fold card I had to incorporate the stunning oak tree stamp and send a message to all our fellow demonstrators You are Wonderful ๐Ÿงก

The fun fold is called a side stepper card and I found a template online  and adapted it to suit me ๐Ÿ˜‰ The card base is made from a piece of card measuring 14 85cm x 10.5cm. 

I then marked lightly from the right hand side 7cm in and 7cm down along the long side. This is the point at which you start a cut line that will finish at the 18cm mark. (See photo below)

Now to create the folds. On the left hand side of the cut line score at 10.5cm to the line. Now on the right hand side score to the line at 7cm, 13cm, 14 5cm, 16cm and 18cm ( see photo below)

Fold the 10.5cm scoreline as a mountain fold gently. The 18cm score line is also a mountain fold. The 16cm is a valley,  the 14.5cm is a mountain the 14cm a valley and finally the 7cm score line is a mountain fold. (The photo below show it better than I can describe it ๐Ÿ˜‰)

I've used some of the gorgeous Plaid Tidings paper from the winter mini catalogue from Stampin' Up! To create a background for my stamped and die cut trees. I fussy cut the sentiment and log cut added a little gingham ribbon and voilร  my card to celebrate all ou fellow demonstrators was done ๐Ÿ˜€

Now Gill and I will be having  a busy weekend with a few late nights at #SULeadersSummit . I hope you have a fab weekend too and will join me here next week to see what lovely inspiration Gill will be sharing with us all.

Have Fun

Cary xxx

 fun fold rooted in nature Stampinup


Thursday 27 August 2020

Throwback Thursday Rooted in Nature

 Rooted in Nature is a stamp set that has kind of taken on the roll of one of the longest running, and very popular stamp set from Stampin' Up!  Called Lovely as a Tree the set was one of those go to ones that can be used for all occasions and   ages just like Rooted in Nature. 

Gill particularly loves the Lovely as a Tree set. So I looked through our archives and found a beautiful card that she made using the set back in August 2017. I decided that for throwback Thursday I'd recreate the card but using Rooted in Nature. 

As you can see from the pictures below they are very similar and both super useful and beautiful ๐Ÿ˜ 

More info on stamp set please click HERE 


Wednesday 26 August 2020

Watercolour Wednesday Rooted in Nature

 For today's samples I've again gone for the unexpected colour combo for the Rooted in Nature  stamp set...as you may have guessed I'm a bit of a colour rebel  ๐Ÿ˜œ So combining bright colours and messy watercolour techniques is right up my street ๐Ÿคฃ๐Ÿคฃ๐Ÿคฃ

For the background I created one of my favourite wet watercolour backgrounds using royal purple, bright blue and strong sea blue/green  colours. The technique is simple useing watercolour paper spritz well with water over the entire surface. Now drop reinker onto a silicon sheet or piece of plastic and with a water painter add a few drops of water. Now the fun begins! Take you water painter and pick up some of the ink and gently drop it onto the wet watercolour paper and watch it spread and as you add other colours merge to create unique backgrounds ๐Ÿ˜ƒ I would advise leaving the piece to dry naturally as you want the colours to saturate and stay because if you use a heat tool the water will get blown around on the surface. 

Once I had my background made I decided I wanted lots of texture so I pulled out my embossing folders, dies  and embossing paste. First I die cut a mask from a piece of vellum and used this with embossing paste onto one piece of my background.

Popping this aside I took out my embossing folders and embossed a piece of vellum to place over the second background. 

I then heat embossed the tree image in clear embossing power and die cut it out twice. I then used white heat embossing powder to stamp 2 sentiments and cut these out.

A small splash of silver mesh ribbon and both cards came together. Now my photos don't do the cards justice ๐Ÿ˜’  they are very textural and look much better in real life !

I hope you like my adventures into colour and texture because they sure were fun to create ๐Ÿ˜„ 

 rooted in nature watercolour backgrounds texture ideas for cards bright colours stampin up


Tuesday 25 August 2020

Tips,Tricks and Techniques Tuesday Rooted in Nature

 For today's inspiration I thought I'd share a very on trend technique, here in the UK at least ๐Ÿ˜‰, using my featured stamp set Rooted in Nature. 

Called the One Sheet Wonder, OSW for short, it does have a couple of meanings. One idea for a OSW involves taking a piece of patterned paper, usually  6" x 6" or 12" x 12", and using a guide cutting it up to make multiple cards with different portions of the paper on them.

 It can also mean creating your own pattern paper and using it as background paper. The size for this way varies but is usually A4 and make 4 card fronts or A5 and make 2 card fronts.

My projects today use both these meanings, I know I'm being greedy ๐Ÿ™ƒ but hey I'm in charge this week ๐Ÿ˜…๐Ÿ˜…๐Ÿ˜…. 

What I have changed up a bit is that I've used a piece  of card the is the size of a card front . For me this is 14.85cm x 10.5cm. Stamped all over using the large and small leaf vein stamps from the Rooted in Nature set. The colours I chose for this are a deep red, a rich yellow and a pale sea blue. If you speak Stampin' Up!  thats Merry Merlot, Bumblebee and Pool Party.

Once stamped I then created a cutting guide, photo below. The measurements are as follows  A = 3cm x 3cm B = 4.85 cm x 4.85cm C = 7cm x 7cm. There is very little waste on this plan and it gave me enough pieces to create 3 cards.

I hope that I've inspired you to have a go at a One Sheet Wonder,  of any style, and that you'll share your creations with us all.


 one sheet wonder rooted in nature fun card idea stampin up


Monday 24 August 2020

Make it simple Monday Rooted in Nature

 Welcome to the first of this week's samples featuring the oh so elegant Rooted in Nature stamp set. Rooted in Nature has been around for a couple of years but is not one that I have played a lot with. So I thought it was about time I had a go ๐Ÿ˜Š

Today's inspiration shows that you don't have to be restricted to "natural " colours, although they do look lovely ๐Ÿ˜Š, when using a nature set. 

I have created 2 identical #simplestamping cards one in shades of  green and a touch a rich coppery tone. And the other in funky bright pink, purple and a sea blue/green colour combo. Both very different in feel but identical in design.

To create the card I stamped the sentiment in black. Then I cut a scrap of copier paper to fit over it. 

With the copier paper covering the sentiment I stamped 3 of the different  leaves from the Rooted in Nature set. To create a feeling of depth to the piece I stamped with out reinking the stamp several times. This is called generational stamping. It's perfect for beginners as it helps extend the colours of ink you have available . See the photo below for an example. Between each stamping instead of reinking I huffed over the stamp to reactive the colour. 

Once happy with the stamping I removed the copier paper mask. Now I take a black pen and draw a frame around the edges of the leaves framing the sentiment. 

Well that's all for today. Thank you for joining me and I hope you'll pop by tomorrow . 

 simple stamping rooted in nature easy card making


Friday 21 August 2020

Fun Fold Friday

 Fun Fold Friday

Hello on this lovely sunny Friday. Today's card is one that I have made for my daughter in law's mum. 
It's her birthday on Sunday and you know the expression, 2 birds with one stone... That's my card for today. This simple folded card is made from either a 14.85 cm square card or 6" by 6" square card. Either set of measurements will work. The stamp set is as all of this week, Nothing's Better Than.
More information HERE
I used metric so starting with a piece of A4, I cut it portrait style, at 14.85 cm. Then scored it also at    14.85 cm. The White card mat inside is also 14.85 cm square. I scored that at 7.4 and a smidge horizontally in both directions and then once diagonally. All folds must be nice and crisp so I used the bone folder to reinforce the edges of the folds.
Using a sheet of the white vellum, Plush Poinsettia papers, I cut 3 squares of 14.4cm by 14.4 cm or 5,3/4" square. I added those to the front and inside of the card. I took some DSP double sided paper or in Stampin' Up! terms Designer Series Paper and cut 2 squares of 14.4 cm square. I found the centre of the papers on one edge and in the middle, then pencilled a line from centre to outer corner on both pieces. These were then cut out. I added the 2 pieces of DSP before adding the White square or diamond as it was turned around. When fixing this centre piece to the card, make sure that you glue or tape 1 whole, unscored square at a time. I fixed the one on the right first then closed the card on top of it to make sure it was closed properly. Then repeated the same for the other side.
I added Silver Foiled card squares from the Stitched Shapes set of dies. I love those dies, they are so very versatile.
The 2 pieces of DSP cut out from the other earlier, was then trimmed down to fit the front and the points meet in the middle.
The rest was just decorated using the Nothing's Better Than stamp set. 
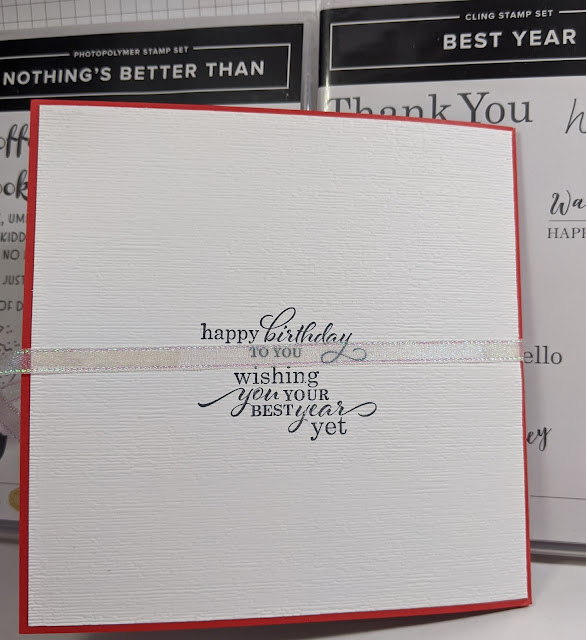
I added a white mat to the back of the card to write on and then added a couple of messages from the Best Year stamp set for the birthday greetings. 


My card is a standard opening card but it could just as easily be an A framed card. Either way will work really well.
Thank you for joining me this week. I hope my cards have given you some inspiration to make your own cards and projects. 
Please keep well, stay safe and keep on crafting, until next time xxx
:)) 
Cary will be back on Monday to show you some of her amazing designs.   

Thursday 20 August 2020

Throwback Thursday

Throwback Thursday  

Thankfully, I haven't spilt my tea over this card so it's nice and clean! Yesterday's ... now that's another matter! However, after my disaster with my cards and the cup of tea yesterday, I went on to work on today's card. This card is based on a similar one I made last year. It's my cheats version of the floating card. I stamped 6 of each of the images from Nothing's Better Than stamp set in Memento Black ink. Then had great fun colouring them all in using my Blends pens. I love my Blends. They have such amazing colours and tones that you can match and shade in so many ways.I then had the fun of cutting them all out. I know, I'm crazy but I just love the fussy cutting. It really is relaxing, I promise.

Nothing's Better Than information HERE

Once I had finished, I added Dimensionals to the backs of each and placed them all close together onto a C6 mat in Whisper White which I had embossed before hand using Dainty Diamonds 3D embossing Folder. Then I die cut a Stitched Oval from the centre of the whole mat. I added the mat to the card base, stamped and die cut some messages and a mat, then added a bow to complete this one.

Then, not wanting to waste anything like all crafter, I made another card using the centre oval that I cut from the centre of the first card.


2nd card


Again, this card is made in the same way as before,  another simple but this time a slightly fiddly card. These are the cards I made last year which have inspired me for today's cards.
I do hope you can get some ideas from them. :)