Tuesday 31 August 2021

Tip,Tricks and Techniques Tuesday Penguin Place

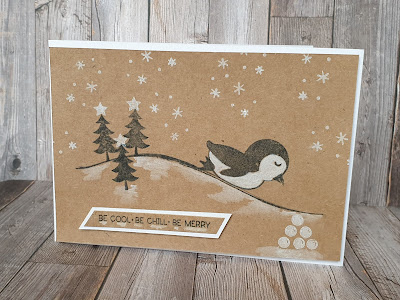
 Do you have a particular Christmas style that you come back to year after year? Or do you bring something different every year? Well to start this Christmas crafting season I've taken inspiration from a little product from the August to December called Kraft paper . Paired with the the Penguin Place  I decided to create Christmas cards using an old trick using White ink and a Blender pen.

I used black ink to stamp onto a piece of the kraft paper cut to fit onto  a standard A6 card base. I used the sliding penguin, the tree and the swosh stamp to create a scene.

I then took my white ink and stamped the snowflake stamp, some stars atop the trees and some snowballs

Next I put some white ink onto an acrylic block and using my blender pen coloured in my penguin.  I also added some white under the swosh and around the snowballs and trees. A sentiment and card number 1 was completed and adhered to a white card base.

Penguin place Stampin up white ink and kraft card

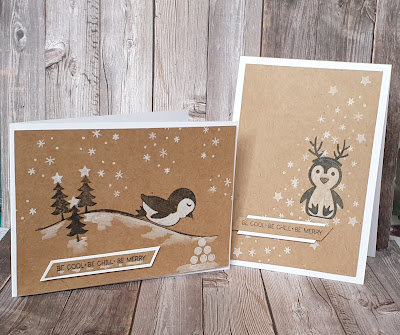
For card number 2 I used the same tequnique and created a card with the seated penguin.  

This time I stamped and coloured my penguin. Then I  created a mask for the penguin by stampin the same stamp onto the sticky edge of a sticky note, and cuttingbit out. I then placed the mask ove the stamped image and took the snowflake stamp and white ink and stamped a flurry over the front of the card.

Once I was happy with my flurry I removed the mask from the penguin.  I then stamped the antlers onto him.

The same message as for card 1 but this time with a small white mat behind it and I was ready to adhere it to a white card base.

Penguin place Stampin Up kraft and white ink card

I love this tequnique of colouring with white ink on a coloured background. I think it makes for a very different Christmas card. What do you think? 

Penguin place Stampin up kraft and white ink coloring card


Monday 30 August 2021

Make it simple Monday Penguin Place

 I do like a stamp set that covers multiple occasions.  I also like one that can be used for #simplestamping projects. I like stamp sets that have a selection of sentiments. I like stamp sets that will appeal to all ages. And I've  got one such set to share with you guys this week!! Called Penguin Place this super fun set has lots to offer!

Penguin Place simple stamping easy card

For today's Make it Simple Monday inspiration as always I'm  just using stamps, ink and paper. I have created what I call  scene latouts for my cards and used different occassions and colour palettes to creat different cards. 

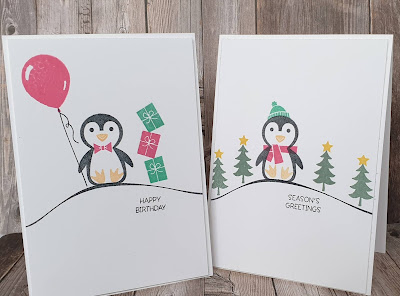
The basic  layout is the same for both the Christmas and birthday cards. I started out by stamping the black components,  the penguin and  the swosh ( a curve that creates a hill). 

I then dressed the penguin a bow tie for the birthday and a scarf and wooly hat for the Christmas one. I did of course give him a beak and feet!

Now to customise the card for the event. Christmas trees with stars atop and a Christmas greeting on one. On the other a pile of gifts and a balloon. 

For this first set of inspiration I went for what I call a primary colour palette.  Red, blue , green yellow and orange in clear bold shades.

Penguin place simple stamping easy cardmaking

Once I'd completed this pair I thought how would they work with a different colour palette 🤔 So I pulled out a selection of inks that were still blue, green, yellow, orange and red bases. But this time the tones and hues were what I call a more contemporary palette. I used a pink instead of red, a softer green , a turquoise shade of blue and softer shades of yellow and orange. 

The layouts are identical just different colours yet they create a different feel to the cards.

Penguin place simple stamping easy cards

So which do you prefer primary? Or contemporary? 

Penguin place simple stamping easy card making

Penguin Place simple stamping easy card making

As always on a Monday there will be a Facebook live over on our page at 4pm BST. I will be sharing how I made these cards.  I will add a link here later once I've gone live.

Here's the Video


Have fun and would love to have you join me on Facebook later if you can please say Hi. Xx

Friday 27 August 2021

Fun Fold Friday - Pampered Pets

 I can't believe that it's Friday again already! WOW!! where did that week go? Time really does fly when you're having fun doesn't it? Today's card although fun is a simple fun fold card. It's a twisted easel card. This style of card is so easy to make as you start with a standard card base, fold the front in half either straight across for a standard easel card of at an angle for the twisted easel card, like mine today. Using the Pampered Pets stamps again, I started by stamping the pets and coloured them in using my Stampin' Blends. I die cut them using the matching dies but then decided to go closer as I wanted the hairs on the pets to stand out more. The idea that I wanted was for the cats to sit on a brick wall and the dogs to be teased as they couldn't get near to them! I think it's fun. 

I used the Bricks and Mortar embossing folder to make the wall part way up the card and a cushion on the top to add a little luxury. The top was a piece of Real Red card was embossed using the Checks and Dots folder and a small strip was cut from it and added to the top of the wall. 

I think I've got the effect that I wanted, so I'm really happy. I hope that you like it too. The card is a 14.85cm by 14.85cm folded card. The front of the card was then scored from the top right corner to the bottom left corner, on the front only.


This is a picture of the front of the card from the inside. It shows the reverse of what I have just mentioned but as you look at the front of the card it will be perfect. So score along from corner to corner on the front or even on the inside in this direction in the picture above. It's exactly the same instructions if you use a C6 or C5 card base. However, if you want a card those sizes you have  to decide if you want landscape or Portrait design. If it's portrait exactly the same as I mentioned.  If you want landscape you will need to score the front of the card in half horizontally ACROSS, the front of the card. 

Whichever way you decide to make an easel card you will need a mat the same size as the front of the card base. I used Real Red to match my card base, you can obviously chose an alternative colour. After all in the words of our dear friend Diane, who lost her battle to cancer last year "it's your card". We always hear Diane talking and using her phrases to us in every class. 😢😘😇 So remember that when you are making a card, you are the one making it so you decide. 

Once you have decided on the front mat, place adhesive on the card base only using the triangle at the front edge. You can used any adhesive that you like whether it's tape or wet glue, they will all work. Add the mat matching the corners of the card as you would normally by laying it flat. Then the decorating is all that you need to do. Simples! 

For more information on the products that I have used this week, please click HERE. It will open up in a new window for you. 


Once again, I used the From All of Us stamps on this card. I love the Happy Birthday sentiments.

Thank you so much or joining me again this week, I hope that I've given you some ideas to make your own cards. Please stop by next week to see the amazing creations that Cary is going to make for you. 

I'm off to Cadbury World this week as a treat from my family, so until the next time, please keep safe, stay well but most of all KEEP ON CRAFTING. xxxxx

Thank you, Gill :)


Thursday 26 August 2021

Throwback Thursday - Pampered Pets

 I have really surprised myself this week as I didn't initially think that I would know what to make with the Pampered Pets stamp set. However, as soon as I started playing....there was no stopping me! I REALLY have had a great time. The hardest card was my #simplestamping card on Monday! It's very hard as a seasoned crafter to make something so simple but it's really been plain sailing all week!

Today I started by die cutting holes in the car front using the new dies called Picture This. It is a set of 2 dies, 1 has random round stitched holes and the other is set of 3 random stitched rectangles. I used a gorgeous dark blue of Night of Navy for the card base and the white mat was also embossed with the Checks and Dots embossing folder. I LOVE spots, I always have, even as a little girl (yes, I was one once! 😂) and always will! 


Anyway, I stamped and coloured the cats and dogs in different colours using my Stampin' Blends, giving them all and individual look. Using Dimensionals (double sided foam shapes) I added them to the card. They remind me of looking at pets at a pet homing centre. The inside has a sentiment and  another puppy having a scratch! I once again used the From All of Us stamp set for the sentiments as I wanted the fun Birthday greetings.


If you would like more information on the stamp set or any of the other products that I used today, please click on the link HERE it will open up onto a new page for you.


Wednesday 25 August 2021

Watercolor Wednesday - Pampered Pets

 This week's watercolour card is nothing like I had intended to make. My idea was a complete card front as a watercoloured image! Needless to say, that didn't happen!! Using the Pampered Pets stamp set I stamped the curled up cat and watercoloured him in using a soft grey and the basic grey ink pads. I stamped a block onto the pad and added a few drops of water onto it. I mixed it in then played. I didn't like my original 2 ideas and ended up with a simple mouse and hearts background. Using the Layering Ovals dies that have sadly retired, I die cut out the white and green mats. 

I wanted some ribbon to match the card base so I took some of the gorgeous Crinkled white ribbon and coloured it using a Blend in the same colour. Granny Apple Green, my favourite green next to Pear Pizazz which is a slightly softer shade. I coloured in the mice and hearts in the same way as before, using ink and water from a block. I wanted this to be a birthday card so I chose to use another stamp set called From All of Us.


For more information on the products that I used, please click HERE It will open up in a new window for you.


Tuesday 24 August 2021

Technique Tuesday - Pampered Pets

 Today's technique is what I call a peekaboo card. By making an hole or shape in the card front, this gives that effect. Using the Pampered Pets stamp set I have achieved what I set out to make. I've made cards that have a flap or tag going across the front as a closure but this is slightly different. By taking out a circle from the card front and using the circle as a mat that is fixed to the arm of the tag or flap by closing the card down and fixing it in position. Simple? Yes, very simple in fact it was much easier than you would think.

The difficult part was that I couldn't make up my mind as to what paper to use for the front and I haven't as yet bought the papers from the NEW Seasonal catalogue so I resorted to the papers that were coordinated to go with the set which have now retired. It happens! To allow more products to come into the new catalogues, we must say goodbye to some of those beloved items. Reluctantly!

I used Stazon Ink Pad in Tuxedo Black for the stamped images with ink and a water brush for the colouring.


For more information on the products that I used, please click on the link HERE


Monday 23 August 2021

Make It Monday - Pampered Pets

 Hello and welcome back to the 2 Big Girls Crafting Blog. I hope you have all been crafting crazy and you are all well? I'm in my element as I've been making cards galore this week and having a ball! I couldn't decide which stamp set to use this week so I asked my granddaughter Bella to choose a set. She chose the lovely Pampered Pets. As soon as I saw it I fell in love with it. We have 2 dogs, both Cocker Spaniels no cats but these cat images are gorgeous.

My first card is aimed at a beginner to make. The idea is that anyone just starting out would have a stamp set, ink pad, paper and/or card. So today's card is a way to help a beginner crafter get started. I stamped the images onto a basic white mat (a piece of card or paper) 0.5cm smaller than the card base, which in this case, when folded in half is 14.85cm by 10.5cm. 


If you would like more information on this stamp set or other products, please click HERE 

It will open up in a new page. 

Friday 20 August 2021

Fun Folds Friday Delicate Dahlias

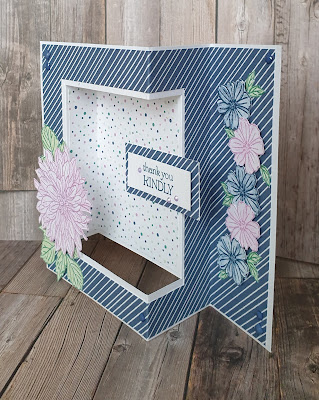
 Have you ever seen a card then tried to find the instructions and come up empty handed? Well this card is the result of seeing a card, finding the instruction was so hard that I ended up making my own up! It took me ages because math is not my forte!! Lol 😉 

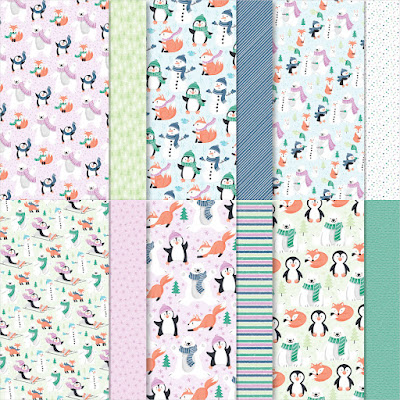
So for the final time this week I will be using the gorgeous  Delicate Dahlias with another Sale-A-Bration offering the super fun Penguin playmates. This fun pattern paper coordinates with a stamp and punch in the July to December mini catalogue from Stampin' Up! Which you can see Here

Penguin playmates Stampin up


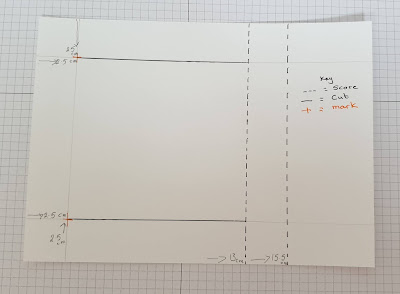
Now to the construction of the card. Start with a piece of cardstock measuring 14.85cm x 20.5cm.  Score at 14cm and 15.5cm as per the photo below.

Delicate Dahlias Stampin Up fun fold


Now with a pencil gently mark 2.5cm in and 2.5cm down from the left hand side . Then mark 2.5cm in and 2.5cm up from the left hand side as per the photo below.

Delicate Dahlias Stampin Up fun fold

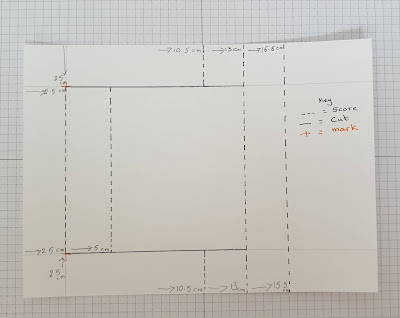
Now cut from the marks to the 13cm scoreline top and bottom. The solid line in thw photo below indicates a cut line, the dotted line means a score line and the orange crossed the pencil marks.

Delicate Dahlias Stampin Up fun fold card

Now to add some more score lines. First score at 2.5cm and 5cm between the cut lines. Then score at 10.5cm above and below the cut lines as shown in the photo below.

Delicate Dahlias Stampin Up fun fold card

 Now to fold the first fold is a mountain, the second a valley.  The 3rd are mountain and the 4th a mountain too.the 5th and final fold is valley.

Now the fun part the decoration.  I firstly cut my pattern paper 14.4cm x 20cm for the outer portion of the card. I then cut a panel out by marking 2cm down and 2cm in on the left-hand side. Then mark 2cm up and 2cm in from the left hand side too. Then cut between the marks vertically.  Now staring at the mark cut horizontally to 13cm both top and bottom. Finally cut at the 13cm line between the horizontal cut lines. Remove the rectangle of patterned paper and use for anothwr project.

For the inner portion of the card I used a coordinating piece of patterned paper measuring 9.9cm x 9.4cm. Once adhered gently fold along the score line.

With the card base complete it was time to stamp fussy cut out my flowers and leaves. Once adhered to the card I stamped my sentiment and mounted it onto a piece of patterned paper.  A few square gems and sequins to add a litle twinkle and I was finished!

Delicate Dahlias Stampin Up fun fold card

The card folds flat to fit within a standard C6 envelope but stands at a jaunty angle on the mantle!

Delicate Dahlias Stampin Up fun fold card

Delicate Dahlias Stampin Up fun fold card

 The view from the top shows how the card folds.

Delicate Dahlias Stampin Up fun fold card

Well that's it from me for this week. Please join me next week when Gill will be sharing her creations with us all. 

Have a great weekend and remember to have fun 🙂

Cary xx

If you're in the UK we'd love to be your Stampin' Up! Demonstrators.  You can purchase any of the products used in my creations Here 

If you'd like to join our Larger Than Life Stampers community/ team and enjoy all the benefits that being a part of  the Stampin' Up! Demonstrator family please click Here

Thursday 19 August 2021

Throwback Thursday Delicate Dahlias

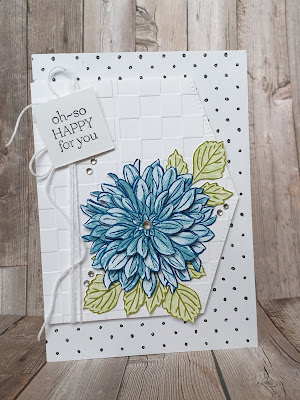
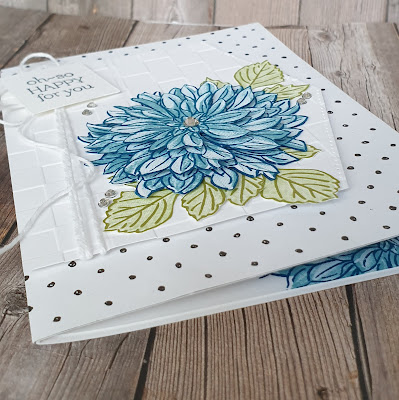
 Do you have a special pair of scissors for certain jobs? I have a special pair of scissors that are over 15 years old! They are just perfect 👌 they fit my fingers, have the perfect point, are the exact length of blade... and what do I do with them? One job and one job only decoupage! And when I saw the large dahlia in the Delicate Dahlias I knew I would be getting those special decoupage scissors out!

I stamped the image 3 times using both the outline and infil stamps. Once stamped I looked at them and worked out where I was going to cut the layers. I use a pencil and mark the areas that I'm going to cut away. This helps me to "see" how it will look when finished.

Once all the layers are cut and I'm  happy with them it's time to use 3d foam to layer them together.

For my card base I used white cardstock and then cut a piece of patterned paper to cover the front. 

I found in my box of scraps an interesting shaped piece of card and decided to add some texture to is using an embossing folder set called Checks and Dots. I chose the check one to compliment the dotty paper I'd used.

A few fussy cut leaves, some twine, a sentiment and a few sparkley rhinestones and I was happy.

Delicate Dahlias Stampin Up decoupage

I was really happy to get those special scissors out and revisit an old technique.  I think the image works beautiful and it was worth the effort.

Delicate Dahlias Stampin Up decoupage

For the inside I stamped the same image on the bottom right hand corner.  This give the finished card that little something extra in my opinion. 

Delicate Dahlias Stampin Up decoupage

So do you have a special pair of scissors ? And what do you use them for?

Delicate Dahlias Stampin Up decoupage