Thursday, 20 February 2025

Darling Dinos and Everyday Arches birthday card

 Well it's certainly getting busy around here! It was my grandson's 7th birthday,  it's half term so I have my 5 year old nice for 2 days while her mummy's at work and my annual weekend craft retreat is  just over a week away 😜🫣🤣.... Yup I'm a busy bunny for sure! The card I made for my grandson was themed rainbows 🌈 and his absolute favourite colour a shade of pink called flirty flamingo . The card was well recieved , which is always a bonus 😀 I used the amazing Everyday Arches dies to create a rainbow. It worked a treat and made enough elements to make 3 cards! So today's inspiration is using one of these pieces. As I still had the oh so cute Darling dinos still on the table I had to combine them.

Everyday arches darling dinos stampin up bright fun rainbow birthday card

The fun colours are bold and bright so I balanced that with a white card base and panel. The white clouds are die cuts from a set called Playing in the Rain.
The dino was stamped and coloured in green and orange the fussy cut out. This was really easy to cut up to the stamped edge so that's what I did for a change. Top tip if doing this type of fussy cutting take a marker in the same colour as you stamped the outline, in this case  black, and from the back run the side of the brush tip of the pen around the edges. This gives a great finish to your piece.

Everyday arches darling dinos stampin up bright fun rainbow birthday card

Before adhering the rainbow to the mat gentle draw a pencil line around the inside of the arch onto the panel. Remove the rainbow then stamp the balloons from the Darling Dinos set. I also stamped them onto the sticky edge of sticky notes. I then fussy cut the balloons from the sticky notes and used them as masks. First I stamped 3 balloons then masked them and stamped 2 more so that they appear to be behind the other balloons.  Then I masked all the balloons and used a blending tool to add a touch of light blue over the area. Next erase the pencil marks and masks. Colour your balloons and stamp the strings.

Now adhere the rainbow using 3d foam.  Then adhere the clouds and dino and a sentiment.  Once all are adhered adhere the panel to the card base and voila a fun bright birthday card sure to bring a smile 😃 

Everyday arches darling dinos stampin up bright fun rainbow birthday card


Sunday, 16 February 2025

Darling dinos new baby card

 As spring approaches here in my small corner of the world the birds outside my windows start to get noisy! Now don't get me wrong I live spring but boy do these bird have an early start... like 4.30am 🫣. Along with bird song spring also brings to mind new babies on the farm, those cute lambs are just so cute as are the chick's, as well as adorable human babies. So for today's inspiration I'm sharing a new baby card. Made using the Darling Dinos bundle which are just sooo much fun.

Darling dinos stampin up new baby card

I like to keep baby cards clean and fresh looking so when with a hit background on a white card base.  To add interest I dry embossed a mat using a 3d embossing folder called Forever Plaid.  I then embossed another piece of white cardstock using another 3d embossing folder called Soft waves.  I then cut out a section of the embossed cardstock following the curvy lines . This gives a flow to the panel for added interest. 

Darling dinos stampin up new baby card

I stamped the dino and sentiment in basic grey as I wanted a softer feel to the card, after all baby's are soft and snuggly aren't they 😉. I kept the colour palette simple and gentle with a soft shade of lilac called fresh freesia and a fresh citrusy shade of green called lemon lime twist. The lilac and citrus add pops of colour to bring the card to life.

Darling dinos stampin up new baby card

The fresh freesia little bow and sequins  both add interest and a little pop of happiness to the finished card.

Darling dinos stampin up new baby card


Wednesday, 12 February 2025

Friends for Life 5-3-1 part 4

 Today I'm sharing part four of my 5-3-1 formula card mini series. For the final card I've chosen to share a fun die cutting technique which I called an inlay technique. The dies are from a stamp and die bundle called Friends for Life.  I love the mix of fonts and elements that those bundle has. It is such a fun bundle.

Friends for life stampin up 5-3-1 card formula monochromatic summer splash

If you've seen the previous projects in this mini series you'll know that I've been on a bold and bright colour fix . Today's day card is no different except it's a monochromatic colour palette!  The beautiful turquoise colour I've used is called summer splash . It's vibrant colour brings to mind the beautiful seas of the Caribbean ..well in my imagination it does having never had the joy of going myself 😉

Friends for life stampin up 5-3-1 card formula monochromatic summer splash

To create the inlay effect I cut a mat of white cardstock and a a mat of summer splash the same size 10cm x 14.4cm. I then took the leaf die from the Friends for Life dies and die cut 5 stems starting in one corner and working outwards.  I have gone over the edges to creat a more relaxed flow to the panel. 
Now keep the die cut pieces to one side. Adhere the summer splash panel to the white panel lining everything up at the edges. 
Now the tricky part take the die cut leaves and adhere them back into the spaces on the cardstock panel. There are lots of ways to apply adhesive to finer cuts one such way is to put a small amount of wet glue onto a silicon mat and either dab the die cut onto the glue. Or take a sponge and gently dab in the glue and then onto the die cut.
This is the 5 element on the card but of course I had to die cut another leaf to decorate the inside 😉.

Friends for life stampin up 5-3-1 card formula monochromatic summer splash

The 3 element on the card are these gorgeous iridescent gems 💎 add the perfect sparkle ✨️. 
The sentiment is stamped onto white using the summer splash ink and the just die cut out using another die from the Friends for Life dies. 

Friends for life stampin up 5-3-1 card formula monochromatic summer splash

Do you like the simplicity of a monochromatic colour palette ? Do you like this vibrant shade of turquoise?  I really like how versatile the 5-3-1 formula can be.. Well that all for this mini series I do hope you've enjoyed the inspiration. 

Tuesday, 11 February 2025

Friendly Seagulls 5-3-1 card mini series bonus card

 I just had to share the oh so cute card that came together in my Live at 5 Facebook live yesterday . I go live on Facebook every Monday afternoon at 5pm GMT on my Cary@2BGCrafting Facebook page. I shared another bonus 5-3-1 formula card along with a fun way to use the Soft waves 3d embossing folder and the fun Friendly Seagulls stamps.

This embossing folder is sooo beautiful and stylish. 

Friendly Seagulls soft waves stampin up fun 5-3-1 card birthday

The 3 bright bold colours just warm your heart especially if like me the weather is grim, grots, and grimy where you are.

Friendly Seagulls soft waves stampin up fun 5-3-1 card birthday

The 5 cheeky chappy Seagulls just  outright make me laugh with their fun characters. 
And of course you just have to add one to the inside of the card don't you agree? 

Friendly Seagulls soft waves stampin up fun 5-3-1 card birthday

The 1 sentiment on the front is from a sale-a-bration exclusive stamp set called Day to Celebrate . Isn't it the perfect one?

Friendly Seagulls soft waves stampin up fun 5-3-1 card birthday

Well I hope you like this bonus project for the 5-3-1 formula mini series.  Here is the video from the Live at 5 to show you how it came together and some great top tips. Enjoy


Monday, 10 February 2025

Terrific Toadstools 5-3-1 card 3

 For part 3 of the 5-3-1 formula mini series I've gone toadstool crazy 🍄! Not only does today's inspiration uses the whimsical Toadstool Gardens but also the fun Terrific Toadstools stamps. The papers perfectly coordinate with the stamps and there is a Bundle of the stamps and a builder Punch if you want to go one step further!

The terrific toadstools stamps are photopolymer making placement so easy. You cannot build your own color combinations and creat wild and waky toadstools or go for more realistic looking ones. For today's card I've stuck to the colour palette from the pattern papers. 

Terrific Toadstools stampin up 5-3-1 formula fun card

So for card 3 of the 5-3-1 mini series I've used a piece of the pattern paper and cut it into 3 strips. This means that the piece of paper I had miss cut could be stretches to fit 😜. Another great way to use up bits that are too big to be thrown but not quite big enough for their original purpose! Using up your scraps is such a rewarding feeling! As I'm often want to say " waste not want not" !

Terrific Toadstools stampin up 5-3-1 formula fun card

For the 5 elements I stamped and fussy cut out four toadstools and stamped one sentiment panel. Adding colour by stamping the grassy mound over the sentiment it's self brings a touch of colour to any otherwise white area.
Talking of white areas I did of course decorate the inside of the card. This time stamping the grassy mound and creating another toadstool. The ability to mix and match the stamps to make different variations is definitely one of my favourite things with this cute stamp set 😍. 

Terrific Toadstools stampin up 5-3-1 formula fun card

For the final element on the card I have used a swoosh of white ribbon.  This counts as my 1 in the 5-3-1 formula. 

Terrific Toadstools stampin up 5-3-1 formula fun card

I hope you're enjoying this 5-3-1 mini series. You can find the others here and here

Coming soon will be the final  part of my 5-3-1 formula mini series. 

Saturday, 8 February 2025

5-3-1 card Cake celebration and Toadstool Gardens

 I was so inspired by my first 5-3-1 card that I just had to have another go or 3 😜 so here is number 2 in this mini series . The 5-3-1 formula is simple choose 5 of 1 thing, 3 of another and finally  of something else . Use all these elements to create you design . Here is the original card I made using this formular.  The card today features the amazing Cake Celebration stamp set and Toadstool Gardens pattern papers.

The Cake celebration stamps are photopolymer so perfect for building up you cakes 🎂 

Cake celebration stampin up 5-3-1 birthday card

For today's inspiration I used 1 piece of patterned paper from the Toadstool Gardens paper pack. This was the inspiration for the colour palette for the card. The bright pinks, oranges and turquoises are just such fun 😃

Cake celebration stampin up 5-3-1 birthday card

The 3 stamped portions show how versatile the Cake Celebration stamp set is don't you agree? The frosting stamp was used for the first layer. Then the cake was stamped and decorated on the second layer and the third layer holds the sentiment. 
Of course you have to add a little something to the inside of your cards don't you? So I stamped the flowers and leaves to create a little bouquet.

Cake celebration stampin up 5-3-1 birthday card

For the final part of of the 5-3-1 formula I used 5 of the gorgeous Sunny Day iridescent dots. If you've been here before you'll know I just can't resist iridescent embellishments 😜 so five was the perfect number to add!

Cake celebration stampin up 5-3-1 birthday card

Join me next time for part 3 of this 5-3-1 card mini series. 

Thursday, 6 February 2025

Toadstool Gardens birthday card

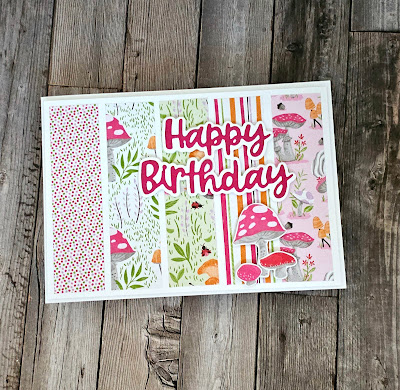
 At my last event I got to spend time with friends old and new. One of the lovely ladies was Karen. She was my very first team mate and has been a demo for nearly as long as I have! As we chatted and crafted Karen  shared some of her latest makes. Karen makes Christmas cards all year long so was sharing some of her gorgeous designs. One that particularly caught my attention was what she called a 5-3-1 card. She explained that the principle was to have 5 of one thing, 3 of another and finally 1 other item. So today I'm sharing my take on a 5-3-1 card using the super fun Toadstool Gardens pattern papers. 

These papers are only available to the end of February 2025 and are free, yes Free, with a qualifying purchase!  How cool is that! The beautiful colour palette of pinks, greens, lilac and orange just make me happy. The cute images just make me smile 😃 

Toadstool Gardens stampin up fun cute birthday card

For my 5 element on today's inspiration I chose to use 5 scrap strips of the pretty paper. Because the papers are part of a pack that have a common colour palette and design they all work beautifully together. I adhered them to a basic white panel and then adhered the panel to a white card base using 3d foam. 

Toadstool Gardens stampin up fun cute birthday card

For the 3 element I went with fussy cutting 3 of the cute toadstools out of another scrap of the pattern paper. I used 3d foam to adhere these to the card front. Then cut another 3 out as well to decorate the inside of the card because I just couldn't resist them 🍄😃

Toadstool Gardens stampin up fun cute birthday card

The final 1 element on the card is the sentiment. I chose to go with a die cut sentiment and shadow from the Wanted to Say dies.

Toadstool Gardens stampin up fun cute birthday card

I really enjoyed using the 5-3-1 formula for today's inspiration.  My mind is now thinking about mixing it up . Maybe 1 piece of pattern paper,  5 gems and 3 stamped sentiment / images... and off I go to make more cards 🤣 Will you give this 5-3-1 formula a go? How would you do it? 

Tuesday, 4 February 2025

Black on Black Birthday Celebration card

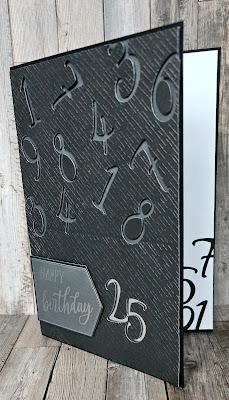
 Why is it that celebrating my son's birthday makes me feel older than celebrating my own does??? My son is my youngest child and he just turned 25 😜 oh my day's where has the time gone? And next year will be worse my eldest daughter turns 40 😱... I must be getting old !!! 🤣. Anyway back to the card making, which by the way keeps me young 😉. Today's inspiration is the card I created for my son. He likes very graphic, architectural design and his colour palette is shades of grey, black with pops of reds and purple. With all that in mind and the fantastic Birthday Celebration stamps and dies to hand here is what I created.

Birthday Celebration stampin up black on black 25th card

I used basic black cardstock for the card base which is a piece of A4 cardstock folded in half to create an A5 card base. Then I used a piece of the Two-tone basic black cardstock and the number dies from the Birthday Celebration bundle and cut the numbers out, make sure to save the inner parts of the numbers. 
 The Two-tone cardstock has a darker side and a lighter side with a white core and comes in a range of colours.
Next adhere another mat of the Two-tone cardstock but with the lighter side uppermost to the card base. 
To add more texture to the card I used a 3d embossing folder from the sadly retired Basics 3d embossing folder pack.
I adhered the die cut panel onto the card base using  black 3d foam. I also added a piece of silver foil behind the number 25 to highlight it.
The sentiment was stamped in versamark and heat embossed with silver powder then die cut out using the largest banner die from the set.

Birthday Celebration stampin up black on black 25th card

Waste not want not is a great motto to help continue the decoration to the inside of the card don't you agree 😀

Birthday Celebration stampin up black on black 25th card

Well I'm pleased to say that my son liked his card and had a lovely birthday.  Would you try a black on black card?

Sunday, 2 February 2025

Cute as can Bee scrapbooking

 Wow what a day I had yesterday!  Yesterday was the first scrapbook and memory keeping event I've ever held.... and it was amazing! The 10 lovely ladies who took part shared their creativity and their laughter at this fun event 😀.  The session was an introduction to scrapbooking and memory keeping . I designed a double page scrapbook layout, a very simple mini album and photo frame. All were designed using the oh so cute and pretty Cute as can Bee pattern papers and sticker sheet.

The colours in these papers and stickers are just delightful. 

Cute as can Bee stampin up fun simple 12 x 12 double page layout scrapbook

For the event my focus was on clean and simple. The layout was designed to inspire but not overwhelmed the new scrappers. I wanted to show that you don't need lots of stash to create beautiful pages.

Cute as can Bee stampin up fun simple 12 x 12 double page layout scrapbook

All the talented crafters who came knocked it out of the park! They added their own flair to their pages  and enjoyed playing with the layout which was amazing 👏 🤩 
As I watched them develop their layouts I was so inspired I just had to create my own stepped up version!

Cute as can Bee stampin up fun simple 12 x 12 double page layout scrapbook

The simple additions of mats and extra embellishments whilst keeping to the feel of the original inspiration made for 2 new pages that still delight me. The mats and embellishments give the layouts more dimension.

Cute as can Bee stampin up fun simple 12 x 12 double page layout scrapbook

Flagging the ends of the strips and adding some simple stamped bee trails give the layout extra movement. The placement of the photo mats also help give more movement to the pages.


Cute as can Bee stampin up fun simple 12 x 12 double page layout scrapbook

All in all I'm loving these stepped up pages especially as they were inspired by the wonderful ladies who I had the pleasure of spending time with. Thank you all Heather, Karen, Lynn, Andrea, Ellen, Maria, Carole, Jackie,  Kay and Jane. You ladies rock 🤩 Can't wait for our next scrap-together 😀

Cute as can Bee stampin up fun simple 12 x 12 double page layout scrapbook