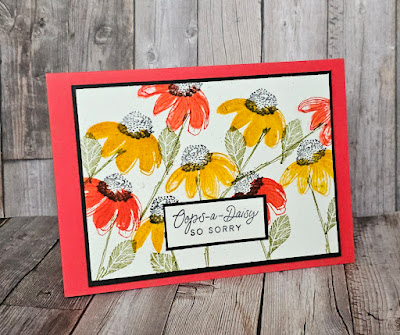
Hello, today my card is more grungy than I am used to. I am trying to push myself a little...though it is quite hard for an old girl to use new tricks! 😅 Using the Grassy Grove stamp set again today along with some daubers, I took the largest stamp and added ink to the stamp using a brownish grey of Gray Granite and the green from yesterday of Old Olive. Then with another dauber, I added some different colour in the form of a blueish green called Pretty Peacock. The colours of inks were all taken from the ink pad with the daubers alone and not direct to the stamp at all.
Tuesday, 30 April 2024
Monday, 29 April 2024
Make It Simple Monday - Grassy Grove
Hello, this week I am going to show you some projects using the Grassy Grove Bundle. This gorgeous stamp set is perfect for a very simple card or even going to the opposite end and making a highly elaborate one. Don't panic...I don't think that I will go that far!
My #simplestamping card is with a green pencil and a white card base, I lightly coloured over white and then with a smaller piece of card and 1 ink pad in a beautiful green of Old Olive I stamped the 2 majestic trees. A simple Thank you and a sentiment and image inside completes this simple card.
Friday, 26 April 2024
Fun fold Friday Cheerful Daisies
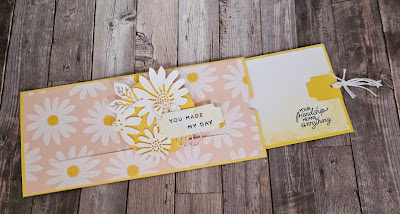
Wow the week has just flown by! It's Friday already! Well I hope you've all had a good week. I've had lots of fun creating with the Cheerful Daisies stamps. Today's fun fold is very simple but I'm not quite sure what to call it. So if you know or have a good idea please comment below!
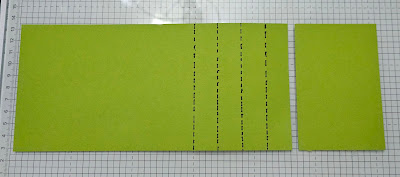
It all starts with a piece or cardstock measuring 10.5cm x 29.7cm. Then trim a piece off measuring 7cm x 10.5cm . With the remaining piece score it at 2cm, 4cm, 6cm, and 8cm. All the folds are then folded as mountain folds. This creates a cube. Apply adhesive to the panel that sits on the card to hold the cube in place. The piece that you cut off in the beginning is then adhered to the left-hand side of the panel. Below are photos of each of the steps.
Sorry it's so picture heavy but pictures say it better than words 😉
So once you've created your card base it's time to decorate 😀. The pretty pattern paper is only available until the end of April 2024. Called Delightfully Eclectic it's a fantastic pack of paper!
Of course the decorations had to include the Cheerful Daisies!
Thursday, 25 April 2024
This or That Thursday Cheerful Daisies
Wednesday, 24 April 2024
Watercolour Wednesday Cheerful Daisies
Did you know that 2 step stamping is great fun especially if you're not keen on colouring in? Well the Cheerful Daisies is a 2 step stamping set and works wonders for those of us who like quick and easy colouring. But did you know that they can also be used to create watercolour images too?
Well all you need is watercolour paper , the stamps , ink and a spritzer filled with water. Start by inking the infill stamp in your chosen waterbased ink . Then gently mist the stamp with water and stamp onto the watercolour paper. Leave the stamp on the paper for the count of 3 and repeat as often as you want.
Once the ink is fully dry take the outline stamp and ink it up in the same colour ink and stamp over the infill stamp images. Once all areas are stamped as desired complete the image with any other images you may like such as the stems and leaves.
Tuesday, 23 April 2024
Tips tricks and techniques Tuesday Cheerful Daisies
Recently Gill and I went to a fantastic Stampin' Up! Event called OnStage live in Rotterdam. These events are always full of inspiration in so many forms from swaps to presentations to make and takes. One of the presentations we saw was given by a UK demo called Mikaela Titheridge. And she shared how to make today's card. I loved it so much that I just had to have a go using the Cheerful Daisies stamps.
It starts life as a piece of cardstock measuring 21cm x 20.8cm. Score at 1cm and 10.9cm. Next adhere a piece of patterned paper measuring 20.5cm x 9.4cm on to the first large panel. Now mark 2.5cm in and 2.5cm up from the 1cm score line on both ends of the pattern paper panel. Now cut a slit between these 2 marks.
You will then need a stip of cardstock measuring 2cm x 8.5cm and your decorated panel. You'll also need the inside panel that needs to measure 20.5cm x 9.4cm. Place this panel behind the front panel. Then slip the cardstock strip from the inside through the long slit. Adhere the bottom of the strip to the bottom edge of the inside panel. Now using the 1cm panel close the card . I suggest using strong tape for this closure.
Now attach your decorated panel to the narrow strip of cardstock using 3d foam. Use a small circle punch cut a semicircle in the middle of the right-hand front panel so that you can pull the inner panel along. Below is a little clip of the card in action.
I do suggest creating your inside panel and from decorated panel first before putting the card together.
Monday, 22 April 2024
Make it Simple Monday Cheerful Daisies
Hello and welcome 😃 This week I'm sharing inspiration using the fantastic Cheerful Daisies stamps. Now you'd think I'd be bored with using these stamps. Why? Well we hosted and all day crafting event on the Saturday just gone where I share over 20 , yes 20 , different samples using this stamp set! Yet here I am about to share another week's worth of inspiration that are compldifferent again! So yes the Cheerful Daisies stamps are a great investment for your stash!
Now this is a 2 step photopolymer stamp set. What is 2 step stamping? Well it's a very versatile style of stamp set. There are out line stamps that work alone. But there are also what I call infill stamps which add colour to the out line stamped image, but they also work well on their own too! So you can layer them up or use them separately giving you more bang for your buck. Being photopolymer they are easy to line up as they are see-through so great for those who are just starting their stamping journey.
So with all that in mind here are 2 versions of the same card made using the large daisy from the set as well as the stem and leaves and sentiment.
The difference is that version one is using several colours of ink pads.
The bright cheerful blue is a reminder of sunny days to come . To create a lighter shade for the infill of the flower all you need to do is ink up the stamp then stamp onto a piece of scrap paper then, without reinking the stamp, stamp the image. This is a very simple technique called generational stamping.
#simplestamping is perfect for so many reasons, speed, just starting out, for those with a very small stash... the list goes on! But one thing it's not is boring!
Friday, 19 April 2024
Fun Fold Friday - Botanical Layers and Botanical Beauty
Hello again. As today is my last day for a week, I have gone to town! Using the Botanical Layers stamps, I stamped the four, large floral images several times in; Lemon Lolly, Calypso Coral, Berry Burst, Granny Apple Green and Bubble Bath! It took a LOT of fussy cutting out! I need a break from fussy cutting now!! :) Using the Botanical Beauty stamp, I stamped onto a white mat in a Boho Blue Ink pad. I also cut and embossed a white mat for the centre 2 half panels and the front.. The blue, I cut in half lengthwise and added to the inside of the card on the outer 2 edges and filled in with a piece of the embossed paper in the centres. I took 2 more pieces of Boho Blue card and cut them to 21 cm wide. 1 piece is 6.5 cm high and the other 10 cm high. The latter of which was cut to 10 cm wide. I added an extra 1 cm to each side for the ahesive to go on before cutting.
Then it was a case of adding the leaves and flowers all over the stands. By making a fold in the centre of each of the stands It will make it stand and fold into the centre easily. Now bear in mind this will not go as standard mail. It will have to large size letter of even hand delivered. Which I always prefer anyway. That was it basically. A simple sentiment on the front and the back completes my cards for this week.
I hope that you have found some ideas to hopefully inspire you to make your own cards this week. Cary will return on Monday with some more of her designs to share with you.
Until the following week when I return again, please take care, stay safe and
KEEP ON CRAFTING
xxx 😍😍 Gill 😍😍 xx
Thursday, 18 April 2024
This or That Thursday - Botanical Beauty and Botanical Layers
Hello on this lovely Thursday. For my cards today using the Botanical Beauty stamp set, I coordinated it along with the Botanical Layers. My first card is obviously THIS...I started with one of Cary's favourite card folds, a tent fold card. I chopped a lump from the front of it and then another piece too! I cut and added some DSP from the Softly Stippled papers. Love them!
Stamping the image onto white card, I used Calypso Coral. This gorgeous colour is so warm and inviting and made for this card! I cut a small piece of white from the piece that I had stamped out and adhered it to another piece of Calypso Coral leaving a small border. A stamped and fussy cut flower stalk onto the front and one onto the DSP for the inside.and that finished this card.
THIS
THAT
This time for my That card, I have used the beautiful Berry Burst. Now many of you will have remembered that this was a colour from many years ago. In fact it was an In Colour. Now I knew that I loved the colour of this when it first came out...I still do. I am so glad it has been brought back as it's great!! This time, a standard card shape in C6 or A6 whichever you like to call it. This time after stamping the image onto a C6 piece of white card, I cut it into 2 pieces diagonally. I matched it up with another piece of white and added them to the front and the inside. A lovely sentiment from another of my favourites, Go To Greetings, a few of the stamped and fussy cut leaves and flowers, then my card is complete.
It's now down to you to decide which is your favourite card. Please let us know?
Wednesday, 17 April 2024
Watercolour Wednesday - Botanical Beauty
Hello and thank you for stopping by. Today, using the gorgeous stamp set Botanical Beauty, I really went to watercolour heaven! I stamped the image in Lemon Lolly, one of the last years new colours. It is soft and subtle but can be bright too. I lightly stamped it onto White card and then I started with many of the green inks from Stampin' Up! I used Shaded Spruce, Granny Apple Green, Pretty Peacock and a touch of Old Olive. I stamped an acrylic block onto the ink pad and using my fine water brush, started to colour in the leaves and ferns in different ways. I repeated this with all of the colours until I was happy with the depth of each colour. I went on to cut the white stamped mat down to 9.4 cm I left the width at 10.5 cm.
I then chopped it up randomly from top to bottom at different angles. I added the pieces onto a mat of the Lemon Lolly card. Once the last piece was ready to go I was able to trim the width down to fit my card base. I adhered the mat to a black mat a few mm larger than the yellow which I think has made the colours stand out so well. I mounted it using Dimensionals on the back and added a piece of yellow ribbon from the Sheer Ribbon Combo pack. 3 gorgeous colours in the pack, Lemon Lolly, pink of Bubble Bath and the bright blue of Azure Afternoon. A sentiment inside and a few extra leaves etc. and I was finished.
Tuesday, 16 April 2024
Tips, Tricks and Techniques Tuesday - Botanical Beauty and Botanical Layers
Hello and thank you for stopping by. Today's card is one that I had in my mind last week when it wasn't my turn for the blog but here it is. Another very easy card if you don't mind some fussy cutting! As many of you know...I LOVE it! I started by stamping the Botanical Beauty onto a white mat in lovely shed of green called Shaded Spruce. Then using my trimmer I gutted the centre out of the card and kept it to the side. I left 2cm all around the outer edge and then mounted the paper onto a piece of the gorgeous blueish green of Lost Lagoon which I had first embossed using the lovely Fern embossing folder.
I stamped the Botanical Layers onto another piece of white card and fussy cut them out. Sadly there are no dies! They were added onto the Lost Lagoon mat over the stamped border. I then adhered all of them to the Shaded Spruce card base.


.jpg)
.png)


.jpg)


