Monday, 31 July 2023

Make it simple Monday Kits

 Wow where does the time go??? It's the last day of July already!!! The nice thing about it though is that tomorrow, 1st August,  starts a month long promotion for the amazing Kit's collection from Stampin' Up! . There will be discounts on all yes All kit's of upto 30%!!!

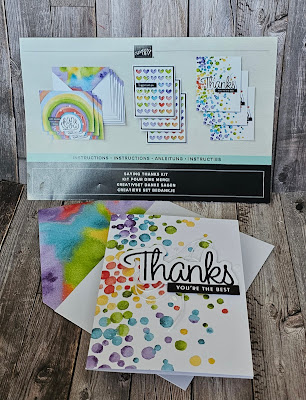
Saying Thanks Kit stampin up fun easy simple cards

Now let's talk a little about kits. When they were first introduced to the SU product line up I admit to being a little, oh ok maybe more than a little, dubious.  After all why use a kit when I have a room full of stash...I love spending time crafting.... I've been doing this for a long time... I'm always inspired to create?

Well let me tell you I have changed my tune and become a convert to the little beauties ✨️ They are still perfect for beginner crafters, they are self contained goodie boxes, they can be great time savers and will always be a great way to kick start your creativity. 

But, and this is why I really changed my mind, they give my creativity focus and allow it to blossom and grow all at the same time! I never though I'd say it but I really do love the SU kit's! As you'll discover if you come back evwry day this week.

But lets talk about what a kit is. Firstly there are a variety of kits available. There are craft kits which range from home decor to gift packaging to tags everything  need to create these fun projects can be found in the kit.

Then there are 2 types of card kits. Every card kit comes in its own box perfect for storing you kit but also your finished works of art. Each contain card bases and envelopes, embellishments and adhesives. The first type is one that is pre printed and doesn't require you to stamp. The second card type of card kit contains stamps, acrylic block and an ink pad which you can add to your stash after all the projects are made 😉 And let's not forget the box ...what crafter doesn't love a box to decorate and use for storage 😃

Wow now that was a lot of words! So let's cut to the creative stuff and have a look at today's projects.  As it's #makeitsimplemonday I thought I'd share my favourite non stampin card kit. Called Saying Thanks it's  a beautifully bright and bold box of goodness. 

Saying Thanks Kit stampin up fun easy simple cards

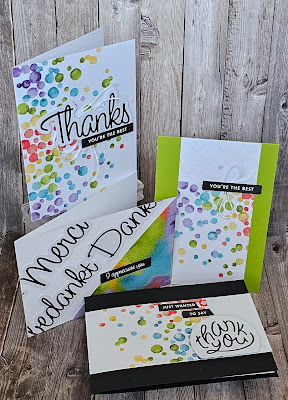
For today's inspiration I have chosen to create the card on the right hand side of the picture. I then took the same card base and an envelope and created a further 3, yes 3, different cards just by adding card bases from my stash.

So here is the card as shown in the kit.

Saying Thanks Kit stampin up fun easy simple cards

Did I mention that every kit comes with and amazing photo instruction leaflet with tons of useful information in it? Well it does and I highly recommend looking through it before you start creating. 

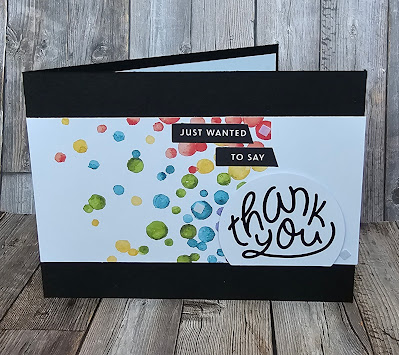
For my first 2 cards I cut one of the kit card bases in half and added them to some card bases from my stash. I didn't fold the card base and instead cut the length to fit my card bases. I used the sentiments from the kit.

Saying Thanks Kit stampin up fun easy simple cards


For this one I used some of the little white hearts that pop out of one of the other card embellishments.  This added texture and interest  to the white part of the cut up card panel.

Saying Thanks Kit stampin up fun easy simple cards

For my third card I used the gorgeous inside of the envelope.  Top tip always look at the insides of the envelopes privided they are usually printed and can be oh so useful as pattern paper! 
Did I mention that these kit's come with sentiments in not just English but French, German and Dutch too? Well they do and I decided not to waste them on my final card.

Saying Thanks Kit stampin up fun easy simple cards

I do hope that I've started to show how much the humble kit can add value to any crafters experience be they just starting their creative journey or avid crafters with much experience. 
Please pop back tomorrow for more inspiration using kits.

Saying Thanks Kit stampin up fun easy simple cards


Friday, 28 July 2023

Fun Fold Friday - Seasonal Branches

Thank you for joining me here once again today. Using the Seasonal Branches stamp set and dies today for the last time this week I have made an easy fun fold called a twisted gate fold card. It is as easy as any other gatefold except that this is slanted at an angle. I have again used  a Basic White card base and scored the front panel from top right to bottom left. That's it! I added another C6 mat on top of that and some DSP from the Delightfully Eclectic papers, I cut 3x 4.5cm squares from Garden Green card  or 3x 1,3/4" squares. I cut 3x white squares in white and embossed them using the Exposed Brick embossing folder. 

They were all added to the card using Dimensionals to add height and an oval duo punch with the birthday wishes on. Again, this was also added using Dimensionals. Inside, I added a Garden Green mat and a white mat over the top and centralised several flowers and leaves over it. The final touch was another Oval sentiment shape, on Dimensionals for the front of the card to stand up against. That's it! simple enough?


Well, once again that's it from me for the week. Cary will of course be back next week and sharing her card makes with you. 
Until I return, stay well, keep safe but as always.....

KEEP ON CRAFTING

It really is the best thing since sliced bread!! 

😍😍 xxx Gill xxx 😍😍


Thursday, 27 July 2023

This and That Thursday - Seasonal Branches

 Well, it's Thursday already and it's time for THIS or THAT decisions to be made... by you! Once again, I have used the Seasonal Branches stamp set and dies. I coordinated these 2 cards with the Cards and envelopes from the Bright and Beautiful set. The colours are just beautiful and so easy to match with.

My THIS card is a landscape card. I started by die cutting a circle shape  from the Irresistible Blooms dies then stamped the branches and flowers from the Seasonal Branches set. I added a piece of DSP from the Bright and Beautiful DSP designer series papers which I think has made the shape pop out. The branch, flowers and leaves were die cut out and then added onto the branch and card. I only used a few of the flowers as I didn't want to swamp the leaves out completely.

THIS


THAT
The next card is THAT and this one is portrait style. Again the Bright and Beautiful Memories and More Card base. I added an embossed circle which was embossed with the Fern embossing folder, onto the card using Dimensionals and then started to add the smaller branch die cuts onto the circle and made a nest! Then I started on the birds. I stamped 2 birds and reversed the now, nesting one. I was able to draw around the bird onto the reverse of the stamped image and proceeded to colour them both in using several colours of Stampin' Blends pens.


Both of these cards were basically very simple and I love the card bases making them pop so well. 


Wednesday, 26 July 2023

Watercolour Wednesday - Seasonal Branches

 For the watercolour card today, this one has not turned out anything like I intended it to! However, using a block stamped into Coastal Cabana ink, I added lots of water to the ink on the block then using the large water brush, I washed it across a piece of Fluid 100 watercolour paper which I had soaked earlier. It went really smoothly across the card mat. Once dry I added some more different colours including blue, pink, yellow.... Once I was completely happy with the mat, I set it aside to dry. I die cut several of the large branch dies out of Pecan Pie card using the Seasonal Branches dies. Then using the stamp set, also called Seasonal Branches, I stamped lots of the leaves onto another piece of watercolour paper. I die cut them out once they were dry and put them aside to when I wanted to add them. I die cut the centre frame out of some Gold foiled card and embossed it with the Metal Plate embossing folder. I added the branches and leaves onto the mat and added the frame around the whole front of the card. I die cut a few golden apples (who wouldn't love a golden apple tree in the garden)?


Tuesday, 25 July 2023

Technique Tuesday - Seasonal Branches

 For today's card I have used designer series paper. Now, I know this isn't a technique but it is certainly one of my go to ways of late. The papers from Stampin' Up! are absolutely gorgeous with all of the different designs and colours they are so easy to match stamps with. So with the Seasonal Branches stamps and a few of the dies I made the card below. I used a circle of White basic card on top of a piece of patterned paper which was added onto another design of paper. The branch and the leaves were stamped and die cut. I fussy cut the birds.


Monday, 24 July 2023

Make It Simple Monday - Seasonal Branches

 Hello and welcome back to another week of some more cards from me. This week I am going to use the beautiful set of stamps called Seasonal Branches and later in the week, I aim to use the matching dies too. So please keep an eye out. As it's #simplestamping for today, I have used only a card base. I stamped the branches in the brown ink and then the birds from the set. Using some ordinary colouring pencils, I started to colour in the birds using many different colours including red, yellow, orange, blue and a few browns. The leaves were stamped in the brown ink pad called Pecan Pie from Stampin' Up! I added some little green touches to make it look a little like buds, foliage starting to shoot all along the stems of the branches. Once I was happy with that, I just added a light blue pencil all across the card and some green lower down to show as if there are hills and grass. I will never profess to be an artist but I will always have a go. That's where all the fun is..... in just having a go. 


Friday, 21 July 2023

Fun fold Friday Just My Type

 Fun Fold Friday already!!! Where has the week gone??? So what have we got for today's inspiration using the Just My Type stamps... a fun fold of course 🤣

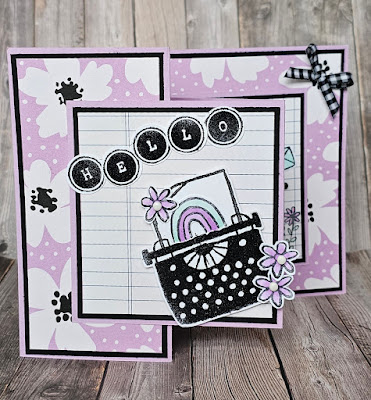
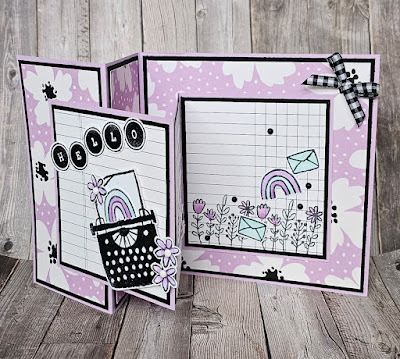
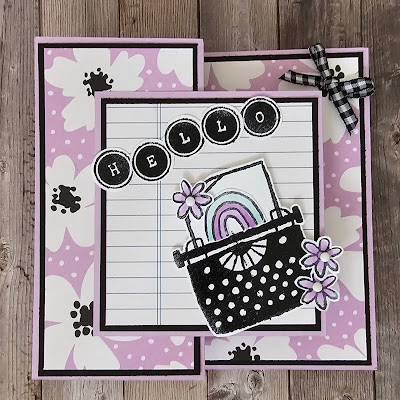
Today's fold is a take on the well known Z fold card. It's a little larger than my normal card size, a 14.85cm x 14.85cm or 6" x 6". But it's still a really easy one to create.

It all starts with a card base measuring 14.85cm x 14.85cm ( 6" x 12") scored at 7.4cm and 14.85cm ( 3" and 6") . You then need a second piece of cardstock measuring 10.5cm x 29.7cm (3 3/4" x 12") scored at 9.9cm and 19.8 (4" and 8")

Next it's time to decorate all the panels. Once all the panels are decorated it's time to put the 2 pieces together.  Take the larger piece and fold the first scoreline as a mountain fold and the second as a valley fold.  For the 2nd piece fold again mountain then valley. 

Lay the card base, the 1st piece out flat, and fold the 2nd piece concertina fashion. Place the 2nd piece in the center of the large left hand panel of the card base and adhere the bottom layer of piece 2 in place.

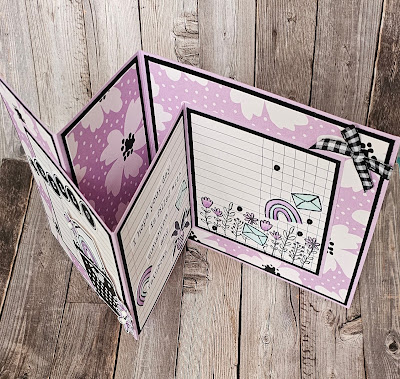
Next open out piece 2 so that it lays to the right hand side . Fold the left-hand panel of the the card base so that they concertina and lay flat partially covering piece 2. Then fold piece 2 so that it encases the folded left-hand edge of the card base. This creates the Z fold see below.

Just my type stampin up z fold fun fold card

The pretty pattern papers I've  used to decorate  my sample with are from a fabulous pack called Delightfully Eclectic.  This is a fun pack of 48 sheets of 12" x 12" pattern paper that as the name suggest has alsorts of patterns to play with! A great addition to any crafters stash.

Just my type stampin up z fold fun fold card

I chose the bold floral for the background and the fun ledger style sheet for the smaller panels. I stamped directly onto the pattern paper and coloured the images with my alcohol markers for some parts.

Just my type stampin up z fold fun fold card

For other decorative pieces I stamped, coloured then fussy cut them out before placing them. I also used a few matt black dots scattered around just for fun.

Just my type stampin up z fold fun fold card

Well that's all folks for this week from me. Please join me next week as Gill shares her creations with us here.
Have a great weekend and remember..
Have fun xx

Just my type stampin up z fold fun fold card


Thursday, 20 July 2023

This or That Thursday Just My Type

 To cut or not to cut that is the question... for today 😃 Is it This? Or That? It all started when I stamped on a small piece of card with some of  the small individual stamps in the Just my Type.

I was originally looking at colour combinations to find a pleasing palette to use. Which I did! The pretty lilac, pale turquoise, soft lemon and pale pink combo was just perfect ... so perfect I decided to use my practice piece for my card! 

The only problem I faced was whether to cut it up or not!!!

In the end I decided to recreate the panel and let you guys decide 😅

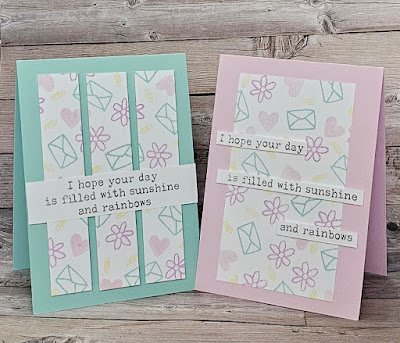
So here is the uncut version....

Just my type stampin up clean and simple happy card

I did decide to cut up the sentiment but should I have cut up the stamped panel?

Just my type stampin up clean and simple happy card

I kept the sentiment whole for the cut up panel version as I felt it more appealing to my eyes.
All in all it's all about whether to cut or not to cut. Which turns out is a really tricky question!  Help! What's you favourite?  Let me know in the comments please. 

Just my type stampin up clean and simple happy card


Wednesday, 19 July 2023

Watercolour Wednesday Just My Type

 Today I've got a fun and somewhat messy watercolour background tequnique to share. Now don't be put of by the word messy it's only as messy if your name's Cary and you don't think it through first 🤣 Don't panic I'll give you my top tips to a tidier session 😉 I've uses the typewriter from the Just My Type stamp set as it's  a solid image, you'll get way as we go along.

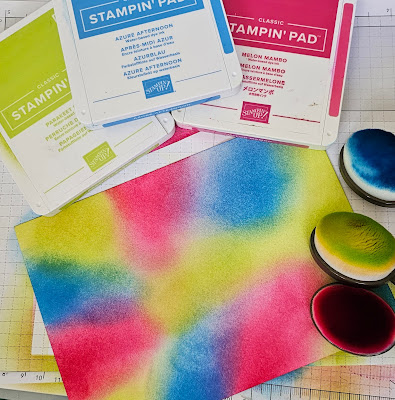
The background starts with waterbased ink pads, blending tools (I use brushes) and watercolour paper. My top tidy tips start here use scrap paper over your work area.

I chose 3 bold colours of ink and blended them randomly over the entire piece of watercolour paper.  Don't be to worried that it doesn't look amazing trust the process. 

Just my type stampin up fun watercolour technique heat embossing thank you card

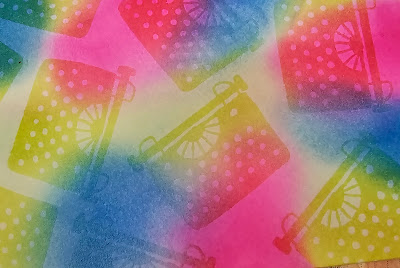
Next , after making sure the ink is fully dried,  stamp your solid image randomly all over using versamark ink.  Then heat emboss using clear embossing powder. Top tip it can be tricky to see where you've stamped so ever couple of times add the embossing powder it helps show where you've already done. 

Just my type stampin up fun watercolour technique heat embossing thank you card

Now once all the powder has been heat set the real fun begins. To start with the images may bot be very obvious but hang tight.

So more top tidy tips... use a wipe clean mat or cover the area with a piece of parchment/ baking paper.  Have plenty of kitchen paper or absorbant cloths to hand. Have a bin to hand for wet stuff 


Just my type stampin up fun watercolour technique heat embossing thank you card

Use a spritzer filled with water and cover the entire piece with plenty of water. For this technique the more the merrier. Now take your kitchen roll and blot the piece. All the water that has now reactivated the ink and the kitchen paper is removing it! 

Just my type stampin up fun watercolour technique heat embossing thank you card

Keep applying the water and blotting it until you're happy. Now I do think if I'd used lighter colours the effect would have been different but that's for another day. Top tidy tip put your used paper towel in a bin straight away the colour can be transferred elsewhere  😉 

The panel needs time to dry but not too long as you will have blotted up most of the moisture already.

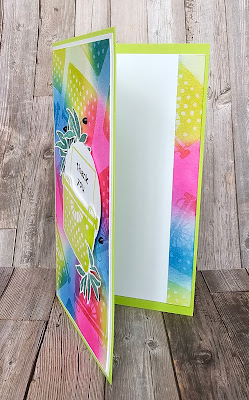
To decorate I simply stamped the typewriter image again in the green ink. I stamped over it again using versamark and heat embossed it with clear powder. This is made easier because the stamps are photopolymer so they are easy to position. I then fussy cut the image out. I also stamped and fussy cut 3 of the leaves images.

Next I used a 2" punch to cut a circle out of basic white cardstock.  I then stamped the paper edge and thank you sentiment positioning it so that the typewriter lined up.

I adhered all the bits together using 3d foam. Itrimmed the watercolour panel and then matted it onto a piece of basic white then onto a green card base.


Just my type stampin up fun watercolour technique heat embossing thank you card

A few matt black dots scattered around completed the front of my card 
I used some of the off cuts to decorate a panel for the inside of the card. 

Just my type stampin up fun watercolour technique heat embossing thank you card

I thoroughly enjoyed this  technique  it reminds me of the Joseph's Coat one but in reverse. I do hope you'll give it a go 😃 and as the card says thank you for reading my post  

Just my type stampin up fun watercolour technique heat embossing thank you card


Tuesday, 18 July 2023

Tips tricks and techniques Tuesday Just My Type

 Sometimes simple is best and today is one of those day's!  Short on time ? Then take inspiration from the #simplestamping and/or #keepitcleanandsimple bands! I started by looking at the samples in the catalogue for the Just my Type stamps. I was instantly inspired by the colour palette of one particular card. This was my starting point.

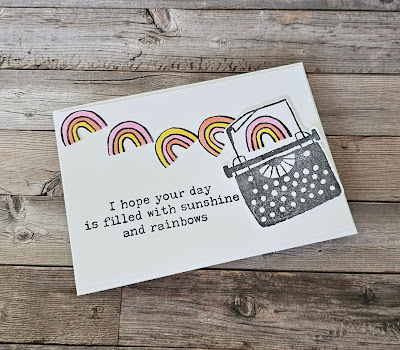
The layout is very simple and one I use quite a lot, sentiment on the left, image bottom right and plenty of white space. Once those elements have been sorted the rest just kind of happens 😀

Just my type stampin up clean and simple card

What happened for this card was I stamped, coloured and fussy cut out 8 rainbows! Oh and the typewriter of course 😉
Placing the typewriter up on 3d foam and adding 1 of my rainbows was the starting point. I then just scattered a few rainbows and adhered them to the card.

Just my type stampin up clean and simple card

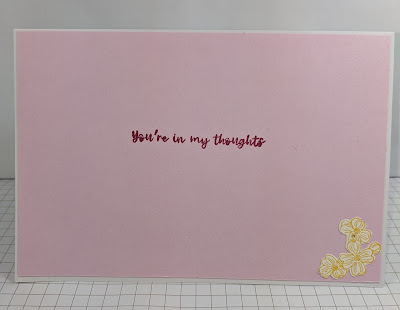
I used the 3 left over rainbows to decorate the inside of the card just for fun and because I didn't want to waste them of course 🙃 

Just my type stampin up clean and simple card

All in all a quick, clean and simple card that will make the recipient smile 😃