Wednesday, 31 January 2024

Watercolour Wednesday Jungle Pals

 After all the fuss yesterday today's inspiration just had to be a little calmer 😅.. So I went with my version of a Siberian tiger. The title of a stamp set should never limit your imagination Jungal Pals....Siberian pals a rose by aby other name smells the same after all 🤣🤣🤣

Any way back to the card. The card starts by creating a watercolour blended background. If you'd like to know how the background was created pop over and check out this post

Jungle Pals stampin up watercolour blended background hello card

While the background was drying I used a die from a set called aspen tree dies. Don't you just love the effect of what's behind peeking through the trees? The tiger is stamped in black and fussy cut out then woven through the trees. 

No naked surface on this card means that the inside needed a little love too.

Jungle Pals stampin up watercolour blended background hello card

Now I know that tucans don't live in Siberia but hey the world is a small place these days and they could be friends... couldn't they ?😉

Jungle Pals stampin up watercolour blended background hello card

Well I hope that after all the fuss of yesterday has been calmed by today's inspiration just proves how versatile the Jungle Pals stamps are.

Tuesday, 30 January 2024

Tips tricks and techniques Tuesday Jungle Pals

 Yesterday's inspiration was clean and simple... Today's? Well let's just say it's not 🤣🤣🤣. The versatility of the Jungle Pals is anazing! So the top tip of the day is.. Sometimes it's great to let your imagination run riot! And with the help of the coordinating Jungle Pals dies that became very easy 😉

Jungle Pals stampin up pun card play on words card

Keeping the colour palette quite simple helps to make the finished artwork less fussy even thought it is quite busy. The Jungle Pals dies are also Free with a qualifying purchase... so what's not to love? Get your cardstock and die cutting machine out and play!

Jungle Pals stampin up pun card play on words card

I love to decorate the inside of cards and today's card just makes me smile. It also makes sense 🤔 or is that just me? 
The punny sentiment is created using alphabet dies called Mini Alphabet dies. They are the perfect size for all size projects.

Jungle Pals stampin up pun card play on words card

Well I do hope that we'll C U Later too 😉😆

Jungle Pals stampin up pun card play on words card


Monday, 29 January 2024

Make it simple Monday Jungle Pals

 Happy Monday 😃 and welcome to the first of my posts featuring the adorable Jungle Pals. This is an exclusive stamp set that is only available for free, yes Free! from Stampin' Up! during Sale-A-Bration. This weeks post will also feature another free stamp set from the Sale-A-Bration offering called Heartfelt Hellos .

But first lets have a look at the cute Jungle Pals stamps.

Jungle Pals stampin up simple stamping clean easy card

See what I mean? They are such fun critters. Full of character and charm perfect for simple clean cards.

As today is #makeitsimplemonday the cards shared are both single layer ones. They are coloured using pencils. 

Jungle Pals stampin up simple stamping clean easy card

A top tip when creating such simple cards is to make sure the image doesn’t float on the page. By float I mean it's not anchored on the page. To ground the image I recomend gently going around the image with a light blue or grey to create a shadow. This really does help to ground or anchor the image on the page so to speak.

Jungle Pals stampin up simple stamping clean easy card

Adding shading to the colouring of your image also helps ground your image onto your card.

Jungle Pals stampin up simple stamping clean easy card

The position of the sentiments also help the composition of your card. As does the choice of font and size of the sentiment. The sentiments in the Heartfelt Hellos are all good ones for this style of card.

Jungle Pals stampin up simple stamping clean easy card


Simple cards doesn’t need to mean boring cards as I think today's cute duo prove 😃

Jungle Pals stampin up simple stamping clean easy card


Friday, 26 January 2024

Fun Fold Friday - Sale-a-bration - Sunny Days DSP

Hello again on another cold and wet Friday. My card today is a slight follow on from Cary's post last Friday. Cary's card last week was an easel card and mine is a twisted easel card. There are many different types of easel cards around so it's always just a case of chosing which design you like to make. My sale-a-bration today is the beautiful DSP Sunny Days. It has some really beautiful designs in the papers as well as the gorgeous colours too!

I started by making a basic white card base and cut a green mat 21cm x 10.5cm and scored at 14.85cm. I cut a Shaded Spruce mat 10.5cm x 14.85cm and put it aside for a few minutes. I laid the white card base face down on the trimmer and on the right hand side of the card, scored between the top right corner and the bottom centre. 

see the picture:  

 
The picture above shows the route of the adhesive with the score line directly above the diagonal tape. 

 
This image above shows the angle of the card base before the separate mat is adhered to it.


This image shows moments before the mat is to be adhered to the corners of the triangle on the right hand side of the card base. After adding adhesive around the edge of the triangle, place the seperate mat on top of the scored triangle, match up the outer corners and fix into position. That is the version of my card that I made today. Here it is for real.


I used the Countryside Corners Dies for the Blueberry Bunches stamps, the Double Oval Punch for the raised stand and my Stampin Blends for colouring the blueberries in Blueberry Bushell ink colour.


That's it from me for the week. Thank you once again for joining us this week, I do hope that you have found some thing to inspire you to make yourself some cards this week.  

Cary will of course return on Monday with more projects to inspire you. 
Until I return the following week please take care, stay well and as always....
 

 😍😍 xxx KEEP ON CRAFTING xxx 😍😍  


Thursday, 25 January 2024

This or That Thursday - Sale-a-bration - Flight and Airy DSP

 Hello again. As it's Thursday I have, of course, 2 cards for you. For these cards I have used some more of the gorgeous Flight and Airy DSP again. I coordinated it with the Heartfelt Hellos stamp set once more. Either of the 2 products are available for FREE when you place an order worth £45 or more. In fact for every £45 you spend on products you get another Saleabration, so, £90, £135 etc etc. This time it's all about colour. I used a coloured card base. 

THIS card is in Lost Lagoon card stock and the birds on the DSP the patterned paper is the reverse of the front ones. I used the Nested Essentials dies for this one and I only fussy cut out the one bird which is on the inside of the card.


For my THAT card I used the gorgeous In Colour Boho Blue card stock for the card base and inkpad. I started by taking a strip of the DSP which happens to go in a line going across the page. I then sort of fussy cut around, very slighlty, around the birds and branches until I had a shape that fitted onto the page. I used a scrap piece of the DSP and using the Deckled Circles I die cut out a half circle by placing the die across only a folded half of the DSP. When it was unfolded, I had a wiggly oval which was perfect for the birds to go onto. The pink DSP behind the blue is Bubble Bath and is the reverse of the birds that I used on the front.  Using a mask, I stamped 3 little birds for inside to complete this one. This little bird many of you will recognise as coming from Happy Hedgehogs.


Wednesday, 24 January 2024

Watercolour Wednesday - Sale-a-bration - Detailed Dogwood

 Hello on this very wet watercolour Wednesday! Today is the perfect day for watercolouring too. Using the large image from the Detailed Dogwood stamp set, I stamped onto Stampin' Up!'s Fluid 100 watercolour paper using Stazon Jet Black ink pad. I don't know what was wrong but I really didn't like it! So I stamped it again a few more times then reverted to using Basic White card instead. I got the beautiful image that I was clearly after. I coloured the image in by dropping a few drops of re-inker onto an acrylic block then I carefully coloured the flowers and leaves one by one. I made sure that I dried each colour before starting on the next one. Yes, the next thing I did was fussy cut it out! It was quite fiddly as there are quite a few leaves and petals too but I love to fussy cut so I wasn't bothered doing it. 

I made a card base using the Granny Apple Green and as it is a landscape shaped card it was 29.7cm by 10.5cm and scored at 14.85cm. I then cut the front panel to measure 10cm wide. I added a piece of DSP to the inside of the card from the Flight and Airy DSP. This is another of the Sale-a-bration offers too. I used the Bubble Bath piece and added a smaller piece to the side of it. I cut the white mat for the front of the card and stamped the leaves on before I used the Softly Sophisticated embossing folder again for both of the front white pieces. I added the Flower using Dimensionals, the sentiment onto a white mat which was punched out using the Label Me Lovely Punch. The green one around it was fussy cut out! 

Now I think I've gabbled enough so here are some pictures.


Tuesday, 23 January 2024

Technique Tuesday - Sale-a-bration -Softly Sophisticated

 Hello again and thank you for stopping by. Today's stamp set is the pretty Softly Sophisticated. As I said yesterday, I really do love the Designer Series Papers DSP that are in the Sale-a-bration SAB catalogue this month. This set is really so delicate and can be used for many different style of cards especially when pairing it with the gorgeous DSP's. That is one of the most interesting things about what crafters do, we mix and match with all sorts of products. It's great isn't it? The paper I used today is called Sunny Days 12" by 12".

Anyway, my technique this week is using up some of the scraps on my table. I'm sure that we all have those bits and pieces somewhere waiting to be used and Oh! Boy! Do I have a load of them! I used my black and red colours today, which is another of my favourite colour combinations. I started by embossing 3 pieces of the coloured card using the Softly Sophisticated embossing folder. Once embossed, I started to play with layering them, placing one piece under and over another until I got the combination that I was happy with. I cut a narrow gap down the centre of the black and red mats and taped the piece of plain white through the slot onto the back of the mats. I stamped the images in just black (Memento) and the gorgeous red of Poppy Parade and added the sentiments inside and out.


Monday, 22 January 2024

Make it Simple Monday - Sale-a-bration - Detailed Dogwood

 Well here we are again on Monday morning once more. I'm so pleased to be here too as all of last week we were moving thinkgs from one room to the other. My son Jonathan and Daughter-in-law Jemma have recently had an orangery built for me for my crafting. They also decided to replace all of the flooring downstairs except my room! OH BOY!! It's been chaotic! I am so glad to be here creating once more as I've missed it! So this week I am going to show you some projects that I will be making with some of my Sale-a-bration items. The first one is Detailed Dogwood stamp set. 

I have co-ordinated it with another SAB, the Heartfelt Hellos as well as Biggest Wish one of my favourites from the annual catalogue. A simple card today for and I have used another SAB piece of the designer series paper called Softly Stippled DSP.


Friday, 19 January 2024

Fun fold Friday Lovely and Sweet

 Happy Friday 😀 I do hope you've had a good week and have a weekend that isn't too stressful and you get the chance to get craft and relax. So to start the weekend lets have a look at today's fun fold inspiration using the beautiful Lovely and Sweet stamps and dies.

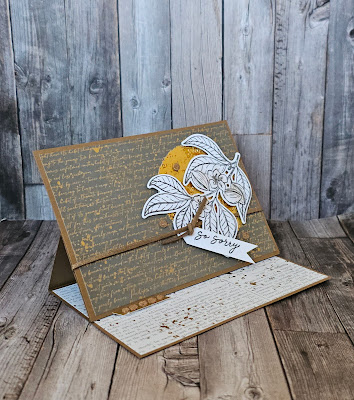
The fold for the card is called an easel card. It is one of the easiest of the fun fold cards. It gives you plenty of space to decorate and is one that sits on the mantlepiece of the recipient easily.

Start by taking a piece of cardstock that measures 21cm x 14.85cm ( 8 1/2" x 5 1/2") and score it at 5.25cm and 10.5cm ( 2 1/8" and 4 1/4") The folds are then both creased as mountain folds.  You will then need a piece of cardstock measuring 14.85cm x 10.5cm ( 4 1/4" x 5 1/2") . This is then adhered to the first of the small panels on the card base. You now have your card base. All you need to remember is that you will need to adhere some form of stopper to the larger card base panel to prop the front up with.

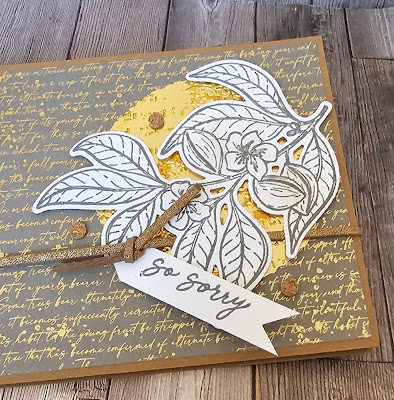
To start I'd  recommend decorating the front panel of the card. For the inspiration for today's card I used some of the gorgeous Nature's Sweetness pattern paper. I also die cut a circle of gold foil. Which I then embossed with an embossing folder to give it plenty of texture.  

Lovely and Sweet stampin up fun fold easel card so sorry card

The embossed circle is then lightly swipped with a saddle brown stazon ink pad. The image is stamped and die cut out before a very light buff of colour is added to the flowers and nuts.

Lovely and Sweet stampin up fun fold easel card so sorry card

I aslo added some of the cork embellishments and faux leather trim from the Nature's Sweetness suite

Lovely and Sweet stampin up fun fold easel card so sorry card

I used more of the beautiful papers on the card base. For the stopper I used a scrap of gold foil and more of the cork rounds. 

Lovely and Sweet stampin up fun fold easel card so sorry card

The back of card is where I placed a mat of basic white cardstock  as the place to write the message. But of course It has to be decorated as well 😉

Lovely and Sweet stampin up fun fold easel card so sorry card

Any way that's  all from me this week. I do hope that you've enjoyed the inspiration using the beautiful Lovely and Sweet stamps and it's  coordinating products.

Next week Gill will be sharing her inspiration with us all here so don't forget to pop back next week.

In the mean time don't forget to...

Have fun!

Have a good weekend

Cary x

Thursday, 18 January 2024

This or That Thursday lovely and Sweet

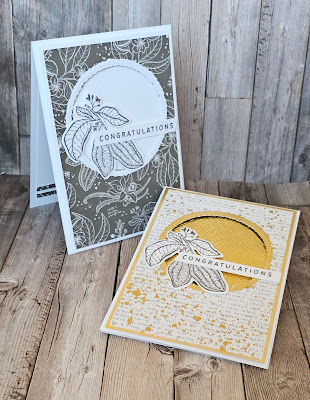
 Same card but with 2 very different feels to them today. It's  been said before but I'll say it again colour is a powerful tool. But in the case of today's inspiration It's the use of metalic vs colour. The colour palette I have used comes from the pattern paper that coordinates with the Lovely and Sweet stamps and dies. The paper is called Nature's Sweetness and is so very elegant.

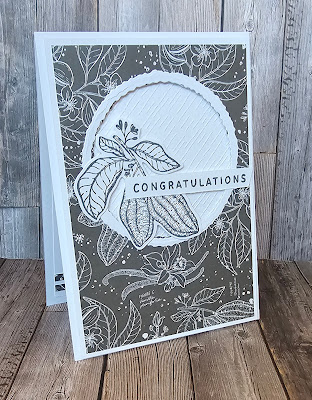
The first card uses white and a soft shade of grey called pebbled path. The texture comes from an embossing folder that is fast becoming a favourite.  It's one of a triple pack called Basics 3d embossing folders.  This one give a fantastic subtle texture. All in all a very monochromatic and elegant look.

Lovely and Sweet stampin up congratulations pattern paper appature card

The second version has a very different vibe due to the addition of the gold foil.  The Nature's Sweetness double sided papers have gold foil details on one side which definitely amps up the elegance. 

Lovely and Sweet stampin up congratulations pattern paper appature card

As always the inside of each card needs a little something something to elevate it.  All you need are scraps of the materials used onbthe front of your card . This completes the look and gives a well finished look to your work.

Lovely and Sweet stampin up congratulations pattern paper appature card

So which do you frefer? This with it's crisp monochromatic look? Or That with the  sumptuous addition of gold?

Lovely and Sweet stampin up congratulations pattern paper appature card