Welcome to this week's inspiration. It's all about the glittery goodness that is Stampin ' Up! Glimmer paper!
Here in the UK Halloween isn't as wholeheartedly celebrated as in other countries like the US. But I love it so being the creator of this week's inspiration gave me the fantastic opportunity to indulge! Lol
For today's project I was inspired by the fab scrap page that I cased from our up line Natalie.
Today's projects use the fabulous silver glimmer paper in all its spooky glory!
The cards were created using the panels on the scrap page as inspiration. I had great fun making them and hope you enjoy them as much as I did making them! Lol
Monday, 31 October 2016
Friday, 28 October 2016
Pumpkin Pie Day 5
Phew! I am now well and truly Pumpkin Pie crazy now!
I LOVE IT!!!
This is a very simple little card to finish off the week with.

Using Fancy Frost DSP, I cut the mat out in Whisper White and mounted it onto a Pumpkin Pie mat then onto the card base made out of Thick White cardstock which Stampin' Up! now do.
My red haired friend is getting engaged to his silver haired girlfriend
so I thought this was the nearest colour to theirs.

Using the Dies from Sunshine Wishes Thinlets set, I cut one in Pumpkin Pie and 1 in Silver.

The 2 simple words from the same set of dies in the opposite colours too finish off this card.
Well, that's all from me for a week.
Please pop by next week and see the amazing creations that Cary has in store for you.
Many thanks.
Gill
Thursday, 27 October 2016
Pumpkin Pie Day 4
This time I'm back in my comfort zone! No more Halloween for me!
I made what I think is called, a Double Z fold card.

I was watching a film that was based in the Outer Hebrides and saw
lots of foliage. There were heathers and ferns
everywhere.
So they inspired me to make this card.
Of course I used the matching Glimmer Paper too behind the stamped Circle.
I used Frosted Medallions for the flowers, Layering Circles Dies for the
scalloped circles and the leaves which were cut in Mint Macaron, came from Pretty Pines Thinlets Dies.
I left one of the inside panels blank for writing on.
I hope you like it.
Wednesday, 26 October 2016
Pumpkin Pie Day 3
Today, I was trying to make a Halloween birthday card as it's my brother in laws
birthday on 31st October. I failed!
Sort of!
I started by using a piece of the Spiders Web DSP from the Halloween Night Speciality DSP's.
It has a silver web and looks amazing but the original card was just NOT right.
So, I tore it to pieces and started again!.
I started by adding some ribbons. I used Peekaboo Peach and then added a piece of washi tape
from the Playful Palette Designer range.
The first mat, I stamped Happy Birthday from Tin of Cards stamp set,
all over then added the simple message mats over.
I finished off by adding some Rhinestones.
I think he will appreciate this one!
Tuesday, 25 October 2016
Pumpkin Pie Day 2
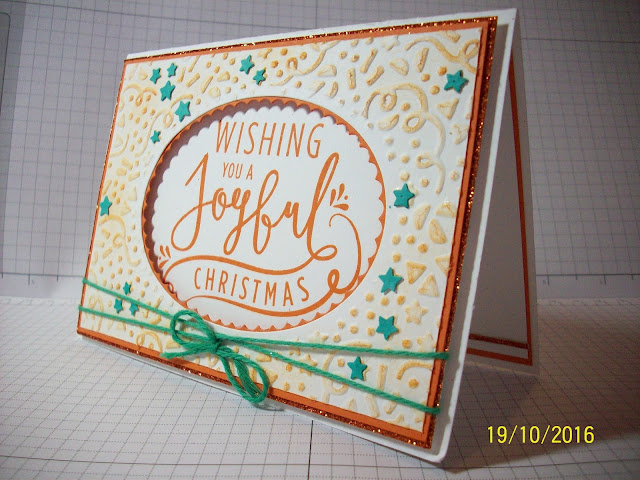
Today's cards I wanted to go Christmassy!
I have embossed the white mat with the Confetti TIEF (Textured Impressions Embossing Folder).
It's very unusual to have an orange Christmas card but I think that it works.
I sponged over the mat gently using the Pumpkin Pie Ink Pad. I didn't want it to be too bright.
I added a piece of Pumpkin Pie Glimmer Paper behind the mats to make it even more Christmassy.
So then I thought that it needed even more lifting so I added the Bermuda Bay accents.
Using the Stars Confetti Punch, I punched a few stars and stuck them to the stars on the mat.
Then added some Bermuda Bay Thick Baker's Twine to finish.
I used Wonderful Year for the stamped message to finish.
Monday, 24 October 2016
Weekly Inspiration -Pumpkin Pie
This week's inspiration I have used Pumpkin Pie.
This colour is another that I wouldn't generally reach for but I have had
great pleasure in doing so.
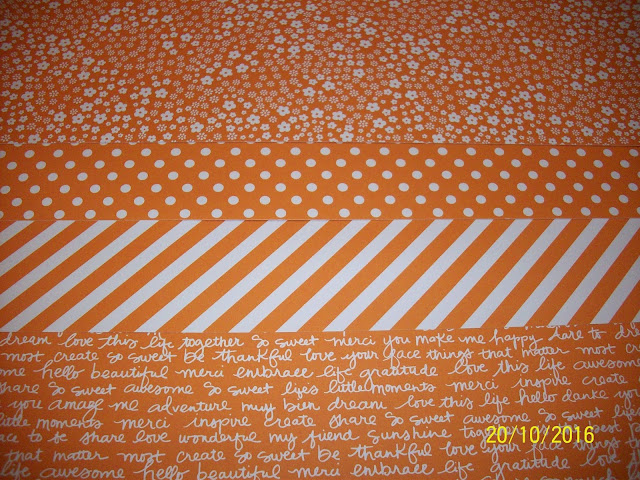
For the first cards I have used Brights DSP (designer Series Paper) stack.

I chose the Pumpkin Pie papers from the pack of DSP where there are 4 sheets of each of the
10 colours in the range.
2 sheets of each double sided designs at only £20 for 40 sheets of 12" by 12"

I have heat embossed the flourish with Copper embossing powder and cut it out.
The flourish is from the Flourishing Phrases stamp set.
I used the Decorative Label punch for the message and background.

I have coordinated the DSP with the Pumpkin Pie and the the next card I used Crumb Cake
DSP and cardstock with a strip and flowers in Pumpkin Pie.
The flowers are die cut from the Flourish Thinlits dies.26 gorgeous dies for only £26.
I'm really pleased with the mixture of the Crumb Cake and Pumpkin Pie together.

Below you can see the 4 different designs of the papers.
Aren't they gorgeous? Friday, 21 October 2016
Merriest Wishes Day 5
As Cary would say I've gone off Piste today!
This was originally a square of Whisper Thick White card stock, 21 cm by 21 cm.
I scored it into 4 equal squares then cut 1 of the squares out.
The Designer Series Paper I used is Candy Cane Lane.
Gorgeous, double sided papers. 12 sheets for only £10
Scoring 2 of the squares beside the cut out square diagonally and folded them back.
I die-cut 2 of the Reindeer Baubles out, 1 on each side of the Gold Foiled Card. Then a Real Red Bauble and stuck the 2 gold ones, one on each side of the Real Red.
Using pieces of Gold and Red Metallic Threads, I tied the 2 together,
looped them through the hoops and suspended them
by attaching them to the back of the card base.
Be Joyful and Deck the Halls... ........ messages were cut
using the Layering Circles Thinlets and then
laid onto the Gold Foiled Bauble.
I used Real Red and Crumb Cake Ink pads for the messages.
Thursday, 20 October 2016
Merriest Wishes Day 4
Today's card was made for a male friend for this Christmas.
I didn't think he would appreciate a pretty card!

Using only Night of Navy and Soft Sky cardstock I then added a little sparkle with
the Gold Foiled card.
An A5 card this time with the square cut out using the Layering Squares Framelits Dies.
I used the Lucky Stars TIEF for the Soft Sky.
I die cut the Reindeer bauble out on both sides of the Gold foiled card.
I then taped a length of Gold Metallic Thread to the back
of one of the baubles then to the back of the Soft Sky aperature.
Twisting the thread in opposite direction so that it twists around when opened.

A simple message from the stamp set and Peace from the Christmas Greetings Thinlets Dies.
Wednesday, 19 October 2016
Merriest Wishes day 3
For this card I made a One sheet wonder stamped sheet.
Using all of the bauble stamps, I stamped in Real Red, 1st and 2nd images, Mint Macaron and
Versamark with Gold Embossing Powder.

A simple Whisper White piece of card which was embossed with the
Sparkle Textured Impressions Embossing Folder was then matted over a piece of
Sparkle Textured Impressions Embossing Folder was then matted over a piece of
Gold Foiled card.

A piece of the gorgeous Real Red Stitched Edge Ribbon and the simple message to finish.

Tuesday, 18 October 2016
Merriest Wishes day 2
Today I have gone glitter mad!
I have only used cardstock, Embossing Powders and DSP foir this project to show
what you can do with only a few products.

I die cut the 2 bauble shapes in Real Red then used Versamark over the whole bauble.
Poured the new Real Red glitter embossing powder over and heat set them.
 n
n
I did the same with the Whisper White but stamped the message on before the Versamark.
I used Heat and Stick powder to fix the Dazzling Diamonds Glitter powder.

The background was a piece of the White on White, Irresistibly Floral
Speciality Designer Series Paper.
Only £11.75 for 12 sheets of 12" by 12" papers.
PERFECT!
Using a sponge, I have covered the DSP with Soft Sky Ink from the Ink Pad.
I love the way that the paper resists the ink over the pattern.
Monday, 17 October 2016
Weekly Inspiration
MERRIEST WISHES
This week I have had the pleasure of making cards with
Merriest Wishes stamp set and the coordinating Framelits dies.
My first card is my take of the card shown in the Stampin' Up! Ideas Book and Catalogue.
Using Gold Foil in addition to the different coloured cardstock,
I used the Framelits for ALL of the baubles as my circle cutting is not as good.
Friday, 14 October 2016
Last but by no means least. ..
Well that's another week of inspiration. I do hope you've enjoyed the projects and maybe feel inspired to have a go at using masks in your own creations.
For today's project I made my own embossing paste to put through the mask. My recipe for embossing paste is1/3rd of a cup of talcum powder, I used baby powder as it smells nice! . To this I add 1 tablespoon of pa glue and 1 tablespoon of white acrylic paint. To this I added water a little at a time until it is smooth and holds its own just plopping off the spoon. To colour the past I added reinker until it reached the desired colour.
For today's project I made my own embossing paste to put through the mask. My recipe for embossing paste is1/3rd of a cup of talcum powder, I used baby powder as it smells nice! . To this I add 1 tablespoon of pa glue and 1 tablespoon of white acrylic paint. To this I added water a little at a time until it is smooth and holds its own just plopping off the spoon. To colour the past I added reinker until it reached the desired colour.
Place the mask over the card and hold down with low tack masking tape then using a spatula , or in my case an old plastic gift card , apply the paste over the mask. Scrape the excess paste of then carefully remove the mask. Make sure to wash the mask straight away to remove paste. I then sprinkled dazzling diamonds over the wet paste and left to dry. Leave to dry. One dry gently brush excess glitter off.
Well I hope you'll join us next week when Gill will be sharing her beautiful creations with us here ☺
So have a great weekend and have fun
Cary ☺ x
Subscribe to:
Comments (Atom)


