Today's Festive and Fun cards were exactly that. I really had a great time. The first card or THIS is on Poppy Parade card base with white mats which were embossed with the Stars At Night folder. I love the texture and dimension that an embossing folder can make on a plain mat. It is absolutely stunning! I stamped several of the images onto plain white circles of card using the Deckled Circles Dies. Once stamped, I started colouring, more fun! I die cut some more circles using a larger die but this time I used some of the DSP from the same papers as yesterday, Merry, Bold and Bright. I had made the card a gate fold card base and I added the circles onto the front and one on the inside with a few sentiments it was done.
Thursday, 30 November 2023
This or That Thursday - Festive and Fun
Wednesday, 29 November 2023
Watercolour Wednesday - Festive and Fun
Welcome back and thank you for stopping by. Today I really had fun with the water colouring and Festive and Fun stamp set. On Fluid 100 watercolour paper, I stamped the giraffe to one side of a whole piece of paper and then had loads of fun watercolouring it. I cut a C6 card base and added a piece of the beautiful fun Designer Series Paper (DSP) and added it to the card base. I cut off the giraffe and then cut a mat 8cm by 11cm. Using the softest pale greenish blue of Pool Party, I added some ink to a block and added some water on top from my water brush and proceeded to wash it across the mat. Once dry, I embossed it with the Christmas Words embossing folder. I fussy cut the giraffe out and using Dimensionals, (foam Pads) adde it to the card base and placed everything together.
Tuesday, 28 November 2023
Technique Tuesday - Festive and Fun
Hello, today's card is another which can follow on from yesterday's #simplestamping card. Using the Festive and Fun stamp set, I stamped the Hippo with his sledge 3 times, though not all completely. I lined the card mat straight along the grid lines on my gridpaper and taped it down with some low tack tape. I then started stamping the Hippo across the page. I used Memento Ink pad for this as there is a lot of detail in the picture and I needed to see all of it. I decided to colour the images in using my water colour pencils. No water, just pencils. I wanted to see the effect of the pencils along the line of colour. I have a post it roll of sticky note paper and I laid it across the bottom of the 1.5cm of the image and cut the post it roll in half across the length. I then placed the other half across the top of the images and covered the top 1.5cm up too. I aimed to colour in only a 2cm band across the whole image and I am rather pleased with it. I could have placed the strips of Real Red tribbon across the top and bottom of the images but decided against it. What do you think?
Monday, 27 November 2023
Make It Simple Monday - #simplestamping - Festive and Fun
Well hello and welcome back, thank you for stopping by. I hope you were all inspired by Cary's creations last week. I was! This week, I'm continuing the Christmas theme of course as it's under a month still to go yet! I'm using a fun stamp set called Festive and Fun. I love it. It was one of the first Christmas sets that I bought this year. As it's #simplestamping Monday, I have made a very simple and straitghtforward card but I have still used a mat inside and outside to give a little depth to the card. For those of you who are new to crafting, a mat is a layer on top of the card base itself and you can go as crazy as you would like and add as many mats as you would like or not, whatever the occasion is. I stamped the giraffe into the centre of the mat using some ordinary, water based black ink called Memento. Then as I often do on a Monday, I have used some ordinary colouring pencils to colour it in. I like to add a little colour especially when I use white on white, so I walked the edges of the white mat onto a bright blue ink pad. This then shows more dimension to the card. A few sentiments inside and out an it's complete. I really is that simple.
Friday, 24 November 2023
Fun fold Friday Saint Nicholas
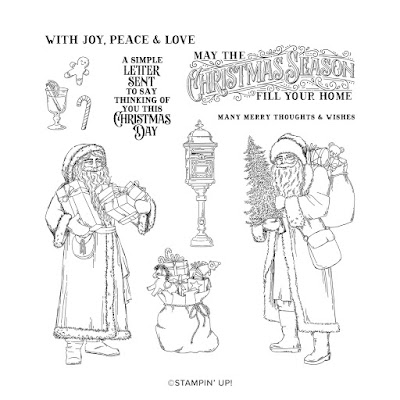
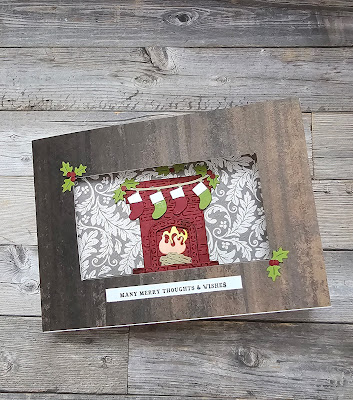
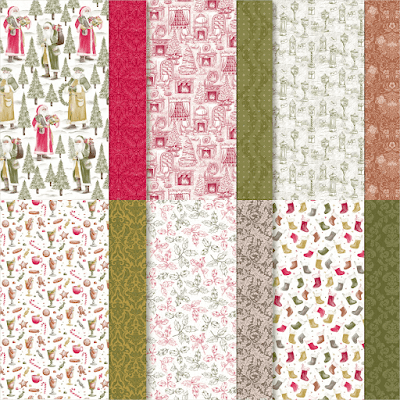
My final card for this week is a combined card and gift card holder. It's a super easy fold . The fun comes when you decorate it! I used the dies from Saint Nicholas and pattern paper that coordinates with them Traditions of St Nick.
The card starts life a as a piece of A4 cardstock scored at 14.85cm and then rotated and scored at 10.5cm. ( basically you take the cardstock and score it into quarters) you then, with the cardstock in a landscape orientation, remove the bottom left quarter. Now fold the bottom right-hand panel up and the left-hand side over to create your card. As I said this fold is super easy and no fuss!
Now the fun part decoration! I want to use the amazing scene building dies to create a fireplace complete with logs and flames. So I decided to cut an appature into the front panel of the card. Top tip if you're going to cover the panel with pattern paper do so before cutting the appature .
I then decorated the panel that showed through the appature. I decided to create a room scene complete with flooring and wall paper.
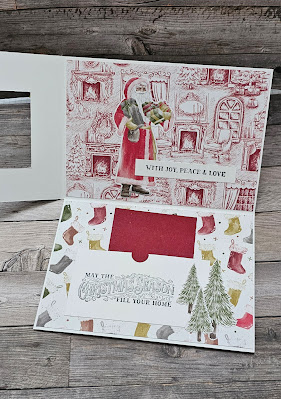
Once that was done I went to work on the inside panels.
The one that falls down is where I placed a pocket to add the gift card.
All in all a simple but fun card perfect for gift cards or money.
Well that's all from me for this week . I have a crafty weekend starting with a team chat on Saturday morning 😀. Gill will be sharing her inspiration here next week so please join us.
Have fun
Cary xx
Thursday, 23 November 2023
Donating advent calendars
Today Gill and I had the honour of delivering 100 advent calendars to a local community food bank . Our amazing crafting community came together to allow us to do this on their and our behalf . We collected donations of money and advent calendars and are amazed at the amount we were able to take along to the foodbank.
The food bank is called FreeShop Crawley and they offer support to 160 customers in our town.
The wonderful thing about this community group is that it offers the customers a shopping experience. They have their shop set up like a farm shop and customers take a basket and go around and pick up items that suit them. They even have a till which helps the customers feel like customers and the shop with stock control.
The shop doesn't just offer food it offers clothing, household essentials as well as a warm welcome and support to those who are in need.
We are so lucky to be able to support this wonderful community with the help of our amazing crafting community ❤️
This or That Thursday Saint Nicholas
Do you use sketches? If you don't know what a sketch is it's a layout that you can follow to the tee or adjust as you desire. They are there to inspire you and are a great way to kick start your mojo if it's lost. The sketch I'm using for inspiration is one that I often turn too when I'm looking for inspiration. So I thought I'd share it with you and share 2 cards using the Saint Nicholas stamps and the coordinating pattern papers called Traditions of St Nick.
The sketch below is one that can be used in many ways. You can turn it so that it's landscape, you can change the shape of the circle, you can alter the direction of the strips.... and on and on!
I decided to use the traditions of St Nick papers. They coordinate with the stamps and general feel of vintage/ traditional style that the stamps evoke beautifully.
Now if you've been here before you'll have noticed that this colour palette is a little out of my wheelhouse... but you'll also know that I like a challenge 😆 So with that said here are 2 cards using my go to sketch and the papers.
The first card follows the sketch but I've added layers and texture. I adhered my pattern paper strips to a mat of red cardstock then ran it through my cut and emboss machine with a gorgeous 3d embossing folder called Distressed tile. I am a little obsessed with this one at the moment 😉
It's just so gorgeous and useful!
Any way back to the card.. By embossing the paper and the cardstock it give a subtle feel of fabric to the panel in my opinion. A few layers a stamped, coloured and die cut image and a sentiment and the card was done.
Wednesday, 22 November 2023
Watercolour Wednesday Saint Nicholas
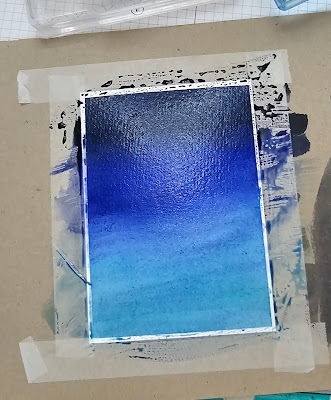
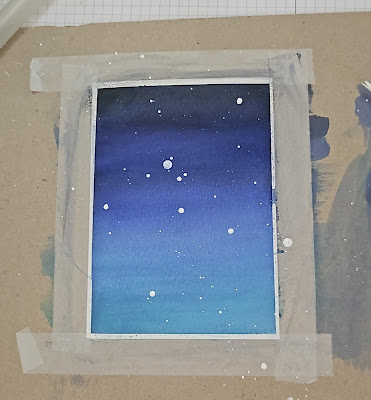
I dream of being an artist 🎨 paintbrush in hand creating beautiful scenes with ease.... in reality I can't even paint a wall without leaving streaks! But today I have created a watercolour night sky that I'm super proud of! I was inspired by a fellow crafter from Australia called Alisa Tilsner. She created a night sky with blending brushes and ink for a card featuring the Saint Nicholas stamps and dies. I love her card but wanted to see if I could create a night sky with ink and water.
I decided I'd give it a go and try to achieve a "proper " watercolour look by using watercolour paper and a piece of chipboard. I attatched my piece of paper to the chipboard with low tack tape. This helps the piece lay flat as you use quite a lot of water...
Next I added drops of reinker to a palette and ink directly from the ink pad onto an acrylic block as I don't have a reinker for every colour ( note to self ..buy reinkers!)
Next I loaded my waterpainter with extra water and dipped the tip in the palest colour and added colour to the bottom of the paper. Working my way up and keeping the colours wet I used the mid and dark colours until I got to the top. I then let it dry ( I used a heat tool too impatience 😉)
Tuesday, 21 November 2023
Tips tricks and techniques Tuesday Saint Nicholas
Lots of stamps come with coordinating dies these days and the Saint Nicholas stamps are no different. The dies cut out not only the stamped images but also fun scene building elements, more of those later this week 😉. But they also contain dies that cut piece that are just for decoration.
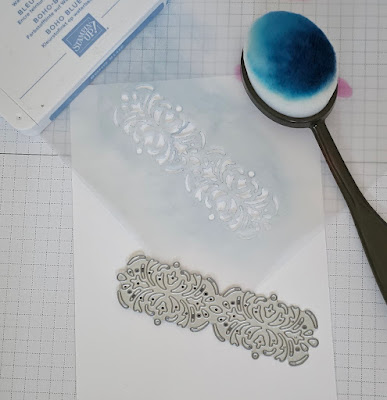
There was one piece that caught my eye.. the elegant scroll detail intricate die, bottom left of the die images above. The reason it caught my eye was because I straight away though ohhh what a lovely mask (stencil) that would make.
So I made it into a mask! I die cut it from a piece of scrap vellum. Vellum works well for this type of mask as it' a fairly non porous material .
So off I went to gather my surplies cardstock, ink, blending brush, stamp and of course my mask (stencil).
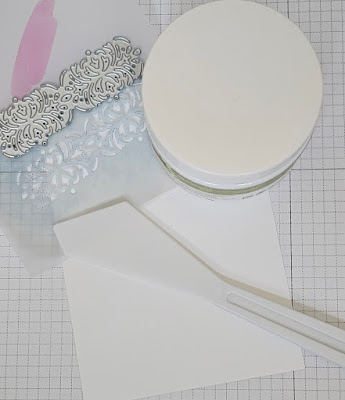
Once finished I wiped my mask (stencil) clean with a piece of kitchen roll and gathered the materials needed for stage two.
For this step I used another cardstock panel, embossing paste , paste tools and a wet cloth along with my mask (stencil)
Top tip make sure you wipe your tool clean immediately once your finished as the paste will dry quickly and ruin your tools. If you want to save your mask you must clean that immediately too.
So there are the components of my card except the sentiment which I heat embossed with white embossing powder onto a vellum strip.
And here is the finished card.
Monday, 20 November 2023
Make it simple Monday
Hello and welcome my names Cary and I'm one half of 2 Big Girls Crafting. Last week we saw the fantastic inspiration from Gill, the other half os 2 Big Girls Crafting, but this week it's my turn! So what will I be sharing with you? Well its time to bring oout the big guy himself Saint Nicholas... well the stamps at least 😉. Now this stamp set is what I would call created in a very traditional or vintage style. Which if you know me isn't my go to style but I have decided to work out side my box and challenge myself!
So to ease myself into this week I am happy its #makeitsimplemonday! My card is just stamps, ink and paper so perfect for the beginner and those looking to create multiples as well as anyone who needs a card quickly .
Friday, 17 November 2023
Fun Fold Friday - Silly Goose
Welcome back on this yet another cold day. We've had really cold few week's so far and I personally don't like it! Anyway, back to the geese. As this is the last day for now with using the Silly Goose stamp set, I have a had real good fun in making this one today. From the front, it looks like a simple card fold until you change the angle.
I started with a Thick White card base 29.7cm wide by 14.85cm high. In Imperial measurements, it is 11,1/4" by 5,7/8". I scored along the long width and scored at 10.5cm, 12cm, 22.5cm and 24cm. Imperial... 4,1/8", 5.3/4", 8,7/8" and 9,1/2". I die cut some wiggly rectangles using the Deckled Rectangles dies. I used the larger for the outside on each layer and smaller all the way down as many layers that I wanted. In this case today, 4 layers.
To join the layers together, I used the Foam adhesive strips. I love the blocking that they create. As the card would have been visible from the edges of the card, I made a frame to cover the whole of the inside.
I cut a piece white card to make the frame. It was 12.5by 16cm or 4,3/4" by 6,1/4". I scored this at 0.5cm and 1.5cm on all 4 sides. Or 3/16!" and 9/16" again on all 4 sides. You'll need to burnish all of the score lines and trim some of the corner folds off to be able to fix them into the position nice and squarely.
Adding Designer series paper to decorate and a few of the gorgeous geese to complete it.
Well, that's it from me for the week once again. Thank you so much for joining me once again, I hope that you have found some inspiration this week but until I return in 2 weeks time, Cary will be here to inspire you so please have fun.
Until I get back, Stay well, Keep safe and until I am back,
KEEP ON CRAFTING
xxx GILL xxx






.jpg)


