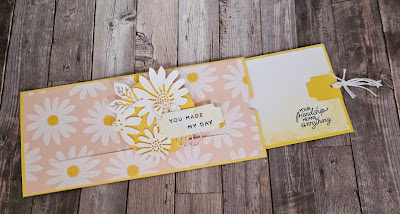
Recently Gill and I went to a fantastic Stampin' Up! Event called OnStage live in Rotterdam. These events are always full of inspiration in so many forms from swaps to presentations to make and takes. One of the presentations we saw was given by a UK demo called Mikaela Titheridge. And she shared how to make today's card. I loved it so much that I just had to have a go using the Cheerful Daisies stamps.
It starts life as a piece of cardstock measuring 21cm x 20.8cm. Score at 1cm and 10.9cm. Next adhere a piece of patterned paper measuring 20.5cm x 9.4cm on to the first large panel. Now mark 2.5cm in and 2.5cm up from the 1cm score line on both ends of the pattern paper panel. Now cut a slit between these 2 marks.
You will then need a stip of cardstock measuring 2cm x 8.5cm and your decorated panel. You'll also need the inside panel that needs to measure 20.5cm x 9.4cm. Place this panel behind the front panel. Then slip the cardstock strip from the inside through the long slit. Adhere the bottom of the strip to the bottom edge of the inside panel. Now using the 1cm panel close the card . I suggest using strong tape for this closure.
Now attach your decorated panel to the narrow strip of cardstock using 3d foam. Use a small circle punch cut a semicircle in the middle of the right-hand front panel so that you can pull the inner panel along. Below is a little clip of the card in action.
I do suggest creating your inside panel and from decorated panel first before putting the card together.


No comments:
Post a Comment