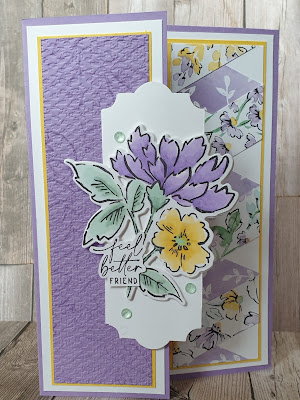
Papercrafters find inspiration for techniques from all sorts of places and other crafts. And today I'm sharing a technique which is based on a quilting on. The technique is called a twisted ribbon border . Instead of fabric I've chosen to use some of the beautiful pattern paper that is part of the Hand-Penned Suite. Called Hand-Penned it is such a pretty floral pattern paper in gorgeous fresh colours.
The twisted ribbon border is created using a base of card stock the measures 14cm x 4cm. These measurements can be adjusted to fit your project once the principal is understood. Mark along the long side top and bottom in pencil at 2cm intervals as per the picture below.
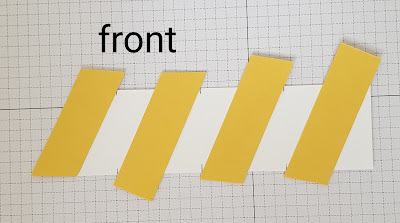
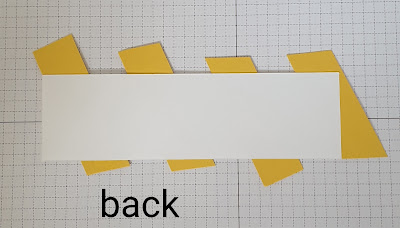
I started placing my strips that will end up appearing to be in back of the panel. I started at the right hand side placing my stip diagonally with the top left corner of the stip sitting flush to the top right corner of the card. The bottom left corner is lined up to the second mark in from the right. I used liquid glue to adhere the strips to allow a little wiggle room.
The second strip follows the first with the left hand sides lining up with the marks at an angle as per the photo below.
Continue till the strip is covered as per the photo below. I always leave my strips over hanging so that I don’t have to worry about them being too short 🙃
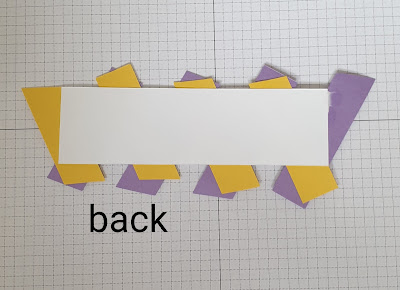
Now take the piece of paper that will appear to be at the front of the twist and starting from the opposite end. Take the top left corner of the strip and place it to the top left corner of the base. The strip is placed diagonally with the bottom left corner placed to the bottom left corner of the strip already in place. The picture below shows it far clearer than I have explained I'm sure 😉
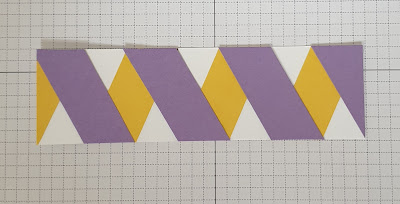
Next trim off the over hanging pieces to neaten and complete the panel. I always trim from behind as I find it easier to follow the line of the base card.
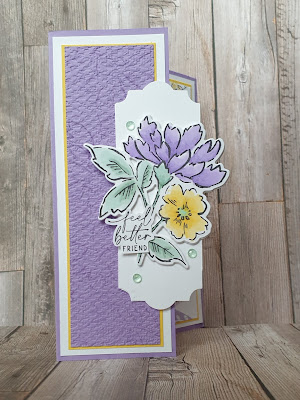
Now that I had the technique worked out I set out to play with the pretty Hand-Penned papers. I chose coloured cardstock to coordinate in purple, yellow and white. I the created layers to fit my split front card base.
The card base was created from a piece cardstock measuring 14.85cm x 21cm , scored at 10.5cm. I then cut a strip measuring 5cm x 14.85cm off one side. This became my split front card base.
The front panel is decorated with layers. On the top purple layer I stamped in the same colour ink to give a tone on tone effect. I then used an embossing folder to give the panel texture.
I decorated the narrow front panel using a punched panel and a stamped image from the Hand-Penned Petals stamp set which I coloured with my alcohol markers from Stampin Up.
I then die cut the image. I also die cut the outline 3 further times in white cardstock. I adhered the 3 pieces together and the stuck the stamped image ontop. My reason for doing this was to create an embellishment that helped add depth to my project, gave strength to the stamped image as it over hanges the edge of the panel and hid the back of the alcohol coloured piece. I stamped and fussy cut out a sentiment and placed it nestled amongst the stems of the flowers. A few of the Genial Gems from the suite and the front was completed.
Now for the inside. I placed my twisted ribbon border panel on to the right hand side of the white panel that filled the whole of the inside portion of the card. I added a narrow strip of yellow card along the left hand edge to mimic the layers of the main panel.
I the stamped and coloured a portion of the same image as the front. I then fussy cut it out and adhered it to the left hand bottom corner of the inside of the card.
I think this card came together really well. The colour pallette is both clean and spring like. Whilst the pattern paper may be busy it doesn't overwhelm the card.
I think this Twisted Ribbon Border technique is a great one to have in your arsenal to use up those narrow strips of patterned paper. I hope you like my project as much as I do and will give this fun technique a go.






I love the card. I'm going to have this one a try. Thanks for sharing.
ReplyDeletePlease do give it a go it's really easy once you het the hang of it! Have fun 😊
DeleteBeautiful card
ReplyDeleteLove this design, thanks for sharing.
ReplyDeleteI love this and your pictorial clearly shows how to! Thank you. The finished card is so pretty.
ReplyDeleteThank you 😊
DeleteDefinitely want to try this amazing idea!
ReplyDeletePlease do I'm sure you'll have fun 😊
DeleteBeautiful!!!
ReplyDeleteThank you 😊
DeleteSo beautiful, never saw this before, will give it a try.
ReplyDeleteThank you and please do have a go it's easy once you get the hang of it 😊
DeleteAbsolutely BEAUTIFUL! Thank you for sharing!🤗
ReplyDeleteThank you and you're welcome 😊
DeleteLove this! TFS
ReplyDeleteThank you 😊
DeleteBeautiful card. What a great idea! :)
ReplyDeleteThank you 😊
DeleteThis is beautiful, TFS.
ReplyDeleteThank you 😊
Deletelove the card and technique.... could this be done on a full card front like double the size?
ReplyDeleteThank you 😊 and yes I'm sure you could make it larger. The key is to create the card mat a size that is divisible by the width of your paper strips. Hope that helps 😊
ReplyDeleteOh wow this is stunning card many thanks for the incredible instruction
ReplyDeleteThank you 😊
DeleteThanks for sharing this beautiful and very creative card and for the great instructions on how to make it! GlendaJ
ReplyDeleteYou're welcome and thank you for taking the time to comment 😊
ReplyDeleteI had talked myself out of that suite only to be stunned at the beauty of this card. It is calming, elegant and draws you in with the weaved border. Absolutely gorgeous!
ReplyDeleteThank you 😊 and sorry for being a crafty enabler 😜
DeleteYour card is stunning with the twisted ribbon border. This border is a new technique to me. So happy I found it today on Pinterest. Thanks for sharing.
ReplyDeleteCAN YOU CONVERT THE MEASURMENTS TO INCHES FOR US PLEASE? THANK YOU IN ADVANCE FOR YOUR RESPONSE
ReplyDeleteI love the twisted ribbon border, can't wait to try it. Only hope mine turns out half as beautiful as yours. Many thanks for sharing.
ReplyDeleteGlad you like it and I'm sure yours will be gorgeous . Thank you for your kind words 😊
DeleteCan't wait to make it! THanks for sharing!
ReplyDeleteThank you and have fun 😊
DeleteThis is stunning! This is a new technique for me... So simple yet so beautiful. Can't wait to try it. Thanks for sharing.
ReplyDeleteThank you 😊 and enjoy having a go 😃
DeleteLove this design!!! I attempted it today and found it easy to do!! My I ask which purple you used?
ReplyDeleteThank you!
Diane Lockwood
I'm so glad you found it easy to create 😊 the purple I have used is called Highland Heather from Stampin'Up! Xx
DeleteHello,
ReplyDeleteYour card is just gorgeous and I like this twisted ribbon technique.
I tried it and it was indeed easy....when you know how to do it.
Thank you for sharing it and is it oke with you that I share it in a Dutch-cardmaking-group I belong too?
Just asking here because I cannot see any other way to contact you.
Groetjes/ Greetings from the Netherlands
Thank you 😊 I'd be honoured for you to share it with your group.😃 take care and have fun .
DeleteCary xx
And thank you tooo Cary
Delete😊
ReplyDeleteBeautiful job and…even better, a wonderful picture-by-picture illustration! Thank you!
ReplyDeleteThank you 😊 I'm glad you found the photo tutorial helpful 😊
ReplyDeleteThis is beautiful but as someone else already asked. Could you convert to us measurements? If not maybe someone else could? Thank you
ReplyDelete