Showing posts with label #stampinupuk. Show all posts

Monday, 4 March 2024

Make it SImple Monday - Magnolia Mood

Hello on this cool Monday morning. As you no doubt were aware, we held our annual retreat just over a week ago and I believe that everyone had a wonderful time. There was lots of laughter, creativity of course, food and most of all fun. It was wonderful. Now back to our normality. Cary's card last week were as always brilliant so I have to follow those! No pressure!! :))  This week I will be aiming to inspire you with the gorgeous Magnolia Mood stamp set. It does have dies to match but I won't be using them just yet. This is a sneak peak of one of the NEW stamp sets to be released very shortly.

Today's card as always is a simple one. I started by stamping a simple sentiment in the centre of a white mat and then lots of the leaves all around. I stamped and extra 3 and cut them out by hand and added them using foam shapes. 


Monday, 19 February 2024

Make It Simple Monday - Simply Zinnia

 Hello, this is our crazy week as we have our weekend retreat this coming weekend so as you can imagine we are a little busy! It is also my son Jonathan's birthday today and we have our card and a cuppa event today too! However, we still have time for the blog. This week I will be playing with the NEW stamp set called Simply Zinnia. It's due to come out very soon so look out for some more beautiful products.This is of course a really lovely set with amazing coordinating paper, dies and gems. As it's Monday, we have our #simplestamping card first. This is ideal for the beginner stamper. I first stamped the single flower several times over the front of a card mat and added a few leaves. That's it. I coloured them in using some cheap colouring pencils in a soft yellow, orange and green. It took about 15 minutes to make, so ideal if you need a card in a hurry.


Monday, 15 May 2023

Make It Simple Monday - Cheerful Daisies

 Hello and welcome back this week. As always, Cary made some marvellous cards with those cheeky little monkeys last week didn't she? My cards this week will be using the gorgeous Cheerful Daisies stamp set. There is something about seeing daisies at the beginning of spring that I just love. So delicate and simple they come up year after year without fail. Perfect! My simple card for today is some #simplestamping. I started by adding a strip of sticky note across the centre of the page and stamped around and over it using Smoky Slate, a very soft gray. Then using the fill-in stamp, I stamped using the beautiful NEW colour of Lemon Lolly, a beautiful soft lemon-yellow ink inside. That was it. Simple enough?


Monday, 6 March 2023

Make It Simple Monday - Love Cats - #simplestamping

Hello and welcome back to the crazy 2 Big Girls Crafting! Yes, this week is absolutely crazy as we have our annual retreat this coming weekend and there is so much to do and such a little time to do it in too!! We will survive it, I know we will! However, this week I am starting off by using the cute Love Cats stamp set. Now those who know me know that I am a dog person, not cats but this stamp set is gorgeous to say the least. 

A simple cat curled up on it's back having fallen head over heels!

So cute!


Friday, 2 December 2022

Fun-Fold Friday - Christmas Lights

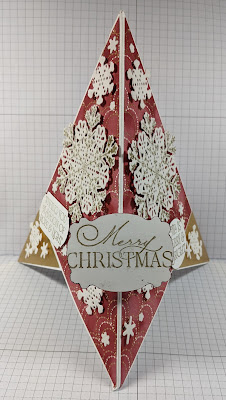
Hello again on another cold Friday here in England. I must firstly apologise for missing my postine yesterday. Unfotunately, family life and nasty baby colds got in the way!  Today, I haven't missed and have made another of my favourite folds. It's the Tripod card fold. One that I started making well over 10 years ago but I keep going back to it. Using the Christmas Lights stamps, mainly the large snowflake, I stamped in gold ink onto the Snowy White 12" by 12" paper 3 times. I then started die-cutting with my MINI CUT AND EMBOSS MACHINE *****. LOTS! Fortunately, it doesn't take long at all and once they were all done, I started to adhere them to the card. I stamped several sentiments from the Brightest Glow stamp set, again in gold ink then punched them out using different punches. 


*****

In the New Year, you’ll have the opportunity to join Stampin’ Up! as a demonstrator for only £99. For that you will get to spend and chose £170 worth of products in any of the current catalogues! That’s one option. Another option is £125 and you get £170 worth of product PLUS choose a MINI CUT AND EMBOSS MACHINE in white or even in the NEW Pale Blue of BOHO BLUE. That all starts in January along with Saleabration where for every £45 you order, you get to choose NEW product from the special Saleabration Catalogue. Look out for more details to follow soon. 2023 is going to be a very special year. 😀😀    

..........

The card itself is very easy to do. It takes 3 squares of card all the same size. I used 3 pieces each 14.85cm by 14.85cm. It can be made in any size squares but they must all be the same size. Each one was scored diagonally once only. The first 2 squares, I placed the score lines placed together in an upside down V, with the 2 top score points meeting each other. I taped these 2 panels edge to edge and taped them together. Then using tear and tape adhesive along the top 2 sides nearest to the score lines, I added the third square over the front of the 2 other pieces. The scored, diagonal line on the third one was now vertical to the base cards and this will now enable the card to stand up once folded into the tripod.

As you can see by my picture on the inside, you can see where I added some Velcro dots to join the card. I also added a panel to the inside to enable me to add my sentiments. Not essential but I find it finishes the inside.

 
You can see how the panels were added from the back view above and also how the velcro dots were placed.

 
Here is the 2 stamp sets that I have used all of this week.2 really beautiful stamp sets with the lovely sentiments too. I do like a good sentiment, it always completes a card doesn't it?
...........
Thank you so much for stopping by this week, I hope I have been able to inspire you to make some projects of your own.  
This is the last of my Christmas cards for this year. In 2 weeks time I will be making some of my Thank You cards. Cary will be here to show you her creations on Monday.
 
As always, until I return, 

TAKE CARE, STAY SAFE AND WELL but most of all, 

KEEP ON CRAFTING


Thank you so much, 

 😍😍 xxx Gill xxx 😍😍


Thursday, 7 July 2022

Throwback Thursday Sale-A-Bration

 Today I'm revisiting an old favourite... Fussy cutting! I know its a bit of a marmite thing... you either love it or hate it!! But both Gill and I love it 😀. So what will I fussy cut 🤔 well as I'm sharing inspiration with the July and August Sale-A-Bration offering I thought what better way to show how useful pattern paper it!! I chose to use the gorgeous Rings of love paper as my starting point. 

Rings of love stampin up pattern paper fussy cutting miss you card

These papers coordinate with items from the July to December mini catalogue and many others from the annual catalogue.  But I feel they are stand alone and can be mixed with so many themes and celebrations. 

The patterns I chose were the mandala and the houses one. I was inspired by a card created by one of the Stampin' Up! Artisan Design team and just love the gentle colour palette. 

Rings of love stampin up pattern paper fussy cutting miss you card

Rings of love stampin up pattern paper fussy cutting miss you card

Are the colours just beautiful?  Gentle and subtle blues and greens. They make for an elegant colour palette. 

To start my card I fussy cut one of the mandala that was printed along the edge of the paper, wast not want not after all!! Next I decided which house to ise and cut some of the trees and a small bush as well.

I wanted the edges of the mandala to not stand out too much on my white mat so took a blending brush and the same shade of green ink, mint macaroon is it's name, and added a gentle blended patch. The blended patch extended beyond the area where the fussy cut paper was going and gently faded outwards . 

To add a little extra to the mat I took an alcohol marker in the same colour and spattered all around.

Next I adhered the mandala flat and added the house and trees with 3d foam. I created the sentiment for the card by stamping and cutting up various phrases to create my own from the Amazing Phrasing stamp set that is also an exclusive Sale-A-Bration offering. 

Amazing Phrasing stampin up split sentiment idea


Once I'd stamped and cut my sentiment I took my blending brush that I'd used to create the background and gently applied a little colour arounf the edges. This ensures that the cut edges aren't quite so harsh against the background. 

Rings of love stampin up pattern paper fussy cutting miss you card

I think this card would work well for a leaving card or a moving away card. 
The dimension that placing the house and trees on 3d foam give helps to make sure they don't just meld into the background. 

Rings of love stampin up pattern paper fussy cutting miss you card

All in all this card came together quickly and easily. The fussy cutting wasn't hard as there weren't any intricate bits 😉

Rings of love stampin up pattern paper fussy cutting miss you card

So my top tip is sometimes let the paper do the talking!!!

Rings of love stampin up pattern paper fussy cutting miss you card


Friday, 25 February 2022

Fun Fold Friday - Awesome Otters

For my final card this week with the Awesome Otters, I have made a C6 card go into a square card. This time with using all of the otter images, I have stamped and coloured them in using blends, fussy cut some and I added a little heart to the last otter. 

I started by taking a C6 card base and cutting it in half so I was left with a piece of Thick White card 10.5cm by 14.85cm. I then took another piece of white and cut it to 10cm by 15.85cm. This piece, I scored at 1cm, 5.5cm and 11.5cm. I used another piece of Thick White card 6cm by 10cm for the panel on the front of the card. I used a piece of  Pool Party card cut at 10cm by 14.4cm and scored this using the Animal Print Embossing Folder. I then added adhesive to the 1cm strip of the long piece and added that to the Thick White card. I added the embossed Pool Party card fixing it with Tombow multipurpose glue over the 1cm strip that had been glued on previously. I took some of the Simply Marbleous papers and added then to the small panels on the scored card piece. In the centre of the side panels is the reverse of the sheets either side of it. Then I had fun stamping and colouring in the otters. 

I added 2 to the front of the card and stamped a little more of the splashes of water to fill the piece of card out. The other 3 images were fussy cut out and added as you can see. I had used the Give It A Whirl Dies a few days ago and they were still on the table so I die cut a few of the different hearts and added them over the card. 

I used the Love and Happiness stamp set for the this card. This set is another set full of sentiments for couples, partners, friends. Basically all sorts!


This week has come to a close very quickly but now it's time for me to go. Lots to do in preparation for the 2 Big Girls Crafting Annual Retreat in March. As one of our ladies said today, just over 3 weeks to go!!!

Thank you so very much in taking time to pop by this week and see what's going on here. Cary will return on Monday and share with you some of her creations for the week. Until I return, 

TAKE CARE, STAY SAFE and KEEP WELL please but more importantly as I say every week....

😍😍😍 KEEP ON CRAFTING 😍😍😍

Gill xxxxx
 

Thursday, 24 February 2022

Throwback Thursday - Awesome Otters

Hello again on this Thursday's post. My card today with the Awesome Otters has taken me back to my simpler days of card making. Using the standing Otter this time, I used a gorgeous green mat in Shaded Spruce and taken a piece of the beautiful papers from the Expressions in Ink range of DSP. These papers are stunning. They look like wet paint which have gold paint thrown into them. Before glueing the paper to the green mat, I added a piece of the white ribbon from the Flowers from Every Season combo pack. I used my Shaded Spruce marker pen to colour the ribbon. Then made a bow and added it to the centre. I love the fact that Stampin' Up! ribbon can be coloured as a general rule to match any card you have. 

I used the Hippo and Friends dies to cut the image out and the additional mats for the sentiments. The dies are also brilliant because not only do they have the dies for the Hippo and Friends images, there are a few different shaded label sets in it too.


Wednesday, 23 February 2022

Watercolour Wednesday - Awesome Otters

Today I wanted to use the Awesome Otters and the Layering Diorama Dies. I love the way the shape of the dies just roll around, just like a pond. I die cut 2 of the dies in white card and then stamped the otters onto the smaller mat. Using my Watercolour pencils and water brush, I coloured in and washed the colour over the whole image.

 Adding the white die cut behind the coloured mat, makes the top mat pop I think. I used a piece of the FREE Saleabration papers called Simply Marbleous. I did tell you there were lots of FREE items to chose from! These papers blend so well with the dies and the otters. Then a simple message completes today's card. 


Tuesday, 22 February 2022

Tips, Tricks and Techniques Tuesday - Awesome Otters

My tip for Tuesday this week is add some texture. With the Awesome Otters and Special Moments (also a FREE stamp set from Saleabration) I used and embossing folder called Tasteful Textures to emboss the soft green mat of Pool Party card. It seems to add a litle ripple in the water behind the circular mat with the otter on. I'm really pleased that they coordinate really well. I had a previously die cut scalloped circle from the Layering Circle Dies and then stamped the little otter in the water so decided to die cut the image from another circle. I used the Label Me Fancy punch for the sentiment and mats.

A little colouring, this time using my Stampin' Blends pens and its completed.