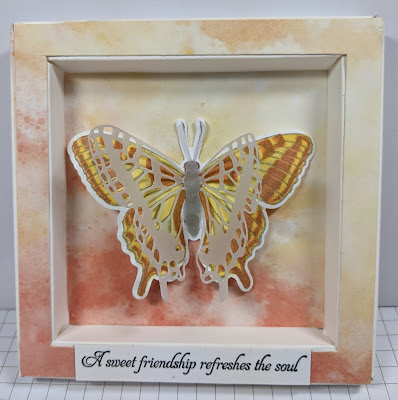
Hello. For my last card this week I have of course made a folded card. Not just a fun fold but a box fold or Diorama (I think that's how it's spelled). This isn't my fold it's one that I saw on another site made by Julie DiMateo. It is her template that I am using today. I have made box cards before and thoroughly enjoyed making them but it was quite a long time ago now I think of it! I am obviously using Butterfly Brilliance Stamp for this project with Whisper White and Calypso Coral card stock for the box to deliver or post it in.
For more information on the stamp set or any other products, please click HERE and it will take you to our shop. It will open up in a new page so that you don't lose your place here.
I started with a 21.5 cm squared piece of White card and scored it all around at 1.3 cm, 2.6 cm, 3.9 cm and 5.2cm. Julie uses Imperial measurements so follow her instructions if you prefer to as they are include here too. Once you have scored all 4 lines on each of the 4 sides you will need to score on opposite sides down to the 2nd horizontal line @ 6.4 cm and 15.2 cm. For Imperial measurements, you will need to follow the cutting instructions on the chart. Basically trim off the greyed out areas on each of the corners in Julie's diagram. Trim a little notch on each of the corners that will be folded to join the corners together. Then fold and burnish all of the score lines, tape or wet glue the little tabs and feed them into the hollow ends. Decorate as you wish. I chose the large Swallowtail butterfly from the set in the end. It was too hard to decide!
I stamped the whole set of 6 butterflies using my Stamparatus. I have arthritus and cannot hold the very large blocks in my hands so I find the Stamparatus the most fantastic tool ever! Once stamped, I die cut them all out using the single die, oh that is so very clever! Then using Blends alcohol marker pens, I coloured several of them in and decided which one I wanted to use.
I took some DSP (double sided paper or in Stampin' Up! terms, Designer Series Paper. It is exactly both in fact) and cut a square 11.5 cm squared then cut out or gutted the centre at 1.1 cm all around. That gave me a perfect frame to add to the front of my box. The piece from the inside was trimmed down a little to fit into the centre of the box. The rest is purely decoration. I finished the front by adding a vellum butterfly too.
Julie has added a kick stand to hers, I added a card base. I cut a piece of card 23 cm by 11.5 cm and scored along the long edge at 11.5 cm. A mat in Calypso Coral of 10.8 cm squared, a message and another small butterfly to complete. It stands really well with the card base too.
Here are Julie's instructions in inches
Below is the measurements for the box and lid that I made to hold it. The box is 16 cm squared and scored at 2cm on each of the 4 sides. I made little notches in the corners to join them together so make the notches and tabs as shown..
The lid is similar to the box only 0.5 cm bigger at 16.5 cm. Again score at 2 cm on all 4 corners and make the notches and tabs as shown.
Below is the completed box. I will add a gift tag when I get around to sending it.
Thank you so much for joining me this week, please stop by next week to see Cary's creations.
Until then, please stay safe, keep well and Carry On Crafting.
xxxxx Gill xxxxx


No comments:
Post a Comment