Well here we are on Friday's post already! Normally, I make the cards and post them on a daily basis. This week I am so ahead of myself for a change. I made this card last Thursday! Strangely enough, last night Cary and I were teaching a class and I showed her what I was making. She said look at Friday's post. So I did. I have made this Friday's card very similar to the one she made and showed last week! What are the odds on that happening? I know that we have similar ideas and often know what the other is thinking but this was weird! Anyway, for my last card for this week, I have made a gatefold card with a twist. Using most of the leaves from the Love of Leaves stamp set, I cut half a piece of A4 card and stamped it onto the ink pad and then kissed another colour on the edges to give different tones to them.
The colours I used are extremely unlike me. I don't mix colours in this way as a rule but for some reason on this one, I did. I used Shaded Spruce and Old Olive on their own and then used Granny Apple Green with Crushed Curry on the edges and then Pear Pizazz with Rich Razzleberry. I am really pleased with the way they have all turned out.
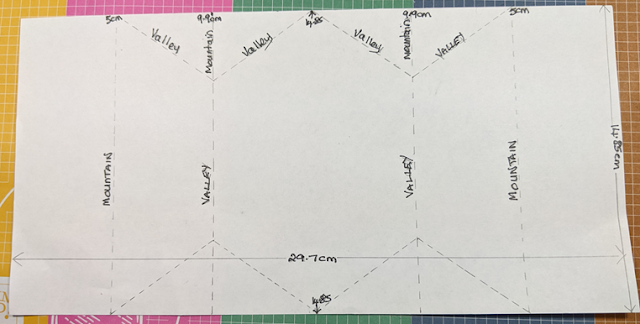
I cut a piece of Rich Razzleberry 29.7cm by 14.85cm or half a sheet of A4 lengthwise. I scored this at 9.9 cm from each end before scoring them again this time at 4.95 cm from each end. On the 9.9cm score lines, using a pencil, I marked 5cm down from each long edge. Then across the centre panel on the top and bottom edges I marked the centre point of 4.95 cm. From there, using my trimmer, I scored between the 4.95 cm and the 5cm pencil mark on the scored lines on either sides of the 5cm marks. This was repeated on the top and bottom of the card. Now I have 2 large V's folded at the top and bottom edges.
Once the main card was completed, I added a square of Rich Razzleberry card 14.85 cm by 14.85 cm. I cut a white mat 14.4 cm by 14.4 cm and embossed that with the Parisian Flourish Embossing Folder before adhering the 2 mats together. I pencil marked the centre to and bottom then using Stampin' Up! Tear and Tape added it to the square. I made a belly-band in Rich Razzleberry and embossed white card. Then I added a few more plain white leaves to the centre front.
Well, I hope that you have managed to follow the cards that I have made this week. Thank you for stopping by and taking a look. I hope that one way or another, I have given you some ideas to make your own projects.
Cary will return next week to share some of her projects which I'm sure you'll love.
Until I return the following week,
please STAY SAFE, KEEP WELL but most of all,
KEEP ON CRAFTING!
Thank you so much,
xxx Gill xxx


.jpg)
.jpg)
.jpg)
.jpg)
.jpg)
.jpg)
Love it Gill
ReplyDeleteThank you 😊
DeleteLove it Gill
ReplyDeleteThank you so much Dee, I'm so pleased you like it xxx
Delete